
Homemade Butterfinger Caramel Candy Bars Recipe: Sweet Success!
Sweet tooths go crazy for these homemade butterfinger caramel candy bars that promise a delightful crunch.
Memories of childhood treats dance through my mind with each bite.
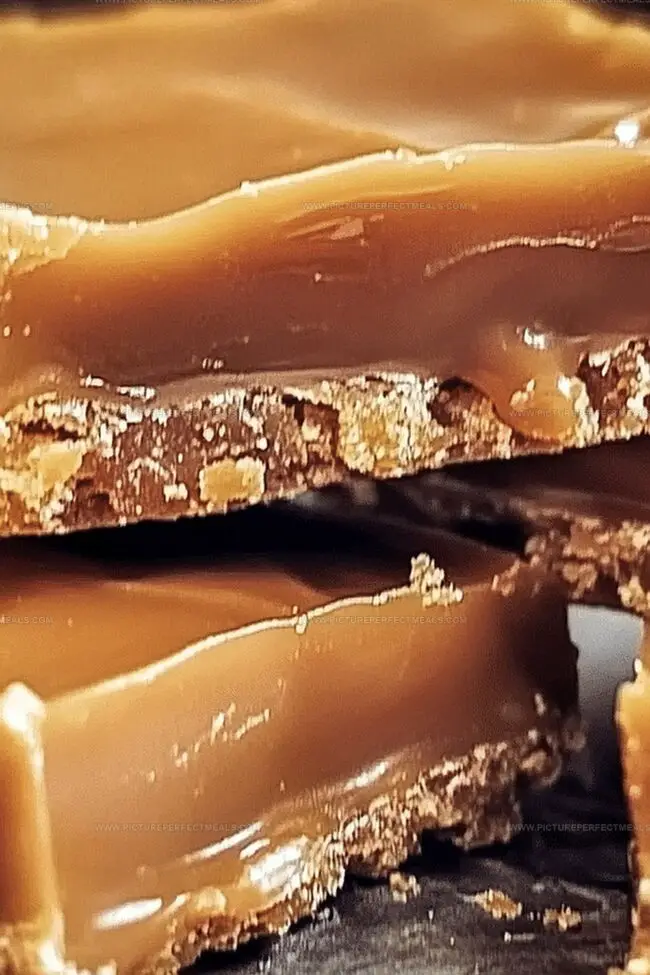
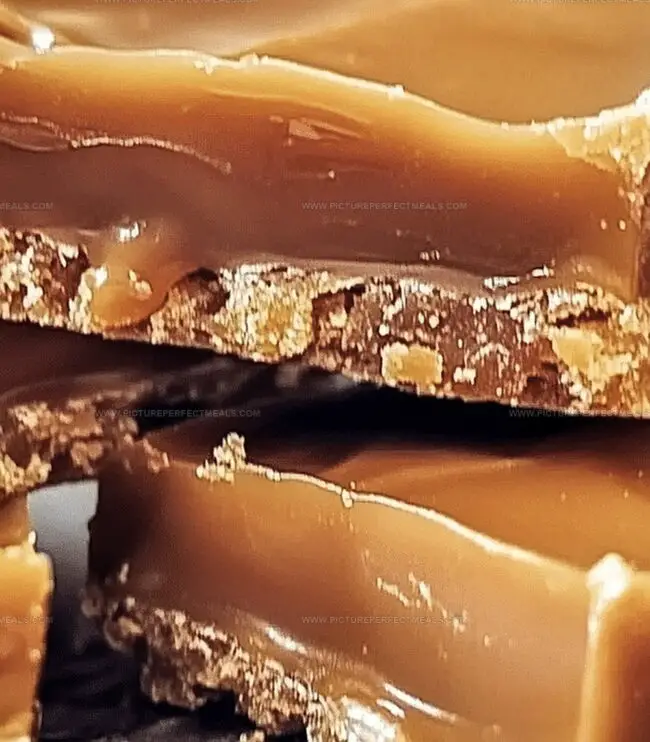
Layers of golden caramel and crispy peanut butter create an irresistible combination.
Crafting these bars in your kitchen feels like unlocking a secret dessert treasure.
Chocolate coats the outside, adding a rich decadence that melts perfectly on the tongue.
Surprisingly simple ingredients come together to make something extraordinary.
Grab a pan and start your delicious adventure today!
What Makes Butterfinger Caramel Candy Bars Addictive
Ingredients for Butterfinger Caramel Candy Bars
Base Ingredients:Caramel and Topping Ingredients:Binding and Flavor Ingredients:How to Make Butterfinger Caramel Candy Bars at Home
Step 1: Prepare Baking Foundation
Preheat oven to 350°F (175°C). Line an 8×8-inch baking pan with parchment paper, allowing extra paper to hang over sides for easy lifting later.
Step 2: Create Crispy Crust Base
In a mixing bowl, combine:Stir until ingredients blend completely. Press mixture firmly and evenly into bottom of prepared pan. Bake for 8-10 minutes until edges turn golden brown. Remove and let cool completely.
Step 3: Whip Caramel Layer
In a saucepan over medium heat, melt:Stir continuously until mixture becomes smooth and bubbling. Cook for 3-4 minutes without stirring. Remove from heat and let cool slightly.
Step 4: Spread Caramel Magic
Pour warm caramel evenly over cooled crust. Allow caramel to set for 15-20 minutes at room temperature.
Step 5: Crush Butterfinger Delight
Crush Butterfinger candy bars into small pieces using a rolling pin or food processor.
Step 6: Add Crunchy Topping
Sprinkle crushed Butterfinger pieces generously over caramel layer.
Step 7: Melt Chocolate Drizzle
Melt chocolate chips in microwave or double boiler. Drizzle melted chocolate over Butterfinger layer using a spoon.
Step 8: Chill and Set
Refrigerate bars for 1-2 hours until completely firm. Lift out of pan using parchment paper edges. Cut into squares and serve.
Tips for Nailing Butterfinger Caramel Candy Bars
Keeping Butterfinger Caramel Candy Bars in Top Shape
Sweet Pairings for Butterfinger Caramel Candy Bars
Unique Versions of Butterfinger Caramel Candy Bars
Print
Butterfinger Caramel Candy Bars Recipe
- Total Time: 30 minutes
- Yield: 12 1x
Description
Indulgent Butterfinger caramel candy bars combine rich chocolate, sweet caramel, and crunchy peanut butter for an irresistible homemade treat. Candy enthusiasts will fall in love with this simple yet impressive dessert that promises pure bliss in every delectable bite.
Ingredients
Main Ingredients:
- 1 ½ cups crushed Butterfinger candy bars (about 6 mini bars or 3 regular-sized bars)
- 1 ½ cups semi-sweet or milk chocolate chips
- 1 cup caramel bits or soft caramels (unwrapped)
Crust Base Ingredients:
- 2 cups graham cracker crumbs
- ½ cup unsalted butter (melted)
- ¼ cup granulated sugar
Finishing Ingredients:
- 2 tablespoons heavy cream
- 1 tablespoon coconut oil or vegetable oil (optional, for a shiny topping)
Instructions
- Prepare the baking surface by lining an 8×8-inch pan with parchment paper, ensuring excess paper hangs over the edges for effortless removal and lifting later.
- Craft the foundational graham cracker base by thoroughly blending crumbs with melted butter and sugar until the mixture resembles damp sand-like consistency.
- Firmly compress the crumb mixture into an even, compact layer across the prepared pan, creating a sturdy foundation for subsequent layers.
- Transfer the pan to a preheated 350°F oven and bake the crust for 9-10 minutes, watching for a delicate golden transformation that signals perfect doneness.
- Remove the crust and allow it to cool completely, maintaining its structural integrity for layering.
- Create a luscious caramel layer by gently heating butter and brown sugar in a saucepan, stirring continuously until the mixture transforms into a smooth, amber-colored liquid.
- Incorporate sweetened condensed milk into the caramel, whisking persistently to achieve a uniform, silky texture without scorching.
- Pour the warm caramel mixture evenly over the cooled graham cracker crust, ensuring complete and uniform coverage.
- Crush Butterfinger candy bars into fine, textured fragments, creating a dynamic topping layer with varied sized pieces.
- Sprinkle the crushed Butterfinger pieces generously across the caramel surface, allowing for maximum flavor distribution.
- Melt chocolate chips using a double boiler or microwave, stirring intermittently to prevent burning and ensure smooth consistency.
- Drizzle the melted chocolate elegantly over the Butterfinger-studded caramel layer, creating artistic patterns or complete coverage.
- Refrigerate the entire creation for 1-2 hours until completely set and firm, enabling clean, precise cutting.
- Lift the dessert from the pan using parchment paper edges, slice into precise squares, and serve chilled for optimal texture and flavor.
Notes
- Swap graham crackers with gluten-free alternatives like almond flour or gluten-free cookie crumbs for a celiac-friendly version.
- Use unsalted butter to control salt levels and prevent over-seasoning of the crust.
- Create a lighter texture by gently pressing the crust mixture instead of compacting it too firmly, allowing for a more delicate crumbly base.
- Experiment with different cookie crumb bases like chocolate wafers or vanilla cookies to add unique flavor variations to the traditional recipe.
- Prep Time: 20 minutes
- Cook Time: 10 minutes
- Category: Desserts, Snacks
- Method: Baking
- Cuisine: American
Nutrition
- Serving Size: 12
- Calories: 300
- Sugar: 22 g
- Sodium: 90 mg
- Fat: 16 g
- Saturated Fat: 10 g
- Unsaturated Fat: 6 g
- Trans Fat: 0 g
- Carbohydrates: 35 g
- Fiber: 1 g
- Protein: 3 g
- Cholesterol: 30 mg
Daves Miller
Contributing Chef & Culinary Educator
Expertise
Education
Sullivan University, Louisville, Kentucky
White Mountains Community College, Berlin, New Hampshire
Daves is the friendly face guiding you through flavorful, fuss-free recipes at Picture Perfect Meals.
He studied culinary arts at Sullivan University and embraced Baking and Pastry Arts at White Mountains Community College. Daves specializes in comforting meals with vibrant flavors, highlighting fresh, seasonal ingredients.