
Cherry Garcia Fudge Recipe Dreamiest Chocolate Treat
Sweet memories of summer nights dance through this cherry garcia fudge creation that captures pure ice cream magic.
Ben and jerry’s classic flavor inspired my kitchen adventure with rich chocolate and juicy cherries.
Dark chocolate mingles with creamy base ingredients, creating unexpected layers of deliciousness.
Chunks of sweet cherries peek through the smooth fudge landscape, tempting every chocolate lover’s imagination.
Unexpected texture and deep flavor profiles make this dessert a true culinary surprise.
My grandmother’s love for decadent treats sparked this delightful recipe experiment.
Watching friends devour each silky bite will make you the star of any gathering.
Cherry Garcia Fudge With Rich Chocolate and Cherries

Ingredients for Cherry Garcia Fudge
Base Ingredients:Flavor Enhancers:Preparation Components:How to Make Cherry Garcia Fudge from Scratch

Step 1: Prepare Cherries
Drain maraschino cherries completely. Chop cherries into tiny bits. Spread chopped cherries between paper towel layers. Press gently to remove extra liquid. This keeps fudge firm and prevents soggy texture.
Step 2: Craft Fudge Base
In medium saucepan over low heat, combine:Stir mixture continuously until everything melts smoothly and blends perfectly.
Step 3: Mix Cherry and Chocolate Elements
Remove saucepan from heat. Fold in:Mix gently to distribute ingredients evenly. Avoid aggressive stirring to prevent chocolate chip melting.
Step 4: Transfer to Baking Pan
Line 9×13 inch pan with parchment paper. Allow paper edges to hang over pan sides for easy removal. Pour fudge mixture into pan. Spread smoothly using spatula.
Step 5: Decorate Fudge Surface
Sprinkle remaining:Lightly press toppings into fudge surface so they stick.
Step 6: Chill and Set
Let fudge cool at room temperature. Refrigerate for minimum 4 hours until completely solid.
Step 7: Slice and Enjoy
Lift fudge from pan using parchment paper edges. Place on cutting board. Slice into squares. Serve chilled or at room temperature.
Tips for Balancing Cherry and Chocolate Flavors
Storing Cherry Garcia Fudge Without Mess
Tasty Pairings for Cherry Garcia Fudge Squares
Flavor Variants for Cherry Garcia Fudge
Print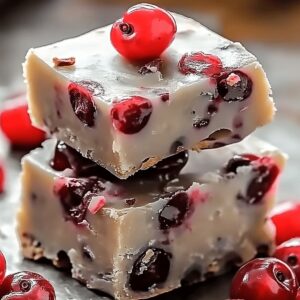
Cherry Garcia Fudge Recipe
- Total Time: 4 hours 20 minutes
- Yield: 12 1x
Description
Sweet cherry garcia fudge brings Italian-inspired indulgence straight to dessert lovers’ hearts. Rich chocolate mingles with luscious cherries, creating a smooth, creamy treat that melts perfectly on your palate.
Ingredients
Main Ingredients:
- 3 cups (540g) white chocolate chips
- 2 ½ cups (485g) maraschino cherries, drained and chopped
- 2 ½ cups (457g) mini semi-sweet chocolate chips
Binding Ingredients:
- 1 can (14 ounces/397g) sweetened condensed milk
- 4 tablespoons (58g) unsalted butter
Flavor Enhancer:
- 2 tablespoons cherry-flavored gelatin powder (optional, for enhanced cherry flavor)
Instructions
- Thoroughly drain maraschino cherries and dice them meticulously, eliminating excess liquid by gently pressing between paper towel layers to ensure optimal fudge consistency.
- Select a medium saucepan and combine white chocolate chips, sweetened condensed milk, butter, and cherry-flavored gelatin powder over medium-low heat, stirring continuously until the mixture transforms into a velvety, uniform liquid.
- Extract the saucepan from heat source and delicately incorporate chopped cherries and mini chocolate chips, folding gently to distribute ingredients evenly without causing excessive chocolate melting.
- Prepare a 9×13-inch baking pan by lining with parchment paper, creating convenient overhanging edges for effortless removal, then cascade the fudge mixture into the pan, utilizing a spatula to achieve a smooth, level surface.
- Artfully scatter remaining cherry pieces and chocolate chips across the fudge’s surface, tenderly pressing them to establish a secure connection with the base layer.
- Allow the fudge to equilibrate to room temperature, then transfer to refrigerator for a minimum of four hours, permitting complete solidification and flavor melding.
- Utilize parchment paper handles to extract the fudge from the pan, position on a cutting surface, and slice into precise squares, ready for immediate indulgence or future enjoyment.
Notes
- Pat cherries completely dry to prevent excess moisture from ruining fudge texture.
- Use fresh, high-quality white chocolate chips for smoother, creamier consistency.
- Chop cherries uniformly to ensure even distribution throughout fudge.
- Consider using low-fat sweetened condensed milk for lighter version.
- Experiment with dark chocolate chips for deeper flavor profile.
- Freeze fudge for firmer, slice-friendly texture if room temperature is warm.
- Store in airtight container between layers of parchment paper to maintain freshness.
- Allow fudge to sit at room temperature 10-15 minutes before serving for softer bite.
- Swap maraschino cherries with fresh or dried cherries for different taste experience.
- Line pan carefully to prevent wrinkles in parchment paper for smoother fudge surface.
- Prep Time: 20 minutes
- Cook Time: 4 hours
- Category: Desserts, Snacks
- Method: Blending
- Cuisine: American
Nutrition
- Serving Size: 12
- Calories: 400
- Sugar: 37g
- Sodium: 150mg
- Fat: 22g
- Saturated Fat: 13g
- Unsaturated Fat: 9g
- Trans Fat: 0g
- Carbohydrates: 48g
- Fiber: 1g
- Protein: 4g
- Cholesterol: 15mg
Daves Miller
Contributing Chef & Culinary Educator
Expertise
Education
Sullivan University, Louisville, Kentucky
White Mountains Community College, Berlin, New Hampshire
Daves is the friendly face guiding you through flavorful, fuss-free recipes at Picture Perfect Meals.
He studied culinary arts at Sullivan University and embraced Baking and Pastry Arts at White Mountains Community College. Daves specializes in comforting meals with vibrant flavors, highlighting fresh, seasonal ingredients.