
Cherry Pie Bombs Recipe: Sweet Explosive Treats for Dessert
Sweet memories of grandma’s kitchen sparked my love for these delightful cherry pie bombs that blend nostalgia with modern dessert magic.
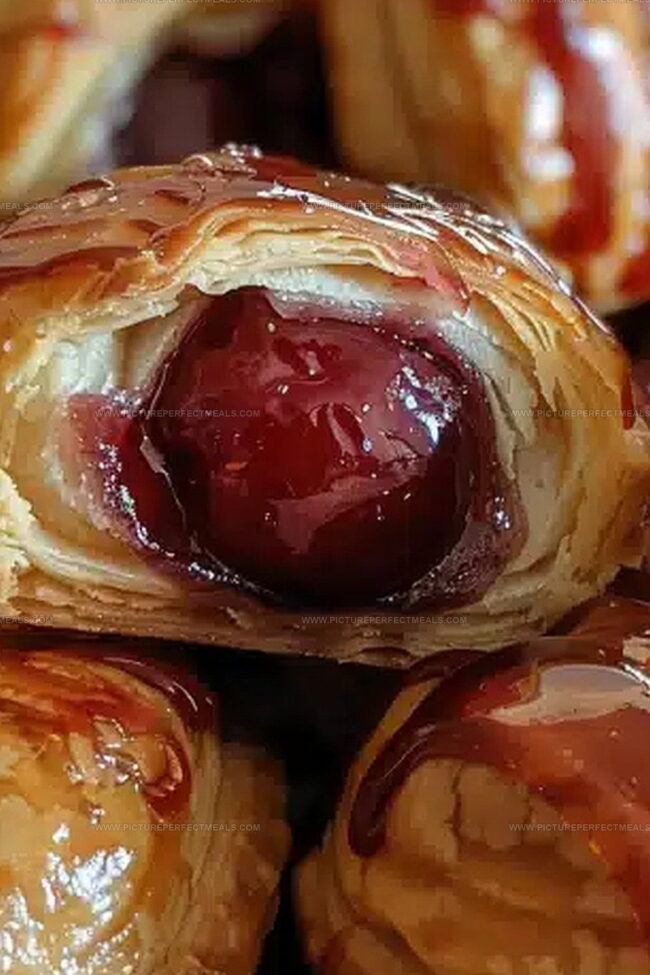
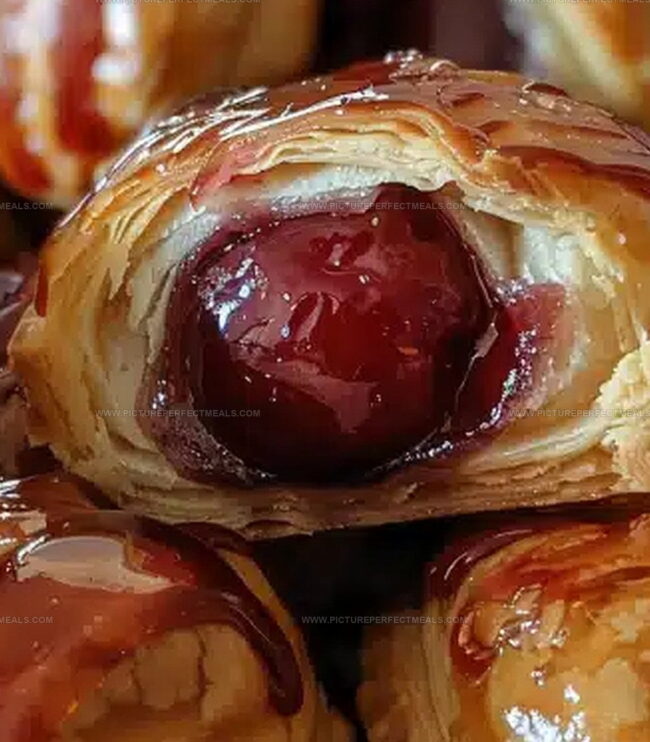
Crispy pastry shells cradle bursts of vibrant, tangy cherries waiting to surprise you.
Each bite promises a delectable explosion of flavor and texture.
Homemade treats like these connect us to cherished culinary traditions while offering a playful twist.
Simple ingredients transform into something extraordinary with just a few clever techniques.
Bakers of all skill levels can master these irresistible morsels that look impressive but come together effortlessly.
You’ll want to share these delectable bites with everyone around the table.
Cherry Pie Bombs with a Sweet Surprise Inside
Everything to Have for Cherry Pie Bombs
Main Ingredients:
Biscuit Dough:- Refrigerated Biscuits: Soft, pre-made dough that forms the base of the pie bombs, provides quick and easy preparation. Look for flaky, thin-layer biscuits for best results.
Filling:- Cherry Pie Filling: Sweet, fruity center that adds flavor and moisture to the pie bombs. Choose high-quality, thick filling with whole cherries.
Glaze Ingredients:
Glaze Components:- Confectioners Sugar, Milk: Creates a smooth, sweet coating that adds sweetness and visual appeal. Use fresh milk and sift the sugar to prevent lumps.
Finishing Ingredients:
Coating and Preparation:- Butter, Nonstick Spray: Helps achieve golden brown color and prevents sticking. Use unsalted butter for better flavor control.
How to Assemble and Bake Cherry Pie Bombs
Step 1: Separate Biscuit Layers
Take each biscuit and gently pull it apart into two thin rounds. You’ll end up with 16 delicate dough circles. Using your fingers or a rolling pin, press and stretch each round into a wider 4-inch circle.
Step 2: Create Fruity Centers
Place a generous dollop of cherry pie filling right in the middle of each dough circle. Carefully fold the edges over the sweet filling, pinching and sealing the dough to create a perfect rounded ball. Make sure the dough thickness is consistent for even cooking.
Step 3: Butter and Prep
Brush the entire surface of each pie bomb with melted butter, covering top and bottom completely. Prepare your air fryer by spraying the basket with nonstick cooking spray and heating to 330F (165C).
Step 4: Air Fry to Golden Perfection
Arrange the pie bombs in the air fryer basket, leaving some space between each one. Cook for 7-8 minutes until they turn a beautiful golden brown color.
Step 5: Whip Up Creamy Glaze
In a mixing bowl, combine:Whisk until the mixture becomes smooth and silky. Adjust the milk quantity to reach your preferred glaze consistency.
Step 6: Glaze and Finish
Remove the pie bombs from the air fryer and let them cool slightly. Dunk each bomb into the glaze, ensuring a nice even coating. Place them on a wire rack positioned over a baking sheet to let excess glaze drip off.
Step 7: Serve and Enjoy
Wait for the glaze to set and firm up. Serve these delightful treats warm or at room temperature for a burst of cherry sweetness.
Baking Tips for Sealed and Gooey Pie Bombs
Store and Reheat Cherry Pie Bombs for Later Enjoyment
Treats and Sips That Match Cherry Pie Bombs
Recipe Twists on Classic Cherry Pie Bombs
Print
Cherry Pie Bombs Recipe
- Total Time: 23 minutes
- Yield: 8 1x
Description
Sweet cherry pie bombs explode with nostalgic summer flavor, offering a delightful twist on classic dessert traditions. Crisp pastry shells cradle warm, juicy cherries, inviting you to savor each irresistible bite of homemade comfort.
Ingredients
Main Ingredients:
- 1 can (8-count) refrigerated biscuits (Pillsbury Grand biscuits)
- 1 cup (255 g / 9 ounces) cherry pie filling
- ½ cup (113 g / 4 ounces) unsalted butter, melted
Glaze Ingredients:
- 2 cups (250 g / 8.8 ounces) confectioners sugar
- 34 tablespoons whole milk, room temperature
Instructions
- Carefully divide each refrigerated biscuit into two delicate layers, creating 16 translucent rounds that will serve as the foundation for these delectable pastry pockets.
- Gently stretch each round into a 4-inch diameter circle, ensuring the dough remains uniformly thin to promote even cooking and optimal texture.
- Position a generous dollop of vibrant cherry pie filling precisely in the center of each dough circle, leaving adequate margin for sealing.
- Delicately fold the dough’s edges over the fruity center, meticulously pinching and crimping to create a perfectly sealed spherical shape that traps the luscious filling inside.
- Liberally brush the exterior surfaces with melted butter, which will contribute to a rich golden-brown coloration and enhanced flavor profile.
- Prepare the air fryer by preheating to 330F and lightly coating the basket with nonstick spray to prevent potential sticking.
- Arrange the prepared pie bombs inside the air fryer basket, maintaining strategic spacing to allow proper hot air circulation and consistent cooking.
- Air fry for approximately 7-8 minutes, monitoring until the exterior transforms into a gorgeous amber-toned crust.
- While the pastries cook, whisk confectioners sugar and milk together, creating a smooth, glossy glaze with an ideal drizzling consistency.
- After removing the pie bombs, allow them a brief cooling period before generously coating each with the prepared glaze.
- Position the glazed treats on a wire rack positioned over a baking sheet, permitting excess glaze to elegantly cascade away.
- Allow the glaze to set and firm before serving, presenting these cherry pie bombs at either a warm or room temperature for optimal enjoyment.
Notes
- Opt for high-quality refrigerated biscuit dough to ensure a flaky, tender texture that doesn’t become tough during cooking.
- Use fresh, thick cherry pie filling to prevent excess moisture from making the dough soggy or breaking during folding.
- Seal the edges carefully by pinching and crimping to prevent filling leakage during air frying, creating perfect pocket-like bombs.
- Adjust the glaze thickness by adding milk or powdered sugar gradually, allowing you to create a smooth, drizzle-worthy coating that sets beautifully.
- Prep Time: 15 minutes
- Cook Time: 8 minutes
- Category: Desserts, Snacks
- Method: Frying
- Cuisine: American
Nutrition
- Serving Size: 8
- Calories: 380
- Sugar: 22 g
- Sodium: 600 mg
- Fat: 24 g
- Saturated Fat: 15 g
- Unsaturated Fat: 9 g
- Trans Fat: 0 g
- Carbohydrates: 39 g
- Fiber: 1 g
- Protein: 3 g
- Cholesterol: 45 mg
Daves Miller
Contributing Chef & Culinary Educator
Expertise
Education
Sullivan University, Louisville, Kentucky
White Mountains Community College, Berlin, New Hampshire
Daves is the friendly face guiding you through flavorful, fuss-free recipes at Picture Perfect Meals.
He studied culinary arts at Sullivan University and embraced Baking and Pastry Arts at White Mountains Community College. Daves specializes in comforting meals with vibrant flavors, highlighting fresh, seasonal ingredients.