
Jolly Christmas Ice-Cream Cake Recipe: A Frosty Holiday Treat
Festive celebrations come alive with a delightful christmas ice-cream cake that promises pure magic.
Layers of creamy goodness dance through every delectable slice.
Seasonal flavors weave together like a sweet winter melody.
Cold and rich textures melt smoothly across your palate.
Imagine surprising guests with this spectacular dessert centerpiece that looks complex but feels effortless.
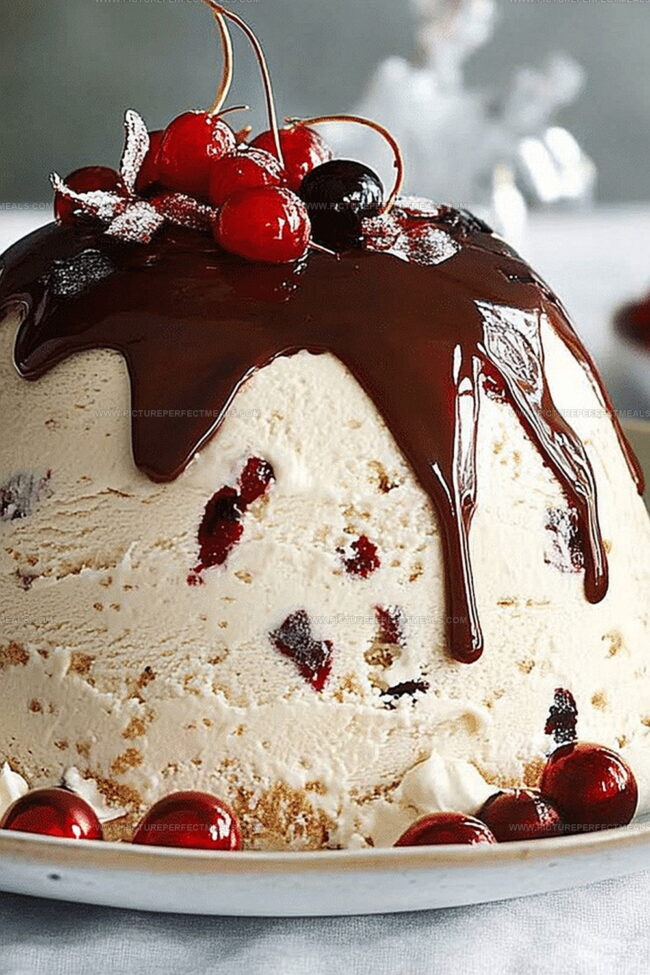
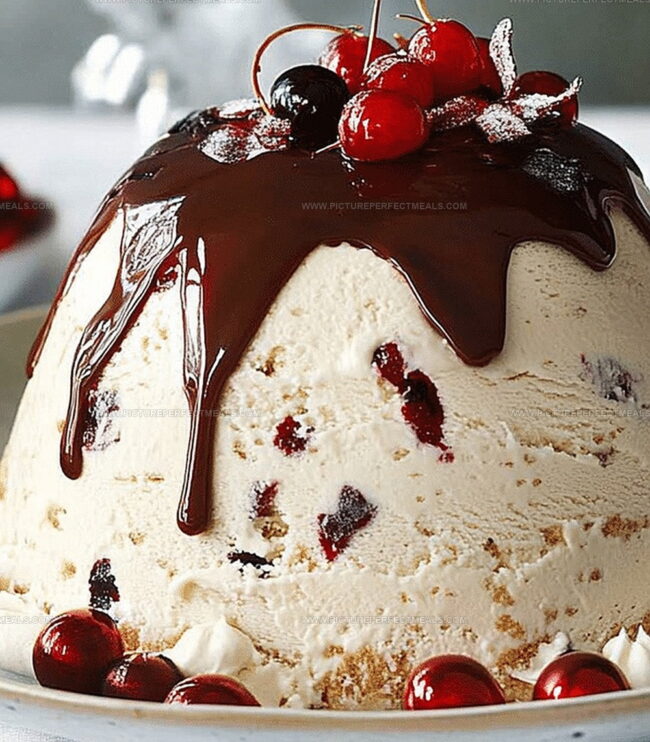
Colorful decorations and smooth cream create a stunning visual treat.
Rush to the kitchen and craft this memorable holiday masterpiece that will spark joy and wonder.
What Makes Christmas Ice-Cream Cake Loved
Inside Christmas Ice-Cream Cake Ingredients
Cookie Base:Crust Notes:Freezing Requirements:Step into the Joy of Making Christmas Ice-Cream Cake
Step 1: Crush and Blend Cookie Base
Grab your favorite holiday cookies and break them into fine crumbs. Pour melted butter over the crumbs and mix thoroughly until the mixture becomes a uniform, slightly damp texture that holds together when pressed.
Step 2: Create a Solid Foundation
Take the cookie mixture and firmly press it into the bottom of a 9-inch springform pan. Use the back of a spoon or your clean hands to create an even, compact layer. Place the pan in the freezer for about 10-15 minutes to help the base set and become firm.
Step 3: Prepare Creamy Ice Cream Layer
Remove ice cream from the freezer and let it soften slightly. Stir in peppermint extract for a festive flavor. Gently fold in crushed candy canes, creating a swirled, festive pattern throughout the ice cream.
Step 4: Spread the Magical Layer
Pour the peppermint ice cream mixture over the chilled cookie base. Use a spatula to spread it evenly, ensuring no air pockets remain. Smooth the top for a clean, professional finish.
Step 5: Freeze and Set
Place the cake in the freezer and allow it to set completely, typically 4-6 hours or overnight. This ensures the layers bind together and the cake maintains its shape.
Step 6: Decorate with Holiday Cheer
Before serving, remove the cake from the freezer and let it sit for a few minutes. Garnish with additional crushed candy canes, chocolate drizzle, or festive sprinkles to enhance the Christmas theme.
Step 7: Slice and Celebrate
Run a knife under hot water before cutting to create clean, smooth slices. Serve immediately and enjoy the festive, cool treat that captures the magic of the holiday season.
Cool Advice for Christmas Ice-Cream Cake Fans
Save and Serve Christmas Ice-Cream Cake Like a Pro
Christmas Ice-Cream Cake’s Best Pairing Ideas
Remix Christmas Ice-Cream Cake for Fun
Got Questions on Christmas Ice-Cream Cake? Here’s Help
Graham crackers or chocolate wafer cookies are ideal. They provide a sturdy base and complement the ice cream’s sweetness perfectly.
Absolutely! You can prepare the cake up to 3 days in advance and keep it stored in the freezer. This makes it a convenient dessert for holiday entertaining.
Use a springform pan and lightly grease the sides with cooking spray or butter. This ensures easy removal and a clean slice when serving.
No, you can place cookies in a sealed plastic bag and crush them with a rolling pin. This method works just as well and requires minimal kitchen equipment.
Print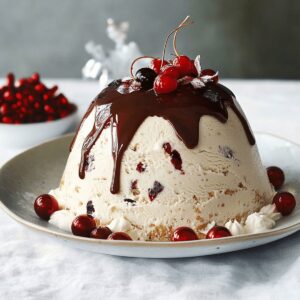
Christmas Ice-Cream Cake Recipe
- Total Time: 3 hours 20 minutes
- Yield: 12 1x
Description
Sweet holiday memories come alive with this Christmas Ice-Cream Cake, blending festive flavors and creamy textures. Seasonal spices and rich layers promise a delightful dessert that will charm guests at winter gatherings.
Ingredients
Cake Base:
- 2 cups (473 ml) chocolate sandwich cookies (like Oreos), finely crushed
- 4 tablespoons (60 ml) unsalted butter, melted
Ice Cream Layers:
- 1 ½ quarts (1.4 liters) vanilla ice cream, softened
- 1 ½ quarts (1.4 liters) chocolate or peppermint ice cream, softened
Decorative Toppings:
- 1 cup (240 ml) whipped topping or whipped cream
- ½ cup (118 ml) crushed candy canes or peppermint candies
- ½ cup (118 ml) red and green sprinkles
- Optional: holiday-themed candies (e.g., chocolate trees, stars, or snowflakes)
Instructions
- Crush chocolate sandwich cookies into fine crumbs, creating a uniform texture for the cake’s foundation.
- Melt butter and thoroughly incorporate it with the cookie crumbs, ensuring complete and even coating.
- Transfer the moistened crumb mixture into a springform pan, using gentle but firm pressure to create a compact, smooth base layer.
- Place the pan in the freezer, allowing the crust to solidify and become stable for approximately 10-15 minutes.
- While the crust chills, prepare to layer soft vanilla and peppermint ice cream for a festive holiday dessert composition.
- Remove the pan from the freezer, ensuring the cookie base is firm and well-set before adding subsequent ice cream layers.
- Carefully spread softened vanilla ice cream evenly across the chilled cookie foundation, creating a uniform thickness.
- Gently add a contrasting layer of peppermint ice cream atop the vanilla, maintaining a smooth and level surface.
- Return the developing cake to the freezer, allowing the ice cream layers to thoroughly set and integrate.
- Decorate the frozen surface with crushed candy canes, chocolate shavings, or festive sprinkles for a celebratory presentation.
- Cover the cake securely with plastic wrap and store in the freezer until ready to serve.
- Before serving, allow the cake to rest at room temperature for a few minutes to facilitate easier slicing.
Notes
- Opt for graham crackers or chocolate wafers as alternative cookie bases, offering versatile flavor profiles for different taste preferences.
- Ensure butter is fully melted and evenly distributed to create a cohesive, compact crust that holds together seamlessly.
- Press the cookie mixture gently but firmly to avoid creating air pockets, which can make the base crumbly and less stable.
- Chill the crust in the freezer for exactly 10-15 minutes to help it set properly without becoming too hard or difficult to cut.
- Prep Time: 20 minutes
- Cook Time: 3 hours
- Category: Desserts
- Method: None
- Cuisine: American
Nutrition
- Serving Size: 12
- Calories: 360
- Sugar: 30 g
- Sodium: 150 mg
- Fat: 18 g
- Saturated Fat: 10 g
- Unsaturated Fat: 8 g
- Trans Fat: 0 g
- Carbohydrates: 47 g
- Fiber: 1 g
- Protein: 4 g
- Cholesterol: 50 mg
Daves Miller
Contributing Chef & Culinary Educator
Expertise
Education
Sullivan University, Louisville, Kentucky
White Mountains Community College, Berlin, New Hampshire
Daves is the friendly face guiding you through flavorful, fuss-free recipes at Picture Perfect Meals.
He studied culinary arts at Sullivan University and embraced Baking and Pastry Arts at White Mountains Community College. Daves specializes in comforting meals with vibrant flavors, highlighting fresh, seasonal ingredients.