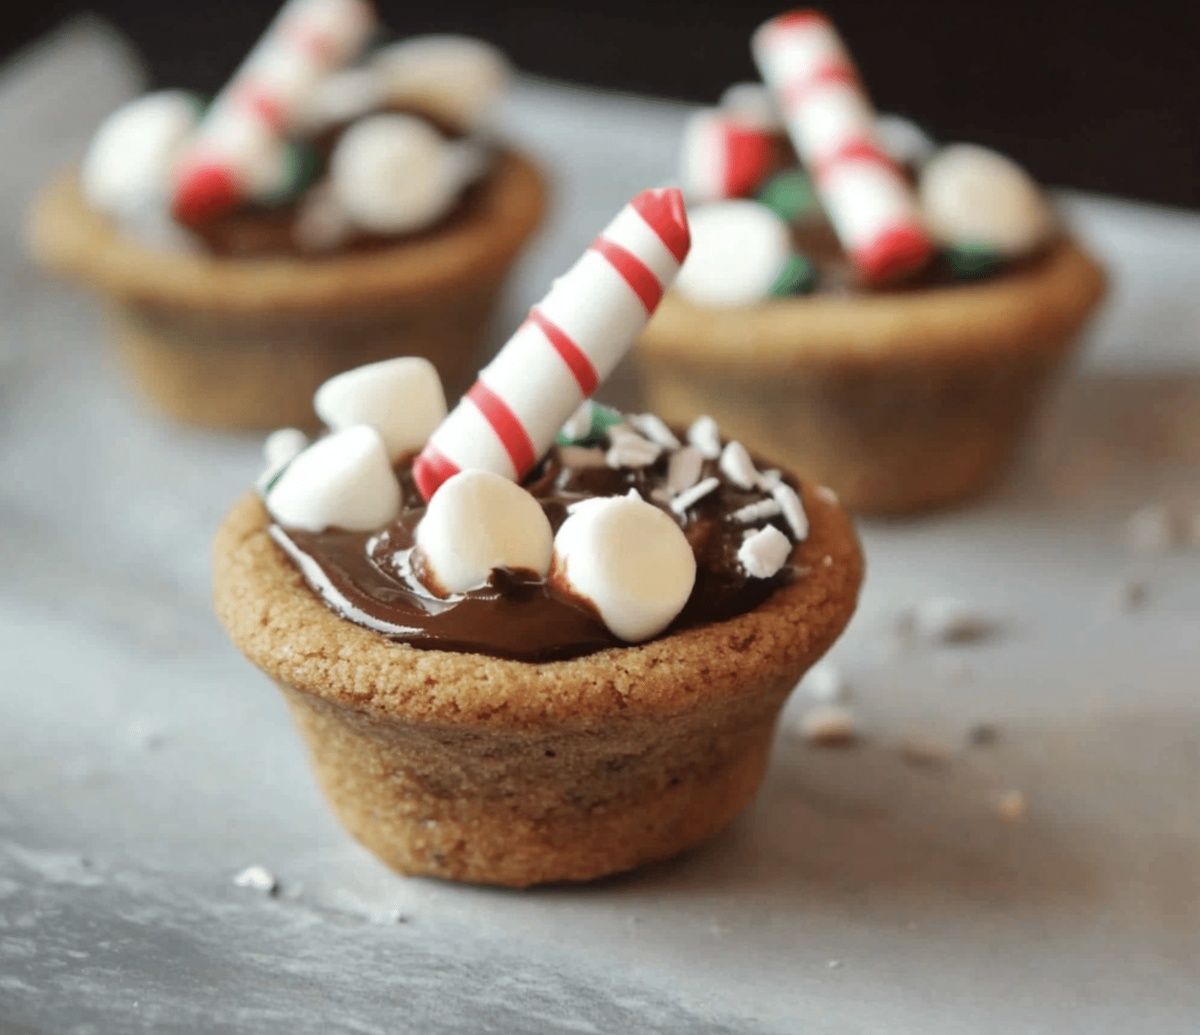
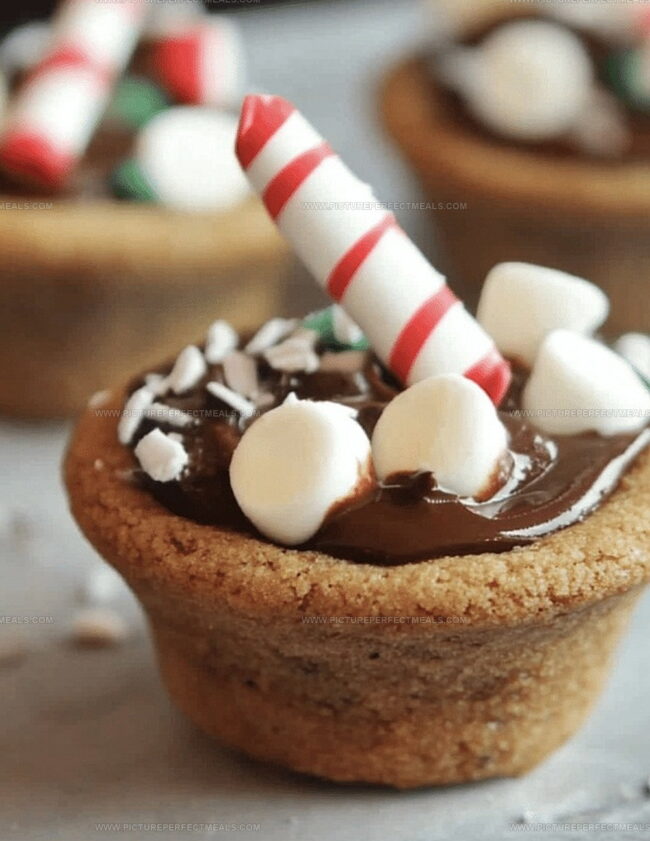
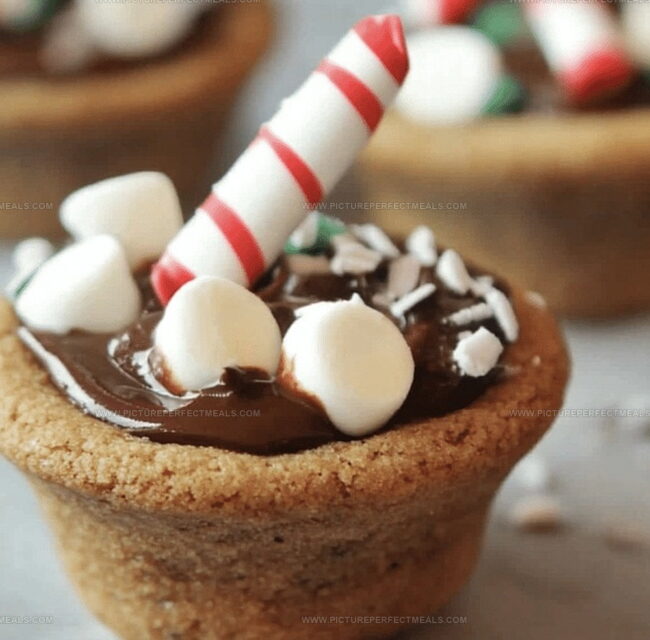
Warm, gooey chocolate chip cookie cups filled with creamy hot chocolate mix create the ultimate winter comfort treat.
These delightful hot chocolate cookie cups blend the richness of chocolate chip cookies with a classic winter beverage.
Soft, chewy cookie shells cradle a decadent hot chocolate filling that melts in your mouth.
Each bite delivers a perfect balance of sweet cookie and velvety chocolate flavor.
The recipe transforms ordinary cookies into a playful, indulgent dessert that sparks joy and nostalgia.
Baking these cups will fill your kitchen with an irresistible aroma that beckons everyone to the table.
Prepare to fall in love with this cozy, crowd-pleasing dessert that promises to become a new seasonal favorite.
Quick Recipe Overview
Prep Time: 20 minutes
Cook Time: 40 minutes
Total Time: 1 hour
Calories: 190 kcal
Servings: 24
Start Here – Ingredients for Hot Chocolate Cookie Cups
For Dry Ingredients:
All-Purpose Flour: Provides structure and creates a tender cookie base with perfect crumbly texture.
Cocoa Powder: Delivers rich chocolate flavor and deep brown color to the cookie cups.
Baking Powder: Helps cookies rise and creates a light, soft texture.
Salt: Enhances overall flavor and balances sweetness in the recipe.
For Wet Ingredients:
Butter: Creates rich, tender cookie base with luxurious mouthfeel and golden undertones.
Granulated Sugar, Brown Sugar: Provide sweetness and contribute to caramelized, soft cookie texture.
Eggs: Bind ingredients together and add moisture to the dough.
Vanilla Extract: Adds depth and warmth to the chocolate flavor profile.
For Filling and Decoration:
Mini Marshmallows, Marshmallow Fluff: Create creamy, gooey center reminiscent of hot chocolate.
Chocolate Chips: Offer smooth chocolate drizzle and additional chocolate intensity.
Candy Canes: Provide festive peppermint crunch and decorative holiday touch.
Sprinkles: Add playful, colorful garnish to enhance visual appeal.
What You’ll Use to Create Hot Chocolate Cookie Cups
Mini muffin tin: Essential for shaping the cookie cups and creating perfect indentations.
Mixing bowls: Two bowls needed for separating dry and wet ingredients.
Whisk: Perfect for blending dry ingredients smoothly.
Electric mixer or hand mixer: Crucial for creaming butter and sugar to light, fluffy consistency.
Measuring cups and spoons: Ensures accurate ingredient proportions.
Spoon or thumb: Helpful for pressing centers of cookie dough to create cup shape.
Microwave or double boiler: Used for melting chocolate chips.
Spatula: Assists in drizzling melted chocolate and spreading marshmallow.
How to Make Hot Chocolate Cookie Cups with Ease
Craft Cookie Base: Whip up a rich chocolate dough by blending dry and wet ingredients until smooth and pliable.
Shape Delightful Cups: Gently press soft dough balls into mini muffin tin, creating adorable little chocolate vessels with perfect indentations.
Bake to Perfection: Slide muffin tin into preheated oven and bake until edges look set and centers are slightly soft. Carefully reshape centers while still warm.
Create Marshmallow Magic: Once cooled, nestle fluffy marshmallows or creamy marshmallow fluff into each chocolate cup’s center.
Add Decadent Drizzle: Melt chocolate and artfully drizzle over marshmallow filling, transforming simple cookies into stunning miniature treats.
Personalize with Flair: Sprinkle crushed candy canes or festive decorations while chocolate remains glossy. For extra charm, attach tiny candy cane handles using melted chocolate.
Chill and Serve: Let cookie cups set at room temperature or quickly firm in refrigerator. Serve these whimsical bite-sized delights to create sweet memories.
Chef Tips to Upgrade Hot Chocolate Cookie Cups
Marshmallow Magic Tip: Press marshmallows gently into the warm cookie cups to create a perfect molten center that melts beautifully and adds extra gooey sweetness.
Make-Ahead Genius: Prepare cookie dough and shape cups up to 2 days in advance, storing them in an airtight container to save time during busy holiday baking sessions.
Gluten-Free Option: Swap regular flour with a gluten-free all-purpose flour blend to make these cookie cups friendly for those with wheat sensitivities without compromising taste or texture.
Flavor Twist: Experiment with different chocolate drizzles like white chocolate, peppermint-infused chocolate, or dark chocolate to create unique flavor profiles that match your mood or occasion.
Dairy-Free Hack: Replace butter with coconut oil or vegan butter substitute and use dairy-free chocolate chips to transform these cookie cups into a delightful treat for those with dairy restrictions.
How to Present Hot Chocolate Cookie Cups Beautifully
Cozy Cocoa Companions: Pair these hot chocolate cookie cups with a steaming mug of classic hot chocolate for the ultimate winter treat.
Festive Party Platter: Arrange the cookie cups on a decorative tray with additional sprinkles, mini marshmallows, and candy cane pieces for a stunning holiday dessert display.
Gift-Worthy Delights: Package the cookie cups in clear cellophane bags tied with festive ribbons for a charming homemade gift that’s perfect for friends, teachers, or neighbors during the holiday season.
Dessert Table Star: Create a winter wonderland-themed dessert station with these cookie cups as the centerpiece, surrounded by other seasonal sweets and hot beverage options.
Keep Your Hot Chocolate Cookie Cups Fresh Longer
Smart Refrigeration Strategy: Store cookie cups in an airtight container between layers of parchment paper to prevent sticking and maintain crispness, keeping them fresh for 3-5 days at room temperature.
Freezing Magic: Wrap individual cookie cups tightly in plastic wrap, then place in freezer-safe containers. They’ll stay delicious for up to 2 months, perfect for make-ahead dessert planning.
Moisture Management: Keep marshmallow-filled cups away from humid areas to prevent softening. Store in a cool, dry spot to maintain their delightful texture and prevent marshmallow from becoming sticky.
Temperature TLC: Before serving frozen or refrigerated cookie cups, let them sit at room temperature for 15-20 minutes. This helps restore their original texture and brings out the rich chocolate flavor, ensuring each bite tastes freshly made.
Delectable hot chocolate cookie cups blend rich chocolate and marshmallow magic into an irresistible dessert. Chocolate lovers will savor each creamy, indulgent bite with pure holiday cheer.
Ingredients
Scale
2 large eggs
1 cup (225 g / 8 oz) unsalted butter, softened
2 ½ cups (315 g / 11.1 oz) all-purpose flour
1 cup (200 g / 7 oz) granulated sugar
½ cup (100 g / 3.5 oz) brown sugar
¾ cup (90 g / 3.2 oz) cocoa powder
1 cup (170 g / 6 oz) semi-sweet chocolate chips
½ cup (120 ml / 4 fl oz) heavy cream
1 tsp vanilla extract
1 tsp baking soda
½ tsp salt
Mini marshmallows
White chocolate, melted (optional, for drizzle)
Crushed candy canes (optional)
Instructions
Preparation: Preheat the oven to 350F (175C) and generously spray a mini muffin tin with non-stick cooking spray to ensure effortless cookie removal.
Dough Creation: Whisk dry ingredients in one bowl, cream butter and sugars in another until fluffy. Blend in eggs and vanilla, then gently incorporate dry ingredients to form a smooth, consistent dough.
Shaping: Craft uniform dough balls and nestle them into muffin cavities, carefully pressing to create deep, cup-like indentations using fingertips or a compact utensil.
Baking and Cooling: Bake for 10-12 minutes until cookie edges turn crisp and set. Immediately upon removal, re-press centers to maintain the cup shape. Allow complete cooling within the tin to stabilize the structure.
Filling and Decorating: Generously fill each cooled cookie cup with marshmallow fluff or mini marshmallows. Melt chocolate chips and artfully drizzle over marshmallow centers. While chocolate remains glossy, embellish with festive sprinkles, crushed candy canes, or attach miniature candy cane handles using additional melted chocolate.
Finishing: Let decorated cookie cups set at room temperature or accelerate solidification by briefly chilling in the refrigerator. Serve at room temperature and enjoy these delightful, compact treats.
Notes
Prevent Sticking: Generously spray mini muffin tin with non-stick cooking spray to ensure easy cookie cup removal and maintain perfect shape.
Create Perfect Indentations: Immediately after baking, use the back of a spoon or small measuring tool to gently press cookie centers while still warm, creating uniform and deep cup-like impressions.
Chocolate Drizzling Technique: Melt chocolate chips carefully using double boiler or microwave in short intervals, stirring frequently to prevent burning and achieve smooth, glossy drizzle.
Customize for Dietary Needs: Substitute butter with plant-based alternatives and use gluten-free flour blend for dairy-free and gluten-sensitive individuals, maintaining the cookie’s rich chocolate flavor and delicate texture.
Recipe development with a focus on single-dish meals.
Fusion of traditional and modern Australian cuisines.
Food styling and photography for digital platforms.
Education
Box Hill Institute, Melbourne
Degree: Advanced Diploma of Hospitality Management
Focus: Specialized in practical food and beverage service, responsible alcohol and hygiene compliance, legal risk management, and hands‑on experience in a simulated restaurant environment.
William Angliss Institute, Melbourne
Program: Certificate IV in Patisserie
Focus: Specialized in pastry and bakery techniques, cookery and specialty food preparation, recipe planning and costing, commercial kitchen operations, sustainable and inclusive work practices, food safety and hygiene compliance, and workplace health and safety.
Jenna is the heart of Picture Perfect Meals, turning simple ingredients into beautiful, easy‑to‑make dishes.
Growing up around family meals in Melbourne, she trained at Box Hill Institute and then perfected her pastry skills at William Angliss Institute. She loves mixing classic Australian flavors with fresh ideas to keep cooking fun and stress‑free.

Jenna Hartley
Founder & Recipe Creator
Expertise
Education
Box Hill Institute, Melbourne
William Angliss Institute, Melbourne
Jenna is the heart of Picture Perfect Meals, turning simple ingredients into beautiful, easy‑to‑make dishes.
Growing up around family meals in Melbourne, she trained at Box Hill Institute and then perfected her pastry skills at William Angliss Institute. She loves mixing classic Australian flavors with fresh ideas to keep cooking fun and stress‑free.