Luscious Chocolate Raspberry Cake Recipe: Indulge Your Senses
Luxurious chocolate meets vibrant raspberry in this decadent chocolate raspberry cake that promises pure indulgence.
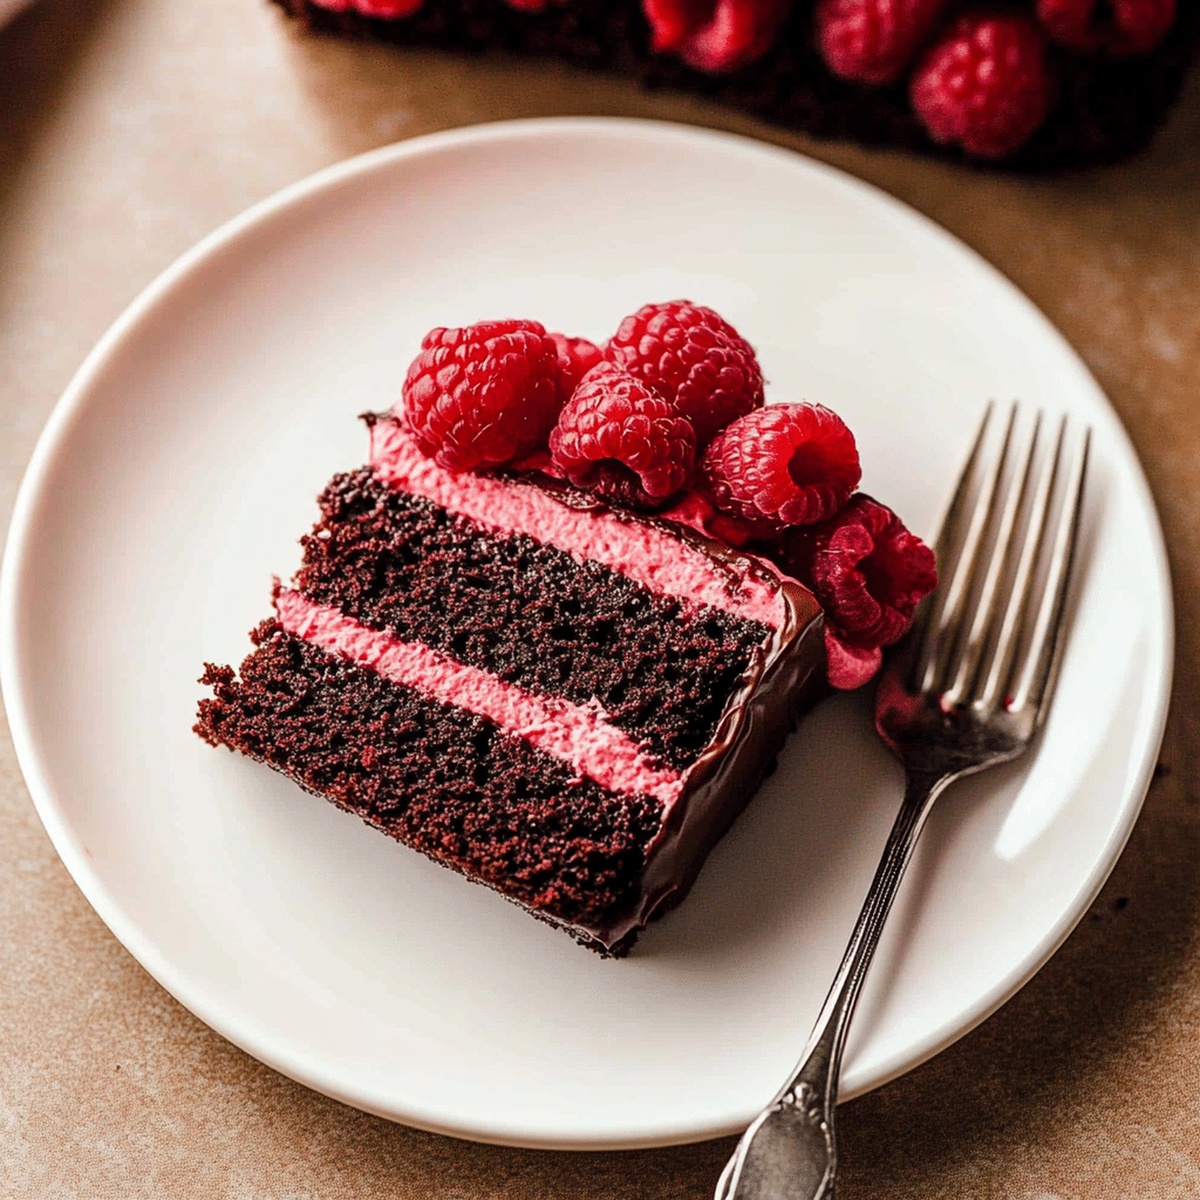
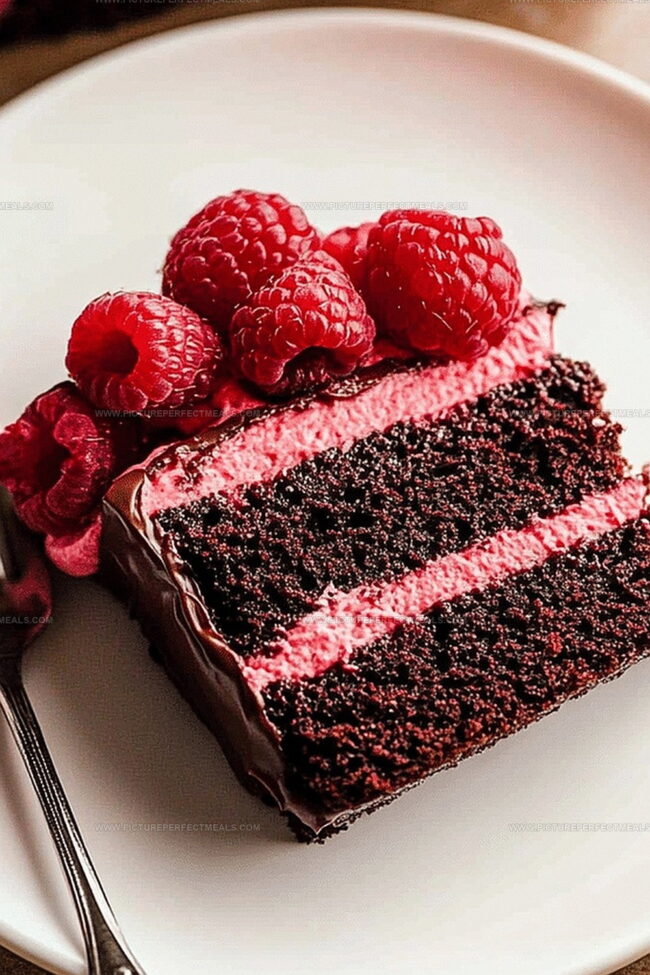
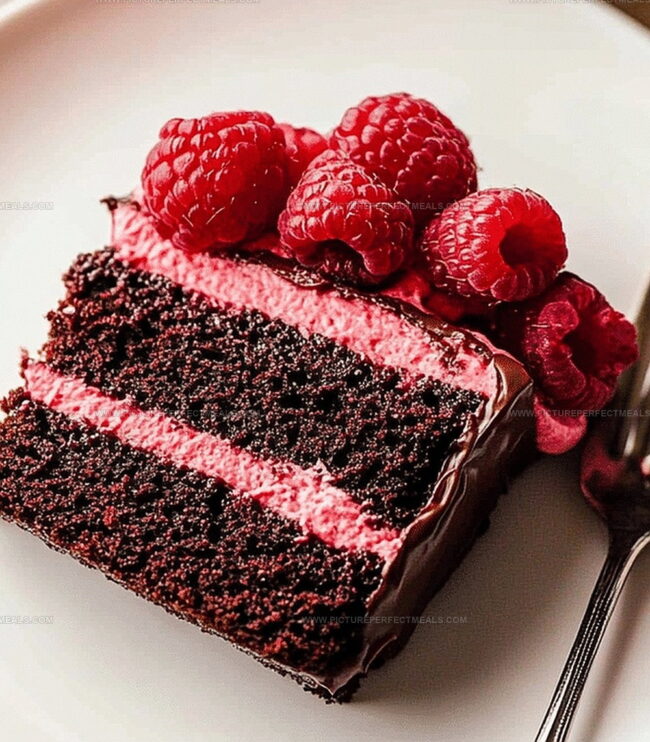
Rich cocoa layers intertwine with sweet-tart berry notes, creating a dessert that dances across your palate.
Every slice tells a story of culinary passion and precise baking technique.
The robust chocolate provides a deep, velvety foundation for the bright raspberry accents.
Silky frosting and fresh berries crown this elegant masterpiece, transforming an ordinary cake into an extraordinary experience.
Elegant yet approachable, this dessert stands ready to impress at any gathering.
Prepare to fall in love with a cake that celebrates the perfect harmony of chocolate and raspberry.
Quick Recipe Overview
Ingredients List for Chocolate Raspberry Cake
For Dry Ingredients:For Wet Ingredients:For Finishing:Tools That Make Cake-Baking a Joy
Step-by-Step for a Decadent Chocolate Raspberry Treat
Crank your oven to a toasty 350 degrees and get those cake pans ready by giving them a smooth butter coating and dusting of flour. Slip in some parchment paper for easy cake release.
Grab a big mixing bowl and whisk together all your powdery friends – flour, cocoa, sugar, baking powder, baking soda, and a pinch of salt until they’re best buddies.
Crack in your eggs, pour in buttermilk, splash some oil, and add a dash of vanilla. Blend everything until it looks smooth and dreamy, like a chocolate river.
Pour in some steamy boiling water and stir. Don’t worry if the batter looks super thin – that’s exactly how it should be!
Split the batter between your prepared pans and slide them into the hot oven. Let them dance and transform for 30-35 minutes until a toothpick comes out clean.
After baking, let the cakes chill in their pans for 10 minutes. Then transfer them to a wire rack to cool completely before frosting or decorating.
Tips for Rich Chocolate and Bright Raspberry Flavors
Serving Your Cake with Raspberry Elegance
Storing a Slice Without Losing Moisture
Print
Decadent Chocolate Raspberry Cake Recipe
- Total Time: 1 hour 5 minutes
- Yield: 13 1x
Description
Silky chocolate raspberry cake blends rich cocoa with tangy berries for an irresistible dessert. French pastry techniques elevate this classic combination, promising pure indulgence for passionate bakers.
Ingredients
- 2 cups (400 grams) granulated sugar
- 2 large eggs
- 1 ¾ cups (220 grams) all-purpose flour
- ¾ cup (75 grams) unsweetened cocoa powder
- 1 ½ tsps (7.5 mL) baking powder
- 1 ½ tsps (7.5 mL) baking soda
- 1 tsp (5 mL) salt
- 1 cup (240 mL) buttermilk
- ½ cup (120 mL) vegetable oil
- 2 tsps (10 mL) vanilla extract
- 1 cup (240 mL) boiling water
- 2 cups (300 grams) fresh or frozen raspberries
- ¼ cup (50 grams) granulated sugar
- 1 tbsp (15 mL) cornstarch
- 1 tbsp (15 mL) water
- 1 tbsp (15 mL) lemon juice
- 1 cup (227 grams) unsalted butter, softened
- 3 ½ cups (420 grams) powdered sugar
- ½ cup (50 grams) unsweetened cocoa powder
- ¼ cup (60 mL) heavy cream (or milk)
- 1 tsp (5 mL)
Instructions
- Preparation: Preheat oven to 350F (175C). Grease and flour two 9-inch round cake pans, lining bottoms with parchment paper for effortless cake release.
- Dry Ingredient Fusion: In a large mixing bowl, whisk cocoa powder, flour, sugar, baking powder, baking soda, and salt until uniformly blended, eliminating any potential lumps.
- Wet Ingredient Integration: Gently fold eggs, buttermilk, vegetable oil, and vanilla extract into the dry mixture. Whisk until the batter transforms into a silky, homogeneous consistency.
- Liquid Transformation: Slowly stream boiling water into the batter, stirring gently. The mixture will become surprisingly fluid – this is the recipe’s signature texture.
- Baking Process: Evenly distribute the batter between prepared pans, creating smooth, level surfaces. Slide into the preheated oven and bake for 30-35 minutes, until a toothpick inserted near the center emerges with minimal crumbs.
- Cooling and Setting: Allow cakes to rest in pans for 10 minutes, then delicately transfer to a wire rack. Let the layers cool completely before proceeding with frosting or assembly.
Notes
- Measure Precisely: Use exact measurements for ingredients to ensure the cake’s perfect texture and taste. Slight variations can significantly impact the final result.
- Control Moisture: The boiling water creates a thin batter, which might seem unusual but guarantees a moist, rich chocolate cake. Don’t panic about the liquid consistency.
- Check Baking Timing: Ovens vary, so start checking the cake around 25 minutes. Look for a clean toothpick test and slightly pulling away edges as signs of perfect doneness.
- Adapt for Dietary Needs: Substitute buttermilk with dairy-free alternatives like almond milk mixed with apple cider vinegar for vegan or lactose-intolerant variations.
- Prep Time: 30 minutes
- Cook Time: 35 minutes
- Category: Desserts
- Method: Baking
- Cuisine: American
Nutrition
- Serving Size: 13
- Calories: 380
- Sugar: 32 g
- Sodium: 200 mg
- Fat: 18 g
- Saturated Fat: 10 g
- Unsaturated Fat: 7 g
- Trans Fat: 0 g
- Carbohydrates: 50 g
- Fiber: 2 g
- Protein: 4 g
- Cholesterol: 45 mg
Jenna Hartley
Founder & Recipe Creator
Expertise
Education
Box Hill Institute, Melbourne
William Angliss Institute, Melbourne
Jenna is the heart of Picture Perfect Meals, turning simple ingredients into beautiful, easy‑to‑make dishes.
Growing up around family meals in Melbourne, she trained at Box Hill Institute and then perfected her pastry skills at William Angliss Institute. She loves mixing classic Australian flavors with fresh ideas to keep cooking fun and stress‑free.