
Fluffy Homemade Dog Ice Cream Recipe Your Pup Will Love
Crafting a delightful dog ice cream that keeps tails wagging is easier than you might expect.
Furry companions deserve cool, refreshing treats during warm summer days.
This simple recipe brings joy to pups with its creamy, nutritious ingredients.
Canine taste buds will dance with excitement over each smooth, frozen bite.
Peanut butter and banana create a perfect combination that dogs absolutely adore.
Whipping up this treat takes mere minutes and requires minimal kitchen skills.
You can make your four-legged friend’s day with this quick and healthy dessert that feels like pure love.
Why Dog Ice Cream Is More Than a Treat
Dog Ice Cream Ingredients That Are Safe and Fun
Main Ingredients:
Fruit Base:Protein and Dairy:Preparation Accessories:How to Make Dog Ice Cream at Home
Step 1: Blend Creamy Ingredients
Toss all ingredients into a blender or food processor. Whirl everything together until the mixture becomes completely smooth and creates a velvety texture. Make sure no chunks remain for your furry friend’s ultimate enjoyment.
Step 2: Select Perfect Freezing Containers
Grab silicone molds, small paper cups, or ice cube trays. These containers will transform your liquid mixture into adorable frozen treats. Pour the blended mixture carefully into your chosen containers, filling each one almost to the top.
Step 3: Chill and Solidify
Place the filled containers into the freezer. Let them hang out and become rock solid for approximately 4 hours. Patience is key here- the longer they freeze, the more delightful they become.
Step 4: Serve and Watch Tail Wag
When ready, gently pop out a frozen treat. Watch your pup’s excitement as they receive this cool, refreshing snack. The tail-wagging reaction will be totally worth your effort!
Helpful Tips for Making Ice Cream for Dogs
Keep Dog Ice Cream Ready and Cold
What to Serve with Dog Ice Cream (Yes, Really)
Tasty Twists for Dog Ice Cream Treats
Print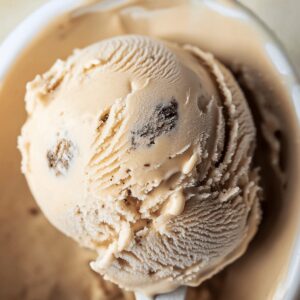
Dog Ice Cream Recipe
- Total Time: 4 hours 10 minutes
- Yield: 2 1x
Description
Cool canine “Pup Freeze” delights furry friends with simple, refreshing ingredients perfect for summer treats. Homemade dog-friendly ice cream provides a nutritious, tail-wagging snack you’ll enjoy preparing together.
Ingredients
Main Ingredients:
- 1 ripe banana (mashed)
- ½ cup (118 milliliters) plain unsweetened yogurt
- ¼ cup (60 milliliters) peanut butter (unsalted and xylitol-free)
Optional/Additional Ingredients:
- ¼ cup (60 milliliters) unsweetened applesauce
Instructions
- Prepare the primary ingredients by mashing the banana thoroughly to ensure a smooth consistency.
- Transfer the banana into a blender or food processor and integrate the yogurt, peanut butter, and optional applesauce for enhanced flavor and texture.
- Pulse and blend the mixture until completely uniform and free of lumps, creating a silky base for the frozen treat.
- Select appropriate freezing vessels such as silicone molds, ice cube trays, or small disposable paper cups for portioning.
- Carefully distribute the creamy mixture evenly into the chosen containers, filling each to approximately three-quarters full to allow for expansion during freezing.
- Place the filled containers into the freezer, positioning them flat to prevent spillage and ensure consistent freezing.
- Allow the dog treats to solidify completely, which typically requires a minimum of 4 hours or preferably overnight for optimal texture.
- When ready to serve, gently remove a single portion from the mold by running briefly under warm water or letting it sit at room temperature for a minute.
- Present the frozen treat to your canine companion, monitoring their enjoyment and ensuring they consume it at a comfortable pace.
Notes
- Choose ripe bananas for maximum sweetness and easier blending, ensuring a smoother texture for your furry friend.
- Use plain, unsweetened yogurt to avoid added sugars and artificial sweeteners that might harm dogs.
- Select natural, xylitol-free peanut butter to prevent potential toxicity and ensure canine safety.
- Customize the treat by swapping ingredients like using Greek yogurt for extra protein or adding a small amount of honey for additional flavor.
- Prep Time: 10 minutes
- Cook Time: 4 hours
- Category: Snacks, Desserts
- Method: Blending
- Cuisine: American
Nutrition
- Serving Size: 2
- Calories: 150
- Sugar: 5g
- Sodium: 40mg
- Fat: 8g
- Saturated Fat: 2g
- Unsaturated Fat: 6g
- Trans Fat: 0g
- Carbohydrates: 17g
- Fiber: 2g
- Protein: 5g
- Cholesterol: 0mg
Daves Miller
Contributing Chef & Culinary Educator
Expertise
Education
Sullivan University, Louisville, Kentucky
White Mountains Community College, Berlin, New Hampshire
Daves is the friendly face guiding you through flavorful, fuss-free recipes at Picture Perfect Meals.
He studied culinary arts at Sullivan University and embraced Baking and Pastry Arts at White Mountains Community College. Daves specializes in comforting meals with vibrant flavors, highlighting fresh, seasonal ingredients.