
Enchanting Secret Heart Chocolate Loaf Cake Recipe
Baking a surprising chocolate loaf with a hidden heart centers your culinary creativity in a delightful dessert adventure.
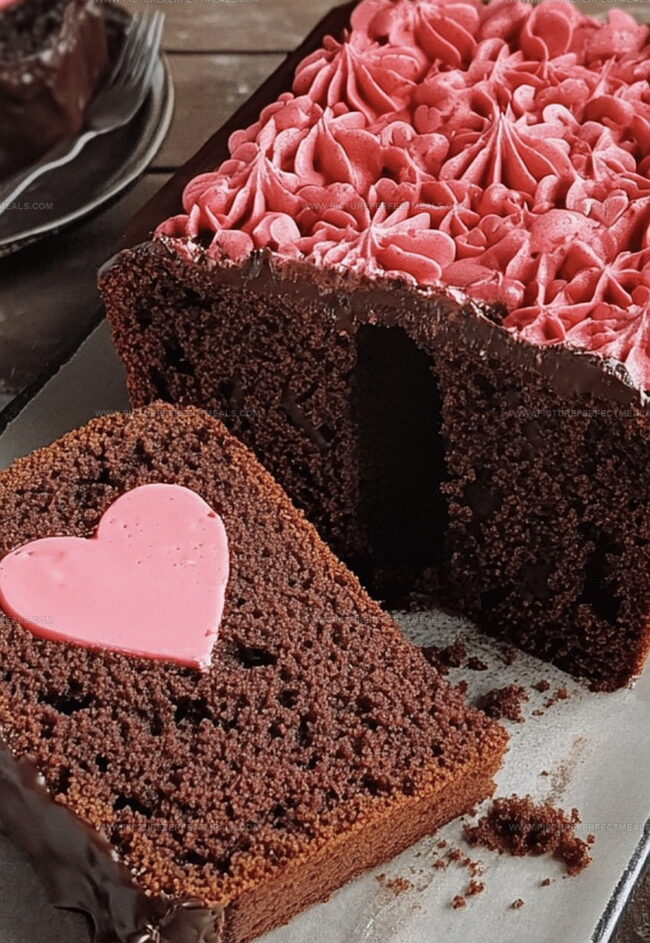
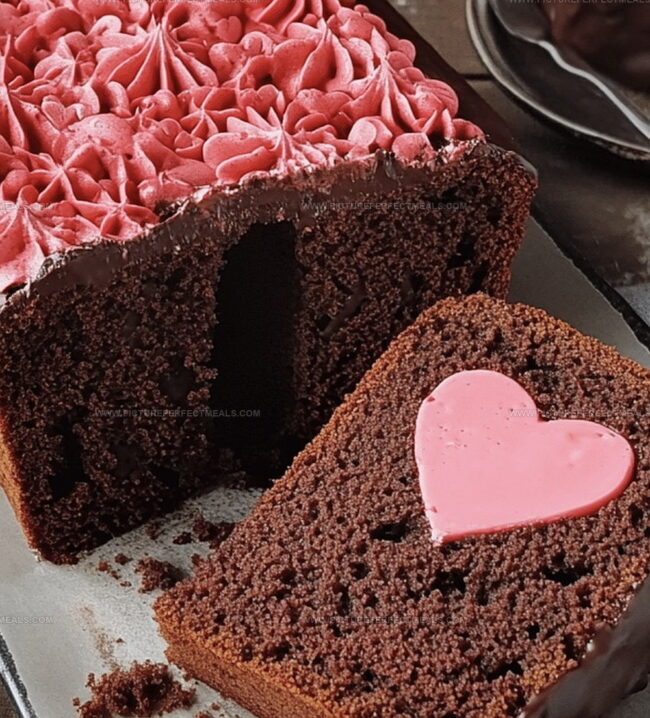
Sweet secrets peek through each slice of this decadent treat.
Unexpected design meets rich chocolate flavor in every mouthwatering bite.
Soft, tender crumb promises a stunning reveal when you cut into the cake.
Chocolate lovers will adore this playful twist on a classic dessert.
The charming surprise tucked inside makes this cake perfect for special occasions or spontaneous celebrations.
You’ll want to master this eye-catching technique that turns an ordinary cake into an extraordinary masterpiece.
Quick Recipe Overview
What’s Inside Hidden Heart Chocolate Loaf Cake
For Cake Base and Filling:For Color and Decoration:For Chocolate Components:Tools to Reveal a Surprise Heart Center
How to Make a Love-Filled Loaf Cake
Blend butter and sugar until airy. Add eggs one by one, then vanilla. Mix in flour and pink food coloring until silky smooth. Bake in a lined loaf pan at 350F for about 50 minutes. Let cool completely.
Slice cooled pink cake into thick pieces. Use a tiny heart cutter to punch out adorable heart shapes. Set these aside.
Cream butter and sugar until fluffy. Incorporate eggs, milk, then sift in flour, cocoa, and baking powder. Mix gently.
Spread a thin chocolate batter layer in the pan. Arrange pink hearts in a neat line. Cover hearts completely with remaining chocolate batter.
Bake at 350F for 50 minutes until a skewer comes out clean. Cool in the pan briefly, then transfer to a wire rack.
Whip butter until creamy. Gradually add powdered sugar and melted chocolate. Beat in vanilla and milk until buttercream is silky.
Spread chocolate buttercream over cooled cake. Sprinkle with heart-shaped decorations if desired. Slice to unveil the hidden heart surprise.
Tricks to Nail the Heart Shape and Moist Texture
How to Present a Cake That’s Made with Love
Storage Tips That Keep the Heart Hidden and Happy
Print
Dreamy Hidden Heart Chocolate Loaf Cake Recipe
- Total Time: 1 hour
- Yield: 11 1x
Description
Delightful hidden heart chocolate loaf cake reveals a surprising love-themed center when sliced. Rich chocolate batter and tender crumb showcase a sweet surprise that will charm dessert enthusiasts and romantic bakers alike.
Ingredients
- 3 large eggs
- 175 grams (¾ cup) unsalted butter, softened
- 175 grams (1 ½ cups) self-raising flour
- 175 grams (¾ cup) caster sugar
- 1 tsp vanilla extract
- Pink gel food coloring
- 3 large eggs
- 175 grams (¾ cup) unsalted butter, softened
- 175 grams (1 ½ cups) self-raising flour
- 35 grams (⅓ cup) cocoa powder
- 150 grams (¾ cup) caster sugar
- ½ tsp baking powder
- 1 ½ tbsps milk
- 100 grams (7 tbsps) unsalted butter, softened
- 200 grams (1 ⅔ cups) icing sugar
- 50 grams (1 ¾ oz) dark chocolate, melted and cooled
- 1 tsp vanilla extract
- 12 tbsps milk
- Heart-shaped sprinkles
Instructions
- Pink Sponge Preparation: Cream butter and sugar until light and airy, then integrate eggs and vanilla, blending until silky smooth. Introduce pink gel food coloring to create a vibrant hue, gently folding in self-raising flour.
- Pink Sponge Baking: Transfer batter to a lined loaf tin and bake at 180C for approximately 50 minutes. Once fully cooked, allow to cool completely.
- Heart Cutting: Slice the cooled pink sponge into 2cm thick pieces and use a small heart-shaped cookie cutter to extract precise heart shapes.
- Chocolate Batter Creation: Cream butter and sugar, then incorporate eggs and milk. Sift cocoa powder, self-raising flour, and baking powder into the mixture, folding gently to maintain a smooth consistency.
- Cake Assembly: Grease and line the loaf tin, spreading a thin chocolate batter layer at the bottom. Arrange pink heart cut-outs in a tight, precise line down the center, then carefully cover with remaining chocolate batter, ensuring complete heart coverage.
- Baking the Layered Cake: Bake at 180C for 50 minutes, verifying doneness with a skewer inserted away from the heart section. Cool briefly in the tin before transferring to a wire rack.
- Chocolate Buttercream Preparation: Whip butter until creamy, gradually incorporating icing sugar. Blend in melted dark chocolate, vanilla extract, and milk until achieving a smooth, spreadable consistency.
- Final Decoration: Once completely cooled, lavishly cover the cake with chocolate buttercream. Optionally, sprinkle heart-shaped decorations on top.
- Serving Reveal: Slice the cake to unveil the hidden pink heart surprise nestled within the rich chocolate layers.
Notes
- Maintain Precise Temperature: Keep oven consistently at 180C to ensure even baking and prevent uncooked centers or burnt edges.
- Protect Heart Cut-Outs: Chill pink sponge before cutting hearts to prevent crumbling and maintain clean, sharp edges.
- Careful Batter Layering: Spread chocolate batter gently around heart shapes to avoid displacing them, using a spatula with soft, slow movements.
- Moisture Control: Check cake’s moisture by inserting skewer near non-heart section to prevent overcooking and ensure a tender, soft texture.
- Prep Time: 30 minutes
- Cook Time: 30 minutes
- Category: Desserts, Snacks
- Method: Baking
- Cuisine: American
Nutrition
- Serving Size: 11
- Calories: 367
- Sugar: 27 g
- Sodium: 100 mg
- Fat: 20 g
- Saturated Fat: 12 g
- Unsaturated Fat: 8 g
- Trans Fat: 0 g
- Carbohydrates: 42 g
- Fiber: 1 g
- Protein: 4 g
- Cholesterol: 78 mg
Jenna Hartley
Founder & Recipe Creator
Expertise
Education
Box Hill Institute, Melbourne
William Angliss Institute, Melbourne
Jenna is the heart of Picture Perfect Meals, turning simple ingredients into beautiful, easy‑to‑make dishes.
Growing up around family meals in Melbourne, she trained at Box Hill Institute and then perfected her pastry skills at William Angliss Institute. She loves mixing classic Australian flavors with fresh ideas to keep cooking fun and stress‑free.