Dreamy Reeses Peanut Butter Cup Roll Cake Recipe

Magic Reeses Peanut Butter Cup Roll Cake Recipe for Fun Days

Decadent chocolate cake meets classic Reeses peanut butter cup flavors in a spectacular dessert that promises pure indulgence.

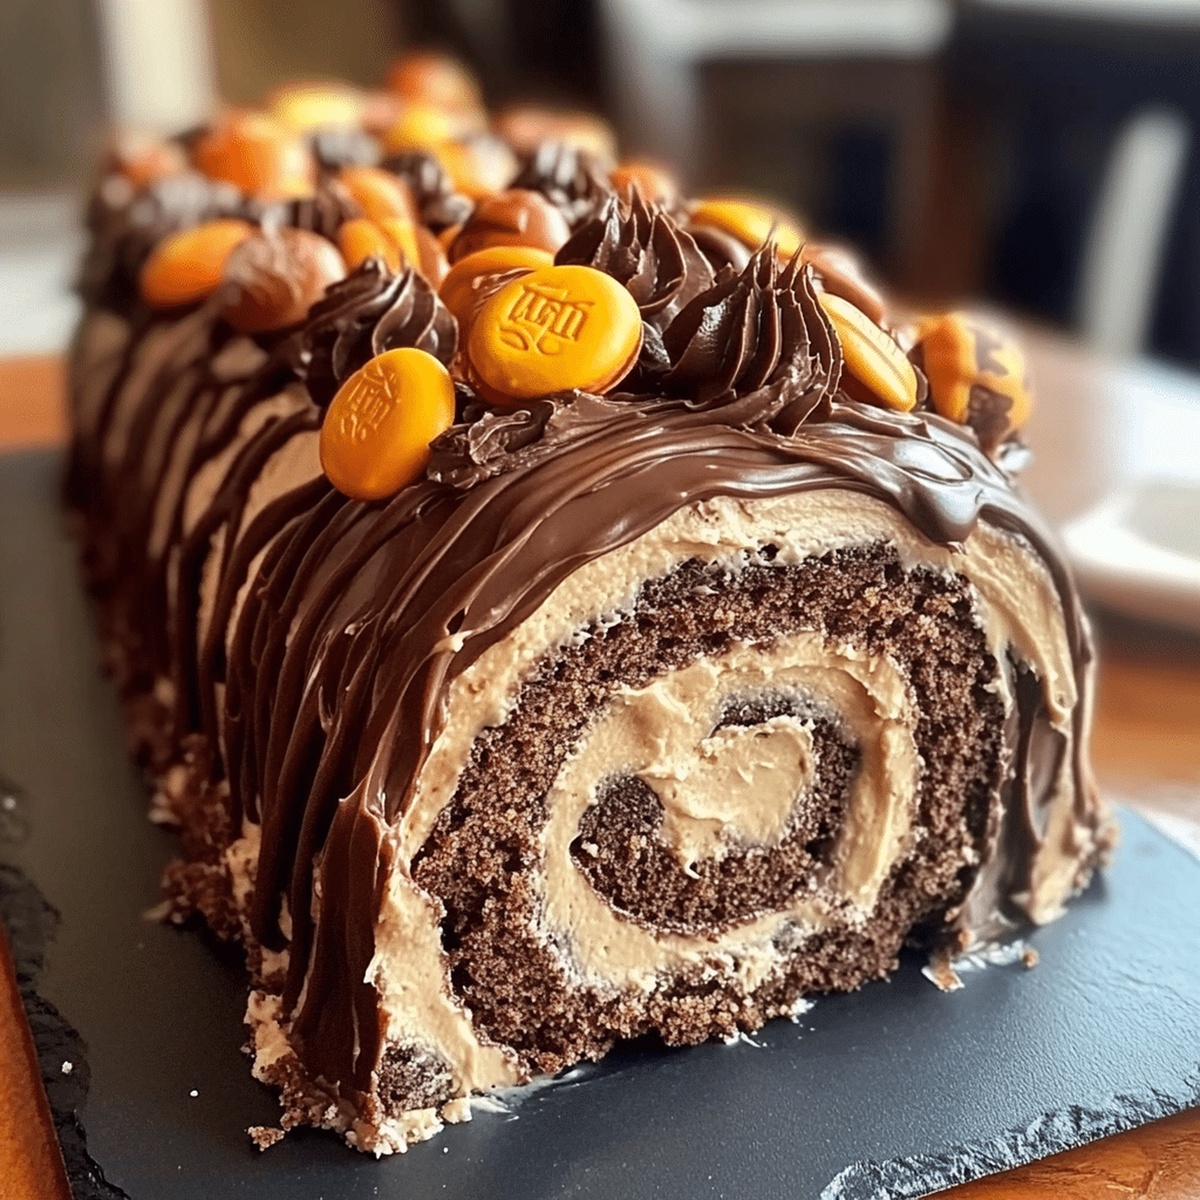
This rolled cake weaves together rich chocolate sponge and creamy peanut butter filling with irresistible charm.

Chocolate lovers will swoon over every delectable slice, packed with deep cocoa notes and smooth peanut butter undertones.

The swirled design creates a stunning visual that matches its incredible taste profile.

Each bite delivers a perfect balance of sweet and nutty sensations that dance across your palate.

Chocolate and peanut butter enthusiasts will find this roll cake an absolute showstopper for any celebration or weekend treat.

Prepare to dazzle your guests with this mouthwatering dessert that elevates simple ingredients into a remarkable culinary experience.

Quick Recipe Overview

Prep Time: 30 minutes

Cook Time: 12 minutes

Total Time: 42 minutes

Calories: 319 kcal

Servings: 12

Reese’s Peanut Butter Roll Cake Ingredients

For Cake Base:
  • Flour: Provides structure and soft texture for the sponge cake, choose unbleached all-purpose flour for best results.
  • Cocoa Powder: Delivers rich chocolate flavor, opt for high-quality Dutch-processed cocoa for deeper color and taste.
  • Baking Powder: Helps cake rise and become fluffy, ensure it's fresh and not expired.
  • Salt: Enhances overall flavor and balances sweetness, use fine-grain table salt.
  • Eggs: Creates light and airy texture, select fresh room-temperature eggs for better mixing.
  • Sugar: Adds sweetness and helps with cake's texture, granulated white sugar works perfectly.
  • Vanilla Extract: Boosts flavor complexity, choose pure vanilla for authentic taste.
For Filling:
  • Peanut Butter: Provides creamy base with nutty flavor, select smooth variety for even consistency.
  • Cream Cheese: Adds richness and tanginess, use full-fat version for best texture.
  • Powdered Sugar: Sweetens and stabilizes filling, sift to prevent lumps.
  • Heavy Cream: Creates light, airy texture when whipped, use cold cream for best peaks.
For Topping:
  • Chocolate Chips: Creates smooth ganache, select high-quality dark or semi-sweet chocolate.
  • Heavy Cream: Helps create glossy ganache, use fresh cream at room temperature.
  • Reeses Peanut Butter Cups: Adds decorative crunch and extra flavor, chop into bite-sized pieces.

Tools for Reese’s Roll Cake Success

  • Electric mixer: Essential for beating eggs and sugar to the right consistency, and whipping cream.
  • Jelly roll pan: 10×15-inch pan specifically needed for creating the thin, flexible sponge cake.
  • Parchment paper: Crucial for lining the pan and preventing the cake from sticking.
  • Clean kitchen towel: Used for rolling the warm cake without breaking it.
  • Saucepan: Small pan for heating cream when making ganache.
  • Mixing bowls: Several needed for separating ingredients and mixing fillings.
  • Whisk: For combining dry ingredients and creating smooth ganache.
  • Spatula: Helpful for spreading batter and filling evenly.
  • Knife: Used for chopping Reeses peanut butter cups.
  • Serving platter: For presenting and serving the finished roll cake.

How to Assemble Reese’s Peanut Butter Roll Cake

  • Warm Up the Oven

Crank the oven to a toasty 350F and get your baking pan ready with a light grease and parchment paper coating.

  • Whip Up the Cake Base

Grab your mixer and beat eggs and sugar until they transform into a fluffy, pale cloud. Toss in vanilla for extra yumminess.

  • Blend Dry Ingredients

Softly fold cocoa, flour, and other dry ingredients into the egg mixture, creating a silky smooth batter.

  • Bake to Perfection

Pour batter into the pan and slide it into the oven. Bake until the cake bounces back when you gently touch it.

  • Create the Peanut Butter Magic

Whisk peanut butter, cream cheese, and powdered sugar into a dreamy mixture. Fold in whipped cream for extra creaminess.

  • Roll and Fill

While the cake is still warm, roll it up in a sugar-dusted towel. Once cooled, unroll and spread the peanut butter filling generously.

  • Chocolate Drizzle Finish

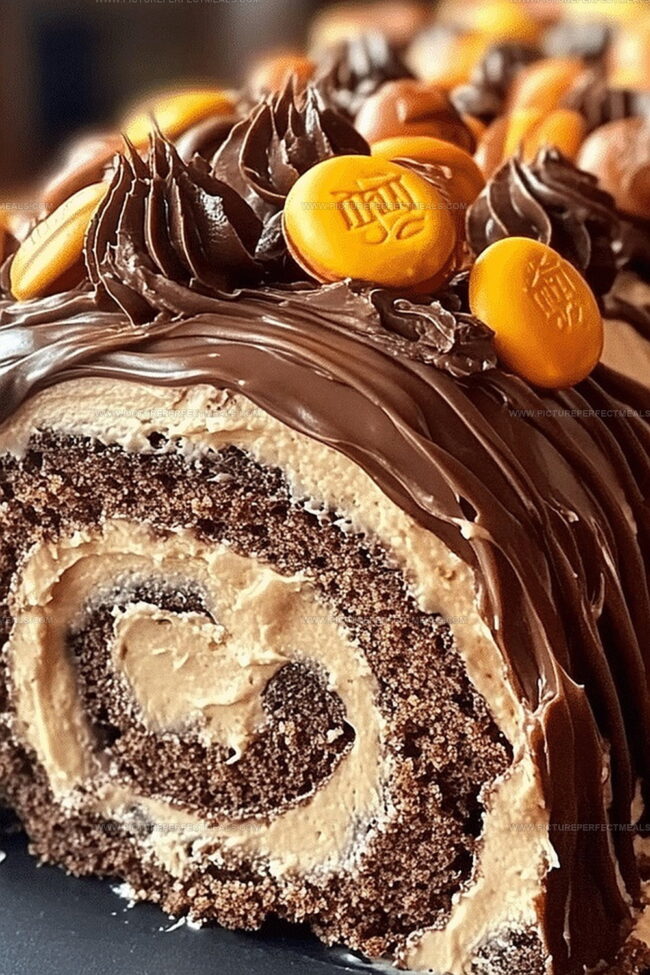
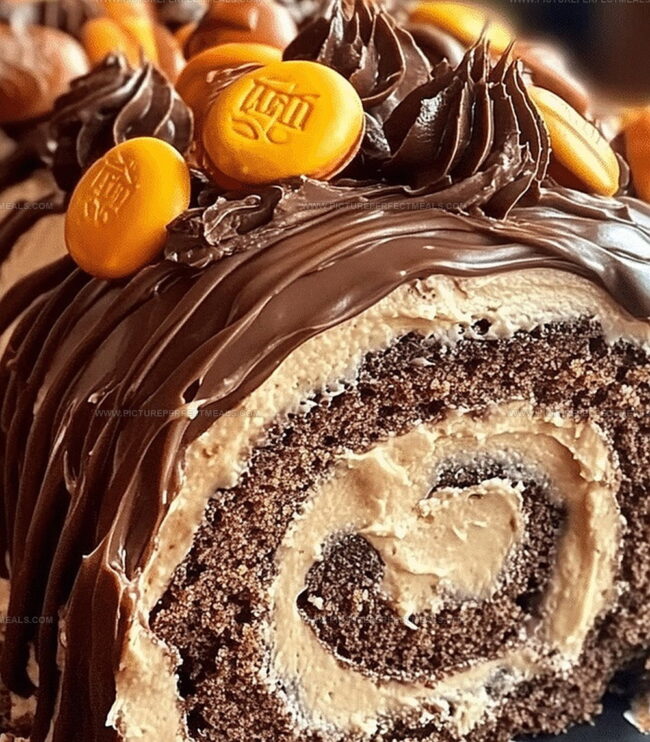
Melt chocolate with hot cream, creating a glossy ganache. Pour over the rolled cake, letting it cascade down the sides.

  • Dress It Up

Sprinkle chopped Reeses peanut butter cups on top for a delightful crunch and extra chocolate love.

  • Chill and Serve

Refrigerate for an hour to let everything set, then slice and indulge in this decadent dessert.

Add-Ons for Your Peanut Butter Cake Roll

  • Peanut Butter Pro Tips: Keep your roll cake perfectly soft by wrapping it tightly in plastic wrap after cooling to prevent drying out.
  • Make-Ahead Magic: Prepare the entire cake a day before serving – the flavors will intensify and the texture will become more decadent overnight.
  • Gluten-Free Option: Swap regular flour with a gluten-free flour blend to make this dessert accessible for those with wheat sensitivities.
  • Chocolate Lovers' Twist: Double the chocolate intensity by mixing melted chocolate directly into the cake batter for an extra rich experience.
  • No-Bake Alternative: For hot summer days, create a chilled version by using a no-bake cheesecake-style filling instead of the traditional baked roll cake method.

Serve Up Reese’s Roll Cake Right

  • Chocolate Lover's Dream Plate: Serve this decadent roll cake on a sleek dark chocolate-colored plate to enhance its rich visual appeal and complement the dessert's deep chocolate tones.
  • Party Presentation Perfection: Slice the cake at a slight angle to reveal the beautiful swirl of peanut butter filling, making each serving look like an elegant dessert masterpiece that will wow your guests.
  • Chocolate Companion Pairing: Accompany the cake slice with a scoop of vanilla ice cream or a small shot of espresso to balance the intense chocolate and peanut butter flavors, creating a sophisticated dessert experience.
  • Sweet Garnish Finale: Sprinkle some extra chopped Reeses pieces or a light dusting of cocoa powder around the plate for an additional touch of decadence and visual interest that elevates the entire dessert presentation.

Roll Cake Storage and Prep Tips

  • Smart Storage Solutions
  • Chill and Shield: Wrap the roll cake tightly in plastic wrap after cooling, protecting it from absorbing refrigerator odors. Keeps fresh for 3-4 days in the refrigerator.
  • Freezer Magic: Slice individual portions and store in airtight containers. Frozen slices stay delicious for up to 2 months. Thaw overnight in the refrigerator for best texture.
  • Room Temperature Tips: Keep the cake covered with a cake dome or loose plastic wrap at room temperature for 1-2 days. Ideal for serving within 24 hours of preparation.
  • Make-Ahead Strategy: Prepare the cake base and filling separately up to 2 days in advance. Assemble just before serving to maintain optimal freshness and prevent soggy texture.
Print
clock clock iconcutlery cutlery iconflag flag iconfolder folder iconinstagram instagram iconpinterest pinterest iconfacebook facebook iconprint print iconsquares squares iconheart heart iconheart solid heart solid icon
Dreamy Reeses Peanut Butter Cup Roll Cake Recipe

Dreamy Reeses Peanut Butter Cup Roll Cake Recipe


5 Stars 4 Stars 3 Stars 2 Stars 1 Star

4.7 from 36 reviews

  • Total Time: 42 minutes
  • Yield: 13 1x

Description

Chocolate sponge cake rolled with Reeses peanut butter cup filling creates a delightful dessert. Rich layers of sweet chocolate and creamy peanut butter promise a memorable indulgence you’ll savor with each delectable slice.


Ingredients

Scale
  • 1 teaspoon vanilla extract
  • 1 teaspoon baking powder
  • 4 large eggs
  • ½ cup (100 g/3.5 oz) granulated sugar
  • ¾ cup (90 g/3.2 oz) all-purpose flour
  • ¼ cup (25 g/0.9 oz) cocoa powder
  • ¼ teaspoon salt
  • ½ cup (120 ml/4 fl oz) heavy cream
  • 4 oz (115 g) cream cheese, softened
  • ½ cup (60 g/2.1 oz) powdered sugar
  • ½ cup (120 ml/4 fl oz) creamy peanut butter
  • ½ cup (120 ml/4 fl oz) heavy cream
  • 1 cup (170 g/6 oz) semi-sweet chocolate chips
  • 1 cup (150 g/5.3 oz) chopped Reeses peanut butter cups

Instructions

  1. Prepare Chocolate Sponge: Blend flour, cocoa powder, baking powder, and salt in a mixing bowl, creating a uniform dry mixture.
  2. Create Egg Base: Whip eggs and sugar using an electric mixer until the blend becomes pale and voluminous, integrating vanilla extract midway through the process.
  3. Combine Batter: Gently fold dry ingredients into the egg mixture, ensuring smooth incorporation without excessive stirring.
  4. Bake Cake: Pour batter into a prepared jelly roll pan, spreading evenly, and bake at 350F until the surface springs back when lightly touched.
  5. Initial Cake Formation: Immediately invert the warm cake onto a sugar-dusted kitchen towel, carefully removing parchment paper, then roll from the shorter edge and allow to cool completely.
  6. Craft Filling: Whisk peanut butter, cream cheese, and powdered sugar until smooth, then fold in whipped heavy cream to create a light, airy mixture.
  7. Assemble Roll: Unroll cooled cake, spread peanut butter cream evenly across the surface, then carefully re-roll without the towel, positioning seam-side down on a serving platter.
  8. Prepare Ganache: Heat heavy cream until steaming, pour over chocolate chips, let sit briefly, then whisk until achieving a glossy, seamless texture.
  9. Finish and Decorate: Drape ganache over the cake, allowing elegant drips, then garnish with chopped Reeses peanut butter cups. Refrigerate for one hour to set and enhance flavors.

Notes

  • Prevent Cake Cracking: Roll the cake while it’s still warm to maintain flexibility and prevent splitting during the rolling process.
  • Manage Moisture Balance: Dust the towel with powdered sugar to prevent sticking and absorb excess moisture, ensuring a clean cake release.
  • Achieve Smooth Filling: Ensure cream cheese and peanut butter are at room temperature for seamless blending and preventing lumpy texture.
  • Ganache Perfection: Let chocolate and cream sit for exactly one minute before whisking to create a silky, glossy chocolate coating without burning or separating.
  • Prep Time: 30 minutes
  • Cook Time: 12 minutes
  • Category: Desserts
  • Method: Baking
  • Cuisine: American

Nutrition

  • Serving Size: 13
  • Calories: 392
  • Sugar: 24 g
  • Sodium: 145 mg
  • Fat: 28 g
  • Saturated Fat: 14 g
  • Unsaturated Fat: 12 g
  • Trans Fat: 0 g
  • Carbohydrates: 32 g
  • Fiber: 1 g
  • Protein: 7 g
  • Cholesterol: 83 mg
Jenna Hartley

Jenna Hartley

Founder & Recipe Creator

Expertise

  • Recipe development with a focus on single-dish meals.
  • Fusion of traditional and modern Australian cuisines.
  • Food styling and photography for digital platforms.​

Education

Box Hill Institute, Melbourne

  • Degree: Advanced Diploma of Hospitality Management
  • Focus: Specialized in practical food and beverage service, responsible alcohol and hygiene compliance, legal risk management, and hands‑on experience in a simulated restaurant environment.

William Angliss Institute, Melbourne

  • Program: Certificate IV in Patisserie
  • Focus: Specialized in pastry and bakery techniques, cookery and specialty food preparation, recipe planning and costing, commercial kitchen operations, sustainable and inclusive work practices, food safety and hygiene compliance, and workplace health and safety.

Jenna is the heart of Picture Perfect Meals, turning simple ingredients into beautiful, easy‑to‑make dishes. 

Growing up around family meals in Melbourne, she trained at Box Hill Institute and then perfected her pastry skills at William Angliss Institute. She loves mixing classic Australian flavors with fresh ideas to keep cooking fun and stress‑free.

Leave a Reply

Your email address will not be published. Required fields are marked *

Recipe rating 5 Stars 4 Stars 3 Stars 2 Stars 1 Star