Elegant Mini Tiramisu Desserts Recipe

Refined Mini Tiramisu Desserts Recipe: Classy Treats for All

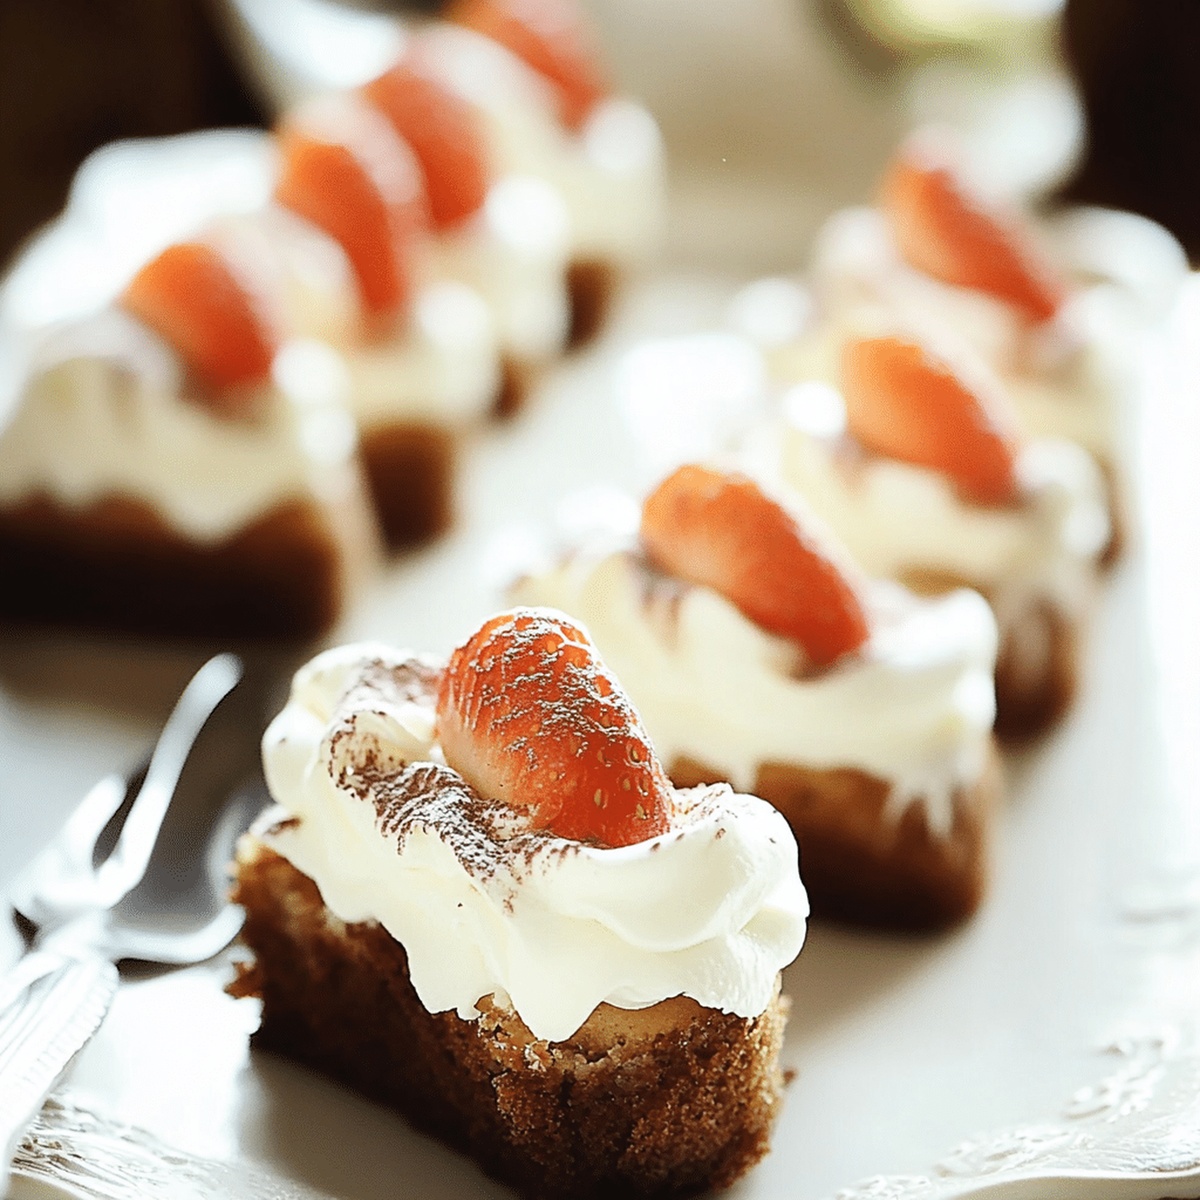
Decadent and creamy tiramisu in mini delightful tiramisu cups creates the perfect bite-sized indulgence for any occasion.

These delectable treats blend classic Italian flavors with modern presentation.

Rich espresso-soaked ladyfingers nestle between velvety mascarpone layers, promising an authentic taste experience.

Each miniature dessert delivers intense coffee and sweet creamy notes in one charming serving.

Chocolate dust and delicate cocoa powder add sophisticated finishing touches to these irresistible morsels.

You’ll adore how simple ingredients transform into an elegant dessert that sparks conversation at dinner parties.

Prepare to impress your guests with these sophisticated little culinary gems.

Instructions for a Quick Dessert That Impresses

  • Brew Flavorful Coffee Mixture

Whip up a delectable coffee blend by combining rich coffee, a touch of sugar, and optional coffee liqueur in a small bowl. Let the mixture cool completely to intensify its flavor.

  • Whisk Creamy Mascarpone Base

Grab your mixing bowl and beat the mascarpone cheese until it becomes silky smooth, creating a luxurious foundation for your dessert.

  • Create Fluffy Cream Topping

In a separate bowl, whip heavy cream with powdered sugar and vanilla until soft, billowy peaks form, giving your dessert an airy texture.

  • Blend Mascarpone and Cream

Gently fold the whipped cream into the mascarpone, creating a light and dreamy filling that will melt in your mouth.

  • Layer Ladyfinger Bases

Quickly dip ladyfingers into the coffee mixture, ensuring they’re just moistened but not soggy. Place a soaked ladyfinger at the bottom of each mini cup or jar.

  • Build Delicious Layers

Pipe or spoon the mascarpone mixture over the ladyfingers, creating beautiful layers. Repeat until each jar is filled, finishing with a luscious mascarpone topping.

  • Chill and Enhance Flavors

Cover your mini tiramisu and refrigerate for at least 4 hours or overnight to allow the flavors to mingle and develop.

  • Serve with Elegant Finish

Just before serving, dust with cocoa powder and sprinkle chocolate shavings for a stunning and delectable presentation.

Mix-Ins to Customize Your Tiramisu

  • Coffee Strength Adjustment: Customize the coffee's intensity by using espresso for a bolder flavor or regular brewed coffee for a milder taste.
  • Make-Ahead Magic: Prepare these mini tiramisu desserts up to 2 days in advance, allowing flavors to meld and develop a richer depth.
  • Gluten-Free Option: Swap traditional ladyfingers with gluten-free ladyfingers or use almond flour-based sponge cake for a celiac-friendly version.
  • Liqueur Alternatives: Replace coffee liqueur with vanilla extract for a non-alcoholic version, or experiment with amaretto or rum for different flavor profiles.
  • Presentation Tricks: Use clear shot glasses or small mason jars to create beautiful layered desserts that showcase the tiramisu's elegant texture and colors.

Serving Mini Tiramisu With a Touch of Class

  • Elegant Dinner Party Finale: Serve these delicate tiramisu cups as a sophisticated dessert centerpiece during an intimate gathering, creating a memorable sweet ending to your meal.
  • Coffee Lover's Dream: Pair these mini tiramisu desserts with a shot of espresso or a smooth cappuccino to enhance the rich coffee flavors and provide a delightful after-dinner treat.
  • Chocolate Lover's Delight: Sprinkle extra dark chocolate shavings or add a small chocolate truffle beside each mini tiramisu to elevate the indulgence and create a decadent chocolate experience for guests who adore intense cocoa notes.
  • Summer Serving Twist: Serve chilled in small elegant glasses on a summer afternoon, accompanied by fresh berries or mint leaves for a refreshing and visually stunning dessert presentation that feels light and luxurious.

Storage Advice That Keeps It and Cold

  • Quick Chilling Strategy: Refrigerate mini tiramisu desserts for a minimum of 4 hours to develop rich, intense flavors and allow ingredients to settle perfectly.
  • Advance Preparation Magic: Make these delightful desserts up to 2 days before serving, storing them tightly covered in the refrigerator to maintain freshness and texture.
  • Container Care Secrets: Use airtight glass jars or sealed containers to prevent flavor absorption and maintain the delicate taste of your mini tiramisu treats.
  • Freezing Wisdom: Wrap individual desserts in plastic wrap, then place in freezer-safe containers to store up to 1 month – thaw overnight in the refrigerator for best results.

Quick Recipe Overview

Prep Time: 15 minutes

Cook Time: 4 hours

Total Time: 4 hours 15 minutes

Calories: 290 kcal

Servings: 6

Ingredients for Mini Tiramisu Cups

For Coffee Mixture:
  • Strong Coffee: Enhances deep, rich flavor and provides moisture for ladyfingers.
  • Granulated Sugar: Balances bitterness and adds sweetness to coffee mixture.
  • Coffee Liqueur: Optional ingredient that boosts aromatic complexity and adult sophistication.
For Cream Base:
  • Mascarpone Cheese: Creamy Italian cheese creating luxurious, silky texture with subtle tangy undertones.
  • Heavy Cream: Provides light, airy structure and contributes to decadent mouthfeel.
  • Powdered Sugar: Softens cream and ensures smooth, consistent sweetness.
  • Vanilla Extract: Adds warm, comforting depth and rounds out cream's flavor profile.
For Assembly and Garnish:
  • Ladyfingers: Delicate sponge cookies that absorb coffee mixture and create elegant layered texture.
  • Cocoa Powder: Adds sophisticated bitter notes and classic tiramisu visual presentation.
  • Chocolate Shavings: Creates textural contrast and enhances visual appeal with rich chocolate accent.

Tools That Help You Layer Like a Pro

  • Electric mixer: Perfect for whipping cream and beating mascarpone to silky smoothness.
  • Mixing bowls: Essential for separating and combining ingredients.
  • Piping bag or spoon: Helps create neat layers of mascarpone filling.
  • Small bowl: For mixing coffee and sugar syrup.
  • Measuring cups and spoons: Ensures precise ingredient quantities.
  • Mini cups or jars: Serves as individual dessert containers.
  • Fine-mesh sieve: For dusting cocoa powder evenly on top.
  • Small whisk: Helpful for mixing coffee and sugar mixture.
Print
clock clock iconcutlery cutlery iconflag flag iconfolder folder iconinstagram instagram iconpinterest pinterest iconfacebook facebook iconprint print iconsquares squares iconheart heart iconheart solid heart solid icon
Elegant Mini Tiramisu Desserts Recipe

Elegant Mini Tiramisu Desserts Recipe


5 Stars 4 Stars 3 Stars 2 Stars 1 Star

4.6 from 37 reviews

  • Total Time: 4 hours 15 minutes
  • Yield: 7 1x

Description

Delicate mini tiramisu desserts showcase classic Italian coffee-soaked elegance in bite-sized portions. Creamy mascarpone layers and delicate ladyfinger crumbs create a luxurious experience you’ll savor with each exquisite spoonful.


Ingredients

Scale
  • 226 grams (8 oz) mascarpone cheese, softened
  • 1012 ladyfingers (Savoiardi biscuits), broken in half
  • ½ cup strong brewed coffee or espresso, cooled
  • ¾ cup heavy whipping cream, cold
  • ¼ cup powdered sugar
  • 1 tbsp granulated sugar
  • 1 tbsp coffee liqueur (optional, e.g., Kahlua)
  • 1 tsp vanilla extract
  • 2 tbsps unsweetened cocoa powder, for dusting
  • Dark chocolate shavings (optional)

Instructions

  1. Syrup Preparation: Whisk espresso, sugar, and optional coffee liqueur in a shallow dish until thoroughly combined, then allow to cool to room temperature.
  2. Mascarpone Base: Whip mascarpone in a mixing bowl until smooth, then gently fold in whipped cream created from heavy cream, powdered sugar, and vanilla extract until light and airy.
  3. Layering Foundation: Briefly dip ladyfingers into cooled coffee syrup, ensuring a quick coating without oversaturating, then place as the initial layer in individual serving cups or glasses.
  4. Cream Incorporation: Using a piping bag or spoon, create an even mascarpone cream layer over the ladyfingers, repeating the layering process until containers are filled.
  5. Chilling and Finishing: Refrigerate desserts for a minimum of 4 hours or overnight to allow flavor development and texture stabilization, then dust with cocoa powder and sprinkle chocolate shavings just before serving for an elegant presentation.

Notes

  • Control Coffee Soaking: Dip ladyfingers quickly and briefly to prevent soggy texture, ensuring a perfect balance of moisture and crispness.
  • Chill for Flavor Infusion: Refrigerate desserts for at least 4 hours or overnight, allowing mascarpone and coffee flavors to develop and blend harmoniously.
  • Temperature Matters: Cool coffee syrup completely before using to maintain the delicate structure of ladyfingers and prevent cream separation.
  • Whipping Technique: Fold whipped cream into mascarpone gently to preserve the light, airy texture, avoiding deflation of the delicate mixture.
  • Prep Time: 15 minutes
  • Cook Time: 4 hours
  • Category: Desserts
  • Method: None
  • Cuisine: Italian

Nutrition

  • Serving Size: 7
  • Calories: 250
  • Sugar: 16 g
  • Sodium: 50 mg
  • Fat: 18 g
  • Saturated Fat: 11 g
  • Unsaturated Fat: 7 g
  • Trans Fat: 0 g
  • Carbohydrates: 21 g
  • Fiber: 1 g
  • Protein: 4 g
  • Cholesterol: 70 mg
Jenna Hartley

Jenna Hartley

Founder & Recipe Creator

Expertise

  • Recipe development with a focus on single-dish meals.
  • Fusion of traditional and modern Australian cuisines.
  • Food styling and photography for digital platforms.​

Education

Box Hill Institute, Melbourne

  • Degree: Advanced Diploma of Hospitality Management
  • Focus: Specialized in practical food and beverage service, responsible alcohol and hygiene compliance, legal risk management, and hands‑on experience in a simulated restaurant environment.

William Angliss Institute, Melbourne

  • Program: Certificate IV in Patisserie
  • Focus: Specialized in pastry and bakery techniques, cookery and specialty food preparation, recipe planning and costing, commercial kitchen operations, sustainable and inclusive work practices, food safety and hygiene compliance, and workplace health and safety.

Jenna is the heart of Picture Perfect Meals, turning simple ingredients into beautiful, easy‑to‑make dishes. 

Growing up around family meals in Melbourne, she trained at Box Hill Institute and then perfected her pastry skills at William Angliss Institute. She loves mixing classic Australian flavors with fresh ideas to keep cooking fun and stress‑free.

Leave a Reply

Your email address will not be published. Required fields are marked *

Recipe rating 5 Stars 4 Stars 3 Stars 2 Stars 1 Star