Festive Christmas Butter Cookies Recipe

Jolly Festive Christmas Butter Cookies Recipe for Holiday Magic

Soft, buttery, and delightfully crumbly, these christmas butter cookies dance with holiday cheer.

Bakers who love traditional seasonal treats will adore this classic christmas butter cookies recipe that melts in your mouth.

Sweet memories of childhood gatherings swirl around each delicate bite.

Generations have cherished these simple yet elegant cookies that sparkle with festive magic.

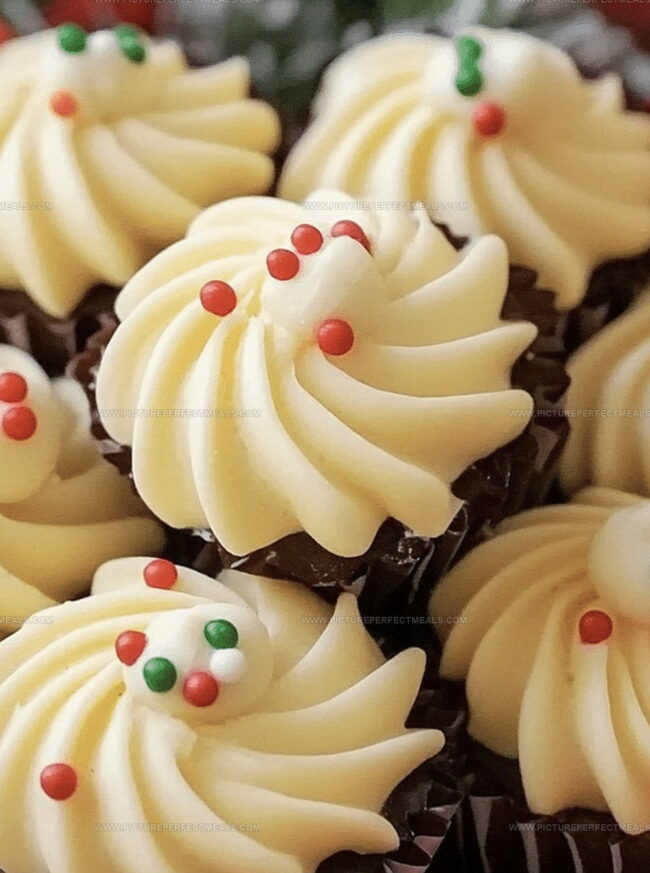
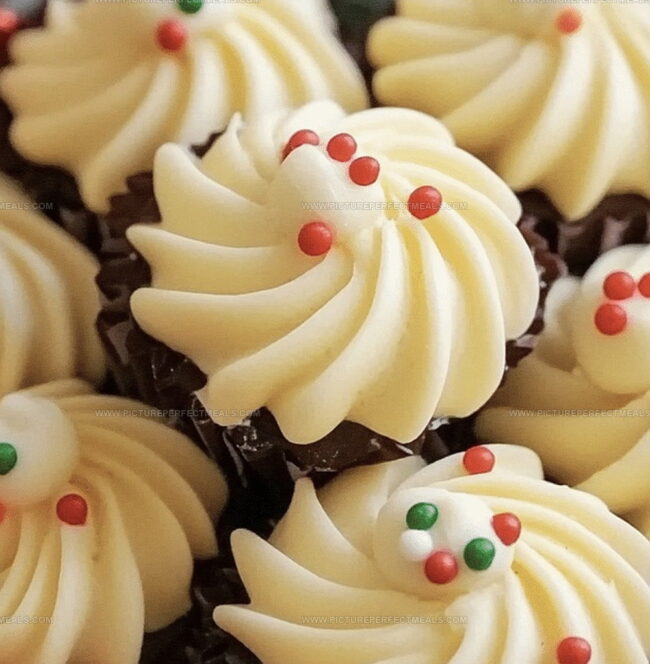
Sprinkled with colorful sugar or decorated with intricate icing, these treats bring warmth to any holiday table.

Rich butter and pure vanilla create a symphony of flavor that celebrates the season’s joy.

You’ll want to share these irresistible cookies with everyone you love.

Quick Recipe Overview

Prep Time: 15 minutes

Cook Time: 15 minutes

Total Time: 30 minutes

Calories: 118 kcal

Servings: 24

For Creaming Base:
  • Butter: Provides rich, velvety foundation with smooth, soft texture; choose high-quality unsalted butter for pure flavor and precise sweetness control.
  • Powdered Sugar: Creates silky, delicate consistency with gentle sweetness; sift to eliminate lumps for smooth mixing.
  • Vanilla Extract: Enhances deep, warm undertones with sophisticated aromatic profile; select pure vanilla for authentic flavor.
For Dry Ingredients:
  • All-Purpose Flour: Builds sturdy cookie structure with gentle crumb; ensure fresh, sifted flour for light texture.
  • Salt: Balances sweet notes and amplifies overall flavor complexity; use fine table salt for even distribution.
For Decorative Elements:
  • Holiday Sprinkles: Adds festive sparkle and cheerful visual appeal; select seasonal color palettes for Christmas theme.
  • Colored Sugar: Creates whimsical, shimmering surface with playful texture; choose complementary Christmas colors.
  • Royal Icing: Provides elegant, smooth finishing with crisp decorative possibilities; prepare fresh for best results.
  • Melted Chocolate: Offers luxurious drizzle with rich, indulgent accent; use high-quality chocolate for gourmet touch.

Baking Tools for Holiday Cookies

  • Electric mixer: Crucial for creaming butter and sugar to light, fluffy perfection.
  • Large mixing bowl: Needed for combining ingredients smoothly.
  • Baking sheets: Essential for holding and baking cookie dough.
  • Parchment paper or silicone mats: Prevents cookies from sticking and ensures easy removal.
  • Cookie cutters: Optional for creating holiday-shaped cookies.
  • Piping bag with star tip: Useful for creating decorative piped cookie designs.
  • Wire cooling rack: Perfect for cooling cookies after baking.
  • Spatula: Helps mix and transfer dough easily.
  • Measuring cups and spoons: Ensures accurate ingredient quantities.

Time to Bake Holiday Butter Cookies

  • Warm Up the Oven

Crank your oven to a toasty 350F. Grab some parchment paper and line your baking sheets, creating a perfect stage for your delightful treats.

  • Whip the Base

Grab a mixing bowl and blend softened butter with powdered sugar until the mixture looks fluffy and cloud-like. This is where the magic begins!

  • Splash of Flavor

Pour in vanilla extract and mix thoroughly, letting the sweet aroma fill your kitchen with holiday cheer.

  • Create the Dough

Slowly fold in flour and salt, stirring gently until a soft, tender dough emerges. Don’t overmix – you want these cookies light and delicate.

  • Get Creative with Shapes

Choose your cookie adventure! Drop spoonfuls onto the sheet, use cookie cutters for festive shapes, or pipe elegant designs using a star-tipped bag. Let your imagination run wild.

  • Add Festive Flair

Sprinkle holiday sparkles, colored sugar, or any decorative touches that make your heart sing before popping them in the oven.

  • Bake to Perfection

Slide your cookies into the oven and bake for 10-12 minutes. Watch for those golden edges – they’re your signal that deliciousness is ready.

  • Final Flourish

Once cooled, drizzle with chocolate or royal icing to make your Christmas cookies truly spectacular.

Tips & Touches for Festive Cookies

  • Festive Cookie Pro Tips: Easy holiday baking hacks that'll make your Christmas butter cookies shine!
  • Butter Temperature Magic: Let butter sit at room temperature for 30-45 minutes before baking. Softened (not melted) butter creates perfectly smooth, tender cookies every single time.
  • Dough Chilling Trick: Refrigerate dough for 30 minutes before rolling or shaping to prevent spreading and maintain crisp cookie edges. Cold dough equals more defined shapes and cleaner cuts.
  • Gluten-Free Swap: Replace all-purpose flour with a cup-for-cup gluten-free flour blend to make these cookies celiac-friendly. Add 1/4 teaspoon xanthan gum for better texture and binding.
  • Flavor Remix: Experiment with extract variations like almond, peppermint, or orange to create unique seasonal twists. Start with 1/2 teaspoon and adjust to taste for subtle, delightful flavor profiles.
  • Storage Wisdom: Store cookies in an airtight container between layers of parchment paper. These treats stay fresh for up to 7 days at room temperature or can be frozen for 3 weeks, making holiday prep a breeze.

How to Present Christmas Cookies

  • Festive Flavor Companions: Pair these buttery delights with warm spiced tea or rich hot cocoa for a cozy holiday moment.
  • Cookie Platter Paradise: Arrange cookies on a decorative tray with fresh pine sprigs, adding cranberry or cinnamon sticks for a stunning Christmas presentation.
  • Sweet Gift Packaging: Bundle cookies in clear cellophane bags tied with red or green ribbons, creating charming homemade gifts for neighbors, teachers, and friends.
  • Holiday Dessert Centerpiece

How to Keep Cookies Perfect for Gifting

  • Smart Storage Solutions: Keep cookies fresh and delightful
  • Airtight Container Magic: Store completely cooled cookies in a sealed container at room temperature for up to 7 days. Layer between parchment paper to prevent sticking and maintain crisp texture.
  • Freezer Friendly Approach: Wrap undecorated cookies tightly in plastic wrap, then place in freezer bags. Freeze for 2-3 months. Thaw at room temperature and add decorations just before serving.
  • Make-Ahead Dough Strategy: Prepare cookie dough in advance and refrigerate for 3 days or freeze for up to 4 weeks. Wrap dough in plastic wrap and seal in a freezer bag to maintain quality.
  • Decoration Timing Tip: Apply royal icing or chocolate drizzle only after cookies have completely cooled. This prevents melting and ensures a clean, professional-looking finish.
Print
clock clock iconcutlery cutlery iconflag flag iconfolder folder iconinstagram instagram iconpinterest pinterest iconfacebook facebook iconprint print iconsquares squares iconheart heart iconheart solid heart solid icon
Festive Christmas Butter Cookies Recipe

Festive Christmas Butter Cookies Recipe


5 Stars 4 Stars 3 Stars 2 Stars 1 Star

4.7 from 22 reviews

  • Total Time: 30 minutes
  • Yield: 25 1x

Description

Delightful christmas butter cookies blend Danish holiday traditions with rich, buttery goodness. Crisp, melt-in-mouth treats celebrate festive cheer, inviting you to savor sweet memories of family gatherings.


Ingredients

Scale
  • 1 cup (225 g) unsalted butter, softened
  • 1 cup (100 g) powdered sugar, sifted
  • 2 cups (250 g) all-purpose flour
  • 1 tsp vanilla extract
  • ¼ tsp salt
  • Holiday sprinkles
  • Colored sugar
  • Royal icing (optional)

Instructions

  1. Oven Preparation: Preheat the oven to 350F (175C) and line baking sheets with parchment paper or silicone mats.
  2. Dough Foundation: Cream butter and powdered sugar until light and fluffy, then blend in vanilla extract thoroughly. Gradually fold in sifted flour and salt, mixing until a smooth, consistent dough forms.
  3. Cookie Shaping: Choose your preferred method – drop cookies can be portioned with a tablespoon and gently flattened, rolled cookies require 30-minute chilling before cutting with festive cutters, or pipe decorative rosettes using a star-tipped piping bag.
  4. Decorative Touches: Sprinkle holiday-themed sugar, colored crystals, or additional decorative elements onto the cookie surfaces before baking.
  5. Baking Process: Place cookies in the preheated oven and bake until edges turn golden, approximately 10-12 minutes. Let cookies rest on the baking sheet for 5 minutes, then transfer to a cooling rack.
  6. Final Embellishment: Once completely cooled, enhance the cookies with elegant royal icing, chocolate drizzle, or additional festive decorations to complete the holiday presentation.

Notes

  • Butter Temperature Matters: Ensure butter is softened but not melted, allowing perfect creaming with powdered sugar for a light, airy texture.
  • Avoid Overmixing Dough: Mix flour gently and briefly to prevent tough, dense cookies; stop mixing as soon as ingredients combine.
  • Chill for Precision: Refrigerate dough for 30 minutes before rolling or piping to maintain shape and prevent spreading during baking.
  • Decorating Pro Tip: Let cookies cool completely before adding royal icing or chocolate drizzle to prevent melting and ensure clean, crisp decorations.
  • Prep Time: 15 minutes
  • Cook Time: 15 minutes
  • Category: Desserts, Snacks
  • Method: Baking
  • Cuisine: American

Nutrition

  • Serving Size: 25
  • Calories: 108
  • Sugar: 4 g
  • Sodium: 0.1 g
  • Fat: 7 g
  • Saturated Fat: 4.5 g
  • Unsaturated Fat: 2.5 g
  • Trans Fat: 0 g
  • Carbohydrates: 10 g
  • Fiber: 0 g
  • Protein: 1 g
  • Cholesterol: 15 mg
Jenna Hartley

Jenna Hartley

Founder & Recipe Creator

Expertise

  • Recipe development with a focus on single-dish meals.
  • Fusion of traditional and modern Australian cuisines.
  • Food styling and photography for digital platforms.​

Education

Box Hill Institute, Melbourne

  • Degree: Advanced Diploma of Hospitality Management
  • Focus: Specialized in practical food and beverage service, responsible alcohol and hygiene compliance, legal risk management, and hands‑on experience in a simulated restaurant environment.

William Angliss Institute, Melbourne

  • Program: Certificate IV in Patisserie
  • Focus: Specialized in pastry and bakery techniques, cookery and specialty food preparation, recipe planning and costing, commercial kitchen operations, sustainable and inclusive work practices, food safety and hygiene compliance, and workplace health and safety.

Jenna is the heart of Picture Perfect Meals, turning simple ingredients into beautiful, easy‑to‑make dishes. 

Growing up around family meals in Melbourne, she trained at Box Hill Institute and then perfected her pastry skills at William Angliss Institute. She loves mixing classic Australian flavors with fresh ideas to keep cooking fun and stress‑free.

Leave a Reply

Your email address will not be published. Required fields are marked *

Recipe rating 5 Stars 4 Stars 3 Stars 2 Stars 1 Star