Festive Christmas Tree Cupcakes Recipe

Jolly Holiday Tree Cupcakes Recipe: Sweet Festive Magic

Baking these delightful Christmas tree cupcakes will spark joy during the holiday season.

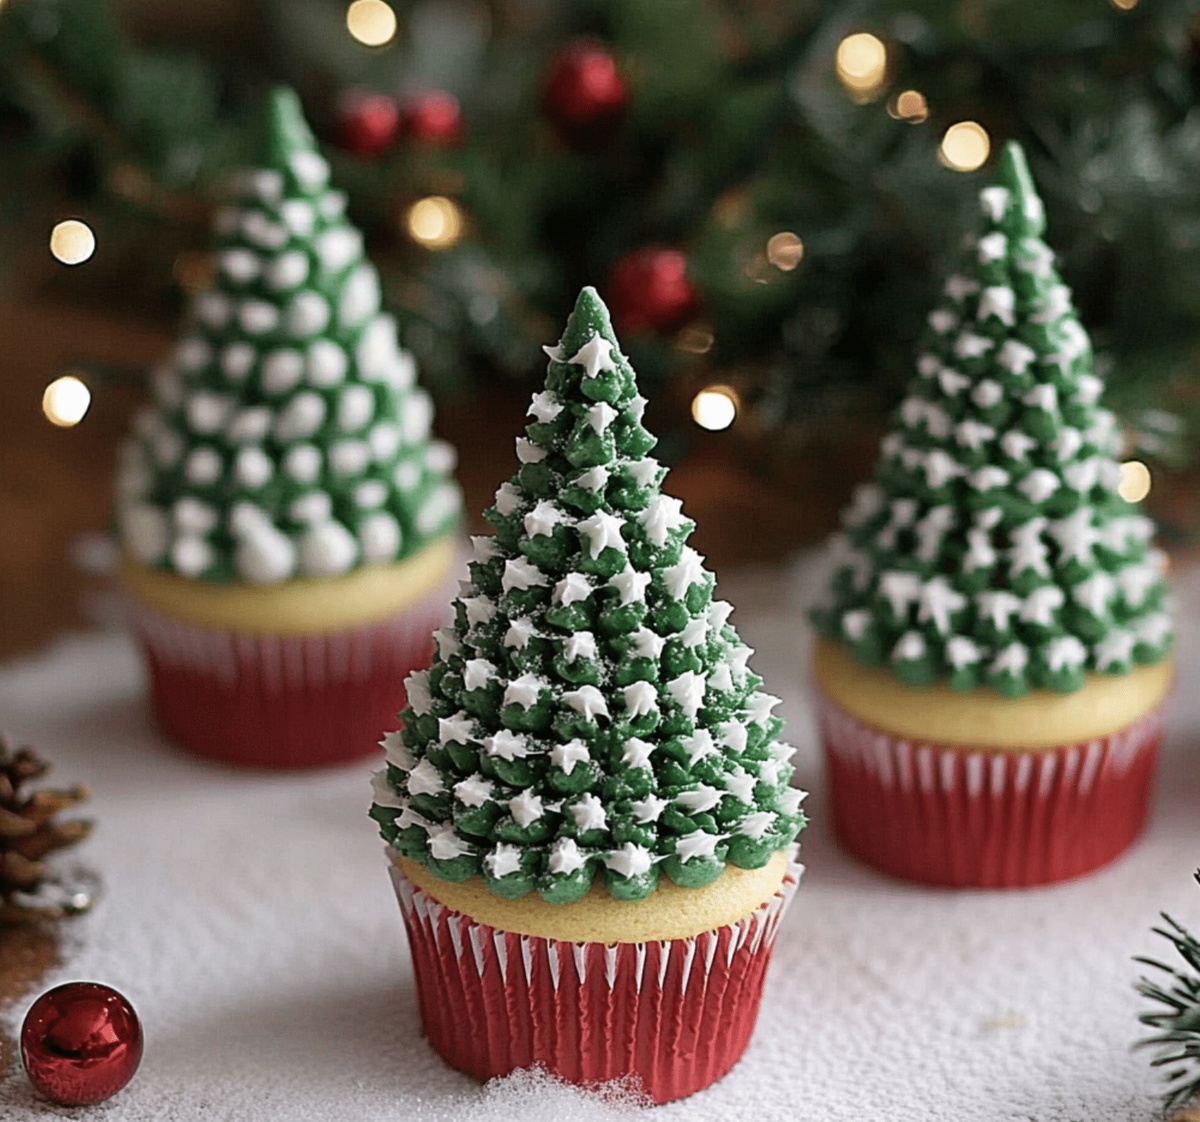
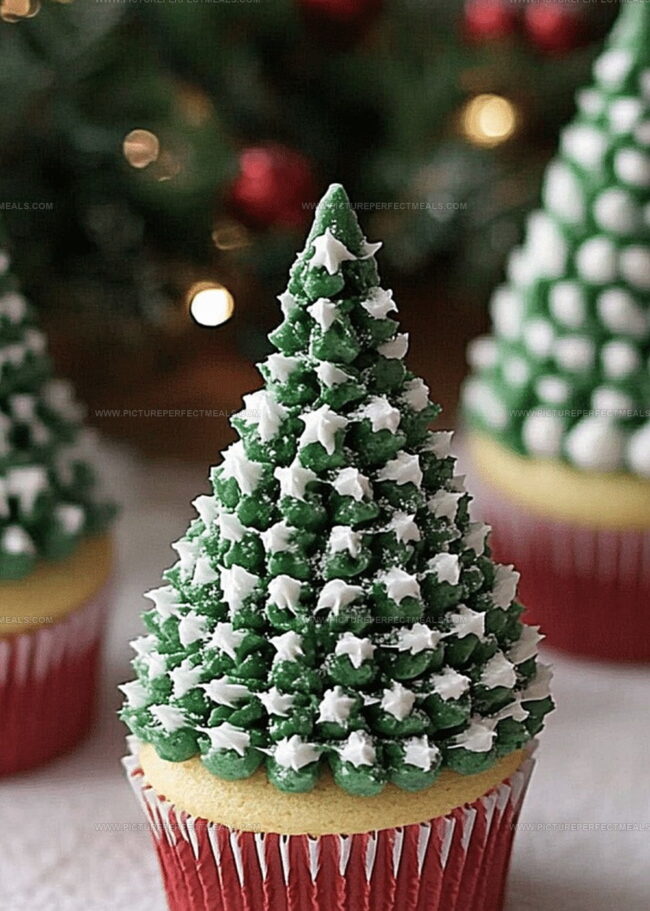
Soft, moist chocolate cupcakes decorated with festive green buttercream create a magical winter wonderland.

The Christmas tree cupcakes bring whimsy and cheer to any holiday gathering.

Children and adults alike adore these charming desserts that look almost too cute to eat.

Each cupcake becomes a miniature edible Christmas tree adorned with sprinkles and tiny sugar decorations.

Sweet frosting peaks mimic evergreen branches, transforming simple cupcakes into delectable holiday art.

You won’t be able to resist these adorable seasonal treats that perfectly capture the spirit of Christmas.

How to Keep Tree Cupcakes Fresh and Fun

  • Festive Refrigeration Strategy: Cool cupcakes entirely before storing in an airtight container, keeping them fresh for 3-4 days at room temperature or up to a week in the refrigerator.
  • Make-Ahead Magic: Prepare cupcake batter and freeze uncooked in liners for up to 2 months, allowing spontaneous holiday baking without extra prep time.
  • Decorating Prep Tip: Store frosted Christmas tree cupcakes in single layers with parchment paper between each row to prevent decorative damage during storage.
  • Freshness Hack: Add a slice of bread to the storage container to maintain moisture and softness of cupcakes, preventing them from drying out quickly.

Quick Recipe Overview

Prep Time: 20 minutes

Cook Time: 30 minutes

Total Time: 50 minutes

Calories: 345 kcal

Servings: 12

Christmas Tree Cupcake Ingredient List

For Base Ingredients:
  • All-Purpose Flour: The foundation of the cupcake, providing structure and texture with its protein-rich composition.
  • Baking Powder: A magical rising agent that helps cupcakes achieve a light and fluffy interior.
  • Salt: Enhances and balances the overall flavor profile of the cupcake.
For Wet Ingredients:
  • Butter: Delivers rich, creamy flavor and helps create a tender crumb in the cupcake.
  • Sugar: Adds sweetness and helps create a golden, caramelized exterior when baked.
  • Eggs: Bind ingredients together and contribute to the cupcake's soft, moist texture.
  • Vanilla Extract: Infuses a warm, comforting aroma and deepens the dessert's flavor complexity.
  • Milk: Provides moisture and helps create a smooth, cohesive batter.
For Decorative Ingredients:
  • Green Frosting: Transforms cupcakes into festive Christmas trees with its vibrant color.
  • Sprinkles or Decorative Candies: Adds a playful, sparkling touch to mimic tree ornaments and create visual interest.

Equipment for Picture-Perfect Tree Cupcakes

  • Electric mixer: Essential for creaming butter and sugar, and beating eggs smoothly.
  • Muffin tin: Holds cupcake liners and shapes cupcakes during baking.
  • Cupcake liners: Prevents sticking and makes cupcakes easy to remove.
  • Medium mixing bowl: Used for combining dry ingredients.
  • Large mixing bowl: Needed for mixing wet ingredients.
  • Whisk: Perfect for blending dry ingredients evenly.
  • Wire cooling rack: Allows cupcakes to cool completely without becoming soggy.
  • Toothpick: Helps check if cupcakes are fully baked.
  • Measuring cups and spoons: Ensures accurate ingredient measurements.

Building Christmas Tree Cupcakes from Scratch

  • Warm Up the Oven

Fire up your kitchen companion to a cozy 350 degrees and nestle those adorable paper cups into your muffin tray.

  • Mix Dry Goodies

Grab a bowl and whirl together the powdery flour, magic rising powder, and tiny salt crystals until they’re best friends.

  • Create Creamy Base

Whip butter and sweet granules until they transform into a fluffy cloud. Welcome eggs one by one, giving each a warm greeting. Splash in vanilla for extra pizzazz.

  • Blend Everything

Gently marry dry and wet worlds, inviting milk to dance between them. Stir just until everything looks harmonious – no overmixing allowed!

  • Fill and Bake

Distribute batter into cupcake homes, filling each about two-thirds full. Slide into the oven’s warm embrace.

  • Cool and Rest

Bake until a secret toothpick test reveals a clean escape. Let cupcakes chill completely on a wire rescue platform, preparing for their festive transformation.

Decorating Tips for Tree Cupcakes That Wow

  • Frosting Mastery: Create smooth, sturdy green buttercream using gel food coloring for vibrant Christmas tree color that won't run or fade.
  • Piping Perfection: Use a star-tipped piping bag to create textured tree branches, starting from the bottom and working upward in tight, overlapping layers.
  • Decorative Flair
  • Gluten-Free Option: Replace regular flour with a 1:1 gluten-free baking blend to make these cupcakes accessible for those with wheat sensitivities without compromising taste or texture.
  • Dairy-Free Adaptation: Substitute butter with coconut oil and use almond milk instead of dairy milk to create a delicious version suitable for dairy-free guests while maintaining the cupcake's rich flavor profile.

Best Ways to Present Tree Cupcakes

  • Holiday Dessert Platter: Arrange cupcakes on a festive wooden board with sprigs of fresh rosemary and small candy canes for a charming holiday display.
  • Frosting Forest Scene: Pipe green buttercream in textured tree shapes using a star tip, then dust with edible silver or white sparkle sugar to mimic snow-covered trees.
  • Cocoa Pairing Delight: Serve warm hot chocolate alongside these cupcakes, garnishing the mug with a mini marshmallow or cinnamon stick for extra Christmas cheer.
  • Family Decorating Activity: Set out plain frosted cupcakes with various decorating supplies like colored sprinkles, candy stars, and edible glitter so kids can create their own festive tree designs.
Print
clock clock iconcutlery cutlery iconflag flag iconfolder folder iconinstagram instagram iconpinterest pinterest iconfacebook facebook iconprint print iconsquares squares iconheart heart iconheart solid heart solid icon
Festive Christmas Tree Cupcakes Recipe

Festive Christmas Tree Cupcakes Recipe


5 Stars 4 Stars 3 Stars 2 Stars 1 Star

4.6 from 37 reviews

  • Total Time: 50 minutes
  • Yield: 13 1x

Description

Festive christmas tree cupcakes delight bakers with their whimsical holiday charm. Green frosting and sprinkle decorations create a cheerful dessert perfect for seasonal celebrations.


Ingredients

Scale
  • 1 ½ cups (190 g) all-purpose flour
  • 2 large eggs
  • ½ cup (115 g) unsalted butter, softened
  • ¾ cup (150 g) granulated sugar
  • ½ cup (120 ml) milk
  • 1 tsp vanilla extract
  • 1 ½ tsps baking powder
  • ¼ tsp salt
  • 1 cup (225 g) unsalted butter, softened
  • 4 cups (500 g) powdered sugar
  • 23 tbsps milk
  • 1 tsp vanilla extract
  • Green food coloring
  • Star-shaped sprinkles or candies
  • Mini round sprinkles or nonpareils
  • Edible glitter (optional)

Instructions

  1. Preparation: Preheat the oven to 350F (175C) and line a muffin tin with cupcake liners, spacing them evenly for consistent baking.
  2. Dry Ingredients: Whisk flour, baking powder, and salt together in a mixing bowl, ensuring a smooth, lump-free combination.
  3. Creaming: Utilize an electric mixer to cream butter and sugar until the mixture transforms into a light, pale, and fluffy consistency.
  4. Wet Ingredients Integration: Add eggs individually, mixing thoroughly after each incorporation, then blend in vanilla extract to elevate the flavor complexity.
  5. Batter Formation: Gently fold dry ingredients into the wet mixture, alternating with milk and maintaining a delicate mixing technique to preserve the batter’s airiness.
  6. Baking: Portion the batter into cupcake liners, filling each approximately two-thirds full, and place the tin in the preheated oven for 18-20 minutes.
  7. Doneness Check: Verify cupcakes are fully baked by inserting a toothpick into the center – it should emerge clean and dry with no wet batter clinging to it.
  8. Cooling: Transfer cupcakes to a wire rack, allowing them to cool completely before proceeding with decoration or serving.

Notes

  • Prevent Overmixing: Gently fold dry ingredients to maintain a light, fluffy cupcake texture, avoiding tough or dense results.
  • Fill Liners Strategically: Use two-thirds full method to ensure even rising and prevent overflow during baking.
  • Temperature Precision: Allow ingredients like butter and eggs to reach room temperature for smoother blending and consistent baking.
  • Check Doneness Carefully: Use the toothpick test to confirm cupcakes are fully baked without overbaking, which can dry out the delicate crumb.
  • Prep Time: 20 minutes
  • Cook Time: 30 minutes
  • Category: Desserts, Snacks
  • Method: Baking
  • Cuisine: American

Nutrition

  • Serving Size: 13
  • Calories: 329
  • Sugar: 32 g
  • Sodium: 155 mg
  • Fat: 18 g
  • Saturated Fat: 11 g
  • Unsaturated Fat: 7 g
  • Trans Fat: 0 g
  • Carbohydrates: 41 g
  • Fiber: 0.5 g
  • Protein: 3 g
  • Cholesterol: 61 mg
Jenna Hartley

Jenna Hartley

Founder & Recipe Creator

Expertise

  • Recipe development with a focus on single-dish meals.
  • Fusion of traditional and modern Australian cuisines.
  • Food styling and photography for digital platforms.​

Education

Box Hill Institute, Melbourne

  • Degree: Advanced Diploma of Hospitality Management
  • Focus: Specialized in practical food and beverage service, responsible alcohol and hygiene compliance, legal risk management, and hands‑on experience in a simulated restaurant environment.

William Angliss Institute, Melbourne

  • Program: Certificate IV in Patisserie
  • Focus: Specialized in pastry and bakery techniques, cookery and specialty food preparation, recipe planning and costing, commercial kitchen operations, sustainable and inclusive work practices, food safety and hygiene compliance, and workplace health and safety.

Jenna is the heart of Picture Perfect Meals, turning simple ingredients into beautiful, easy‑to‑make dishes. 

Growing up around family meals in Melbourne, she trained at Box Hill Institute and then perfected her pastry skills at William Angliss Institute. She loves mixing classic Australian flavors with fresh ideas to keep cooking fun and stress‑free.

Leave a Reply

Your email address will not be published. Required fields are marked *

Recipe rating 5 Stars 4 Stars 3 Stars 2 Stars 1 Star