
Jolly Little Debbie Tree Cheesecake Recipe for Holiday Magic
Creamy cheesecake meets holiday magic in this delightful Little Debbie tree cheesecake recipe that captures seasonal nostalgia.
Childhood memories blend perfectly with festive dessert creativity.
The classic Little Debbie Christmas tree cakes inspire this delectable treat that sparkles with sweet charm.
Layers of rich cream cheese and classic cake create a stunning dessert centerpiece.
Seasonal bakers will adore this simple yet impressive confection.
Chocolate drizzles and festive decorations complete this showstopping dessert that promises to become a new holiday tradition.
You’ll want to share every delicious bite with loved ones.
Quick Recipe Overview
Ingredients in Little Debbie Tree Cheesecake
For Crust:For Cheesecake Filling:For Decoration:Equipment Needed for Tree Cheesecake
How to Build Little Debbie Cheesecake
Crush your favorite holiday cookies and blend with melted butter. Press the mixture firmly into a springform pan, creating a solid foundation for your festive dessert. Pop the crust in the refrigerator to set while you prepare the creamy filling.
Blend cream cheese until silky smooth. Gently incorporate sugar, vanilla, and sour cream, creating a luxurious mixture. Slowly introduce eggs, maintaining a delicate touch to keep the batter light and airy. Lovingly fold chopped Little Debbie cakes into the batter, adding a playful holiday twist.
Pour half the filling into the chilled crust. Arrange whole Little Debbie cakes on top, then cover with remaining batter. Gently tap the pan to eliminate any sneaky air bubbles. Nestle the pan in a warm water bath and bake until the edges are firm and the center has a gentle wobble. Turn off the oven, crack the door, and let the cheesecake cool gracefully for an hour. Refrigerate for several hours to achieve the perfect texture.
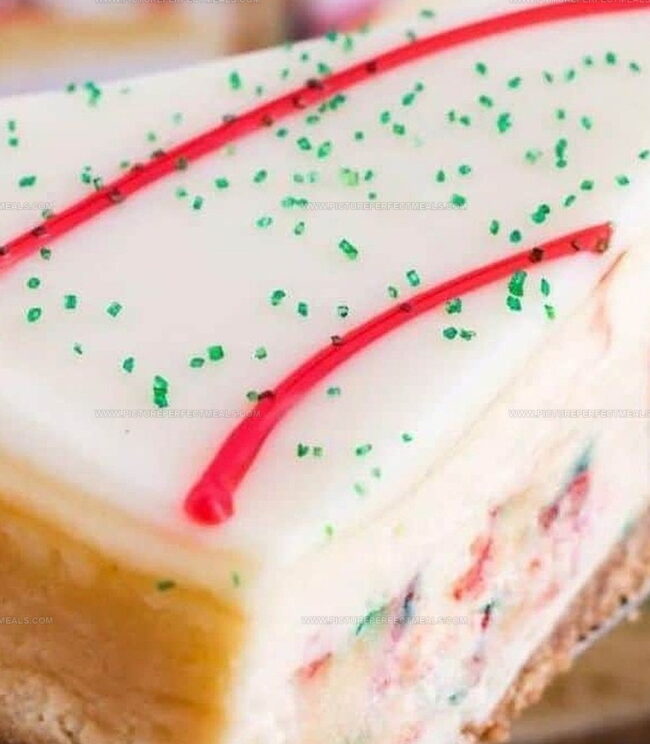
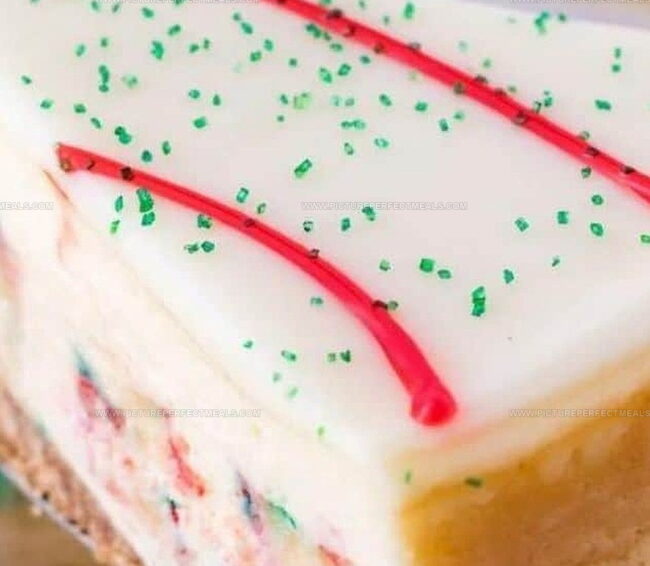
Create a dreamy white chocolate ganache by melting chocolate and cream together. Drizzle the smooth mixture over the chilled cheesecake. Sprinkle green sanding sugar for a festive touch. Add vibrant red icing stripes to capture the essence of a Christmas tree, transforming your dessert into a holiday masterpiece.
Cheesecake Tricks for Holiday Flavor
Serving Tree Cheesecake the Festive Way
Storage Tips for Holiday Cheesecake Bites
Print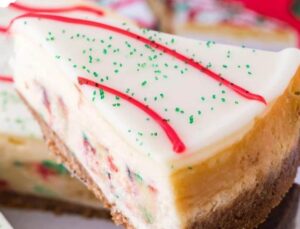
Festive Little Debbie Tree Cheesecake Recipe
- Total Time: 1 hour 20 minutes
- Yield: 13 1x
Description
Little Debbie tree cheesecake brings festive nostalgia to holiday dessert tables. Creamy layers with signature Christmas tree cake crumbles create a sweet memory you’ll savor.
Ingredients
- 24 oz (680 g) cream cheese (softened)
- 6 Little Debbie Christmas Tree Cakes
- 3 large eggs (room temperature)
- 1 ¼ cups (250 g) granulated sugar
- 1 ½ cups (180 g) vanilla wafer cookie crumbs
- 6 tbsps (85 g) unsalted butter, melted
- 4 oz (113 g) white chocolate, chopped
- ¼ cup (60 ml) heavy cream
- ¼ cup (60 g) sour cream (room temperature)
- 1 tbsp vanilla extract
- Green sprinkles
- Red icing (for decorating stripes)
Instructions
- Crust Formation: Pulverize cookie crumbs with melted butter, pressing mixture firmly into springform pan’s base. Refrigerate briefly to set foundation while preparing filling.
- Cheesecake Batter Composition: Blend cream cheese until silky, gradually incorporating sugar, vanilla, and sour cream. Gently fold in Little Debbie cake pieces, maintaining smooth consistency while integrating cake fragments evenly throughout mixture.
- Layer Construction: Pour half the cheesecake batter into chilled crust, strategically positioning whole Little Debbie cakes across initial layer. Cover completely with remaining batter, eliminating potential air pockets by gently tapping pan.
- Precision Baking: Submerge cheesecake in water bath, baking at recommended temperature. Watch for characteristic doneness: set edges with slightly jiggly center. After baking, deactivate oven, leaving door slightly ajar for gradual cooling during one-hour resting period.
- Chilling and Structural Stabilization: Transfer cheesecake to refrigerator, allowing minimum five-hour cooling to solidify texture and enhance flavor profile.
- Festive Decoration: Craft white chocolate ganache by melting chocolate with cream until glossy. Drizzle over chilled cheesecake, adorning with emerald sanding sugar and crimson icing to evoke classic Christmas tree design.
Notes
- Prevent Cracking: Bake cheesecake in water bath and cool gradually to minimize surface cracks, ensuring smooth, professional-looking texture.
- Cake Fragment Distribution: Chop Little Debbie cakes into consistent, small pieces to guarantee even flavor throughout each slice and prevent large cake chunks.
- Softening Ingredients: Allow cream cheese and eggs to reach room temperature before mixing, promoting smoother blending and preventing lumpy batter.
- Ganache Precision: Melt white chocolate carefully at low heat, stirring constantly to prevent scorching and achieve glossy, silky finish for topping.
- Prep Time: 20 minutes
- Cook Time: 1 hour
- Category: Desserts, Snacks
- Method: Baking
- Cuisine: American
Nutrition
- Serving Size: 13
- Calories: 370
- Sugar: 24 g
- Sodium: 250 mg
- Fat: 22 g
- Saturated Fat: 13 g
- Unsaturated Fat: 7 g
- Trans Fat: 0 g
- Carbohydrates: 36 g
- Fiber: 1 g
- Protein: 6 g
- Cholesterol: 90 mg
Jenna Hartley
Founder & Recipe Creator
Expertise
Education
Box Hill Institute, Melbourne
William Angliss Institute, Melbourne
Jenna is the heart of Picture Perfect Meals, turning simple ingredients into beautiful, easy‑to‑make dishes.
Growing up around family meals in Melbourne, she trained at Box Hill Institute and then perfected her pastry skills at William Angliss Institute. She loves mixing classic Australian flavors with fresh ideas to keep cooking fun and stress‑free.