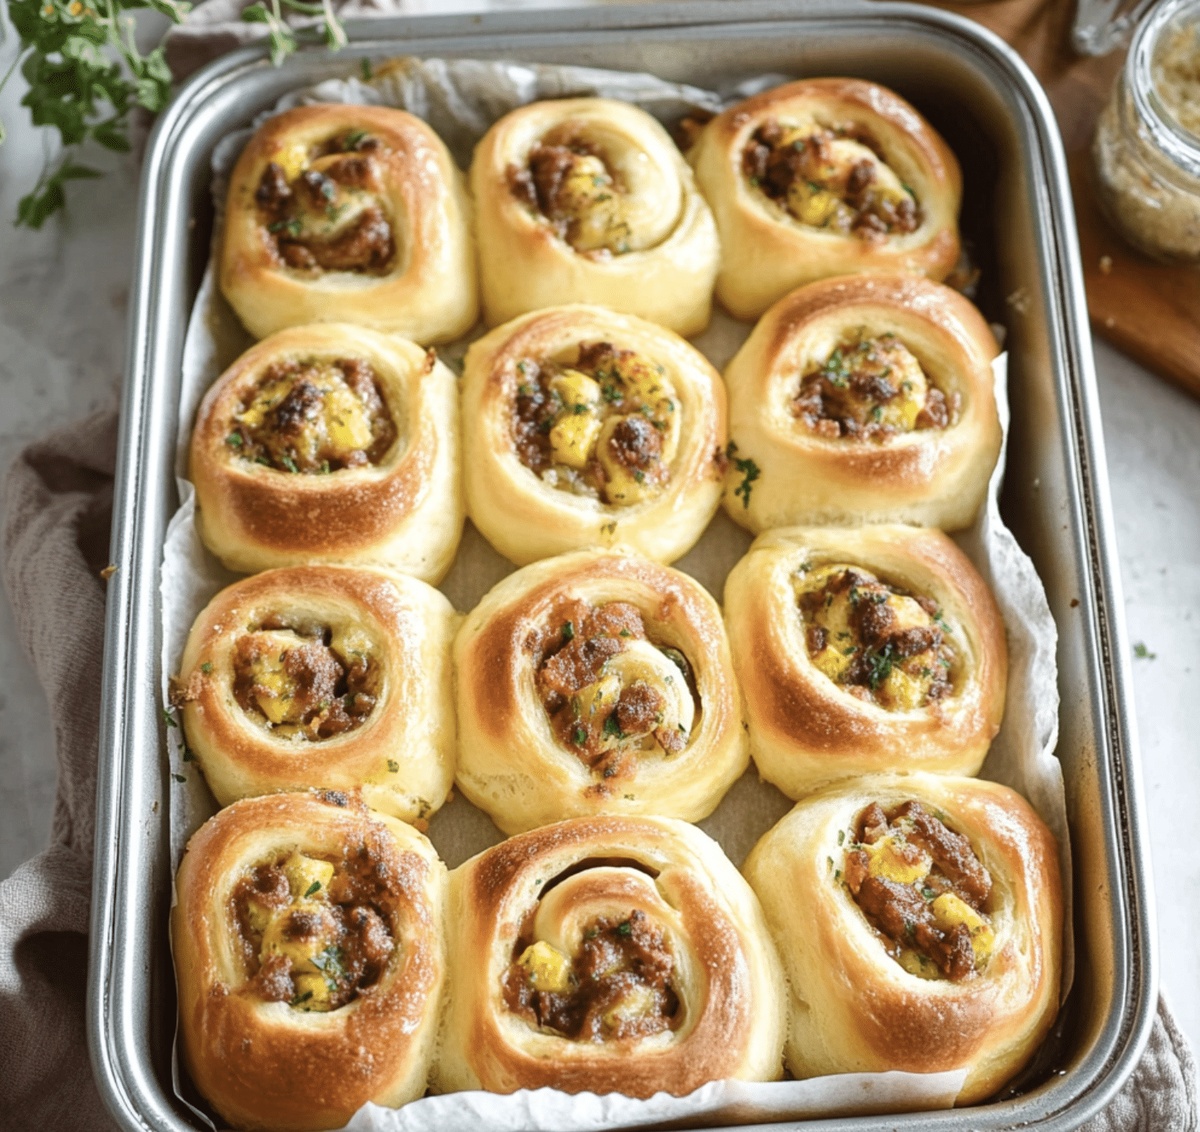
Golden mornings call for comfort wrapped in these delectable breakfast rolls bursting with warm, soft textures.
Pillowy homemade breakfast rolls promise a delightful start to any day.
Freshly baked and fragrant, they emerge from the oven with a tempting golden-brown crust that beckons hungry souls.
Each tender bite carries the essence of home-cooked warmth and simple culinary joy.
The aroma wafting through the kitchen signals a morning filled with delicious possibilities.
Crisp edges and soft centers make these rolls an irresistible morning companion.
You’ll want to savor every morsel of these delightful breakfast treasures.
Quick Recipe Overview
Prep Time: 20 minutes
Cook Time: 20 minutes
Total Time: 40 minutes
Calories: 280 kcal
Servings: 12
Key Ingredients in Classic Breakfast Rolls
For Dough Base:
Flour: Provides structure and foundation for tender, soft rolls with a delightful texture.
Yeast: Magical ingredient that helps the dough rise and creates airy, fluffy breakfast rolls.
Salt: Enhances flavor and controls yeast activity for balanced bread development.
Sugar: Feeds the yeast and adds subtle sweetness to complement the bread’s taste.
For Liquid Ingredients:
Warm Milk: Activates yeast and adds richness, creating soft and moist rolls.
Melted Butter: Brings incredible flavor and helps create a tender, golden-brown crust.
Egg: Adds richness, helps bind ingredients, and contributes to a beautiful golden color.
Tools for Rolling Out a Fluffy Morning Treat
Large mixing bowl: Essential for combining dry and wet ingredients smoothly.
Measuring cups and spoons: Precise measurements ensure perfect dough consistency.
Stand mixer or hand mixer with dough hook: Helps knead dough efficiently and develops gluten.
Wooden spoon or spatula: Great for initial mixing before kneading.
Clean kitchen towel: Covers dough during rising process to prevent drying.
Baking sheet or rectangular baking pan: Provides surface for shaping and baking rolls.
Kitchen scale (optional): Helps in accurate ingredient weighing for consistent results.
How to Make Breakfast Rolls Step by Step
Kickstart Your Dough Mix wet and dry ingredients together in a spacious bowl. Blend thoroughly until you create a soft, cohesive mixture. Use your hands or a mixer with a dough hook to work the ingredients into a smooth, stretchy texture. The goal is a perfectly unified dough that feels silky and responsive.
Let It Rise Find a cozy, warm spot in your kitchen. Place the dough in a covered container and allow it to expand and develop. Give it roughly an hour to double in size, transforming from a compact lump into a puffy, promising canvas of potential deliciousness.
Prepare Work Surface Dust your countertop with a light sprinkle of flour. Gently transfer the risen dough onto the surface, treating it with care and respect.
Shape Your Rolls Roll out the dough into a welcoming, even rectangle. Cut the dough into uniform sections that will become your gorgeous breakfast rolls. Each piece should look inviting and promise a delectable morning treat.
Final Rise Arrange the rolled pieces on a baking sheet. Allow them another short rest, letting them puff up and become irresistibly plump. This is where the magic of transformation happens.
Bake to Perfection Slide the baking sheet into a preheated oven. Watch as your rolls transform into golden, aromatic treasures that will make everyone’s morning brighter. Bake until they reach a beautiful, warm brown color with a tempting sheen.
Morning Roll Variations for Sweet or Savory Options
Kneading Perfection: Gently press and fold the dough to develop gluten without overworking it, which can make rolls tough and dense.
Rising Secrets: Place the dough in a draft-free spot like a turned-off oven with the light on to ensure consistent, warm temperature for optimal rising.
Gluten-Free Twist: Swap wheat flour with a gluten-free blend and add xanthan gum to maintain the rolls’ soft texture and structure.
Dairy-Free Option: Replace milk with almond or oat milk, and use coconut oil instead of butter for a plant-based alternative that doesn’t compromise flavor.
Flavor Boosters: Experiment with herb additions like rosemary, thyme, or garlic powder mixed into the dough for an extra burst of savory goodness.
Serving Tips for Warm Breakfast Rolls
Morning Delight Pairing: Serve these warm rolls alongside scrambled eggs, crispy bacon, or a fluffy vegetable frittata for a complete breakfast experience.
Jam-Packed Flavor Boost: Spread homemade berry jam, creamy butter, or honey on these fresh rolls to elevate their taste and add a sweet touch to your morning meal.
Brunch Presentation Trick: Arrange the rolls in a rustic basket lined with a clean kitchen towel, creating an inviting and cozy breakfast spread that looks as delicious as it tastes.
Leftover Love: Transform any remaining rolls into savory bread pudding or use them for mini breakfast sandwiches with ham and cheese later in the day.
Keeping Breakfast Rolls Soft and Ready for Later
Quick Refrigeration: Store leftover breakfast rolls in an airtight container inside the refrigerator for up to 4 days. Wrap each roll individually in plastic wrap to maintain moisture and prevent them from drying out.
Freezing Strategy: Freeze fully cooled rolls in a sealed freezer bag for maximum 3 months. Place parchment paper between layers to prevent sticking and make thawing easier.
Reheating Technique: Warm refrigerated rolls in the microwave for 15-20 seconds or in a preheated oven at 300°F for 5-7 minutes. Brush with melted butter before reheating to restore softness and enhance flavor.
Freshness Tip: Keep rolls at room temperature for 1-2 days in a bread box or covered container. Ensure the container has slight ventilation to prevent moisture buildup and maintain crisp exterior.
Homemade breakfast rolls showcase comfort from North American bakeries with tender, golden pastries. Warm spices and gentle sweetness invite diners to savor each delightful bite you’ll remember long after the last crumb disappears.
Ingredients
Scale
6 eggs (large)
6 bacon slices
3 ½ cups all-purpose flour
1 cup cheddar cheese (shredded)
1 cup milk (warm, 110F/43C)
¼ cup milk or cream
¼ cup butter (unsalted, melted)
2 tbsps butter (unsalted, for brushing)
1 egg (large)
2 ¼ tsps instant yeast (1 packet)
2 tbsps sugar
1 tsp salt
1 tsp garlic powder (optional)
Salt and pepper (to taste)
Instructions
Mixing: Whisk flour, yeast, salt, and sugar in a large mixing bowl, creating a harmonious dry foundation for the breakfast rolls.
Liquid Integration: Introduce warm milk, melted butter, and beaten egg into the dry ingredients, blending until a smooth, cohesive dough emerges.
Kneading Technique: Vigorously work the dough using hands or a stand mixer with dough hook, developing gluten and achieving a silky, elastic texture for approximately 8-10 minutes.
First Proofing: Transfer the dough to a lightly oiled bowl, covering completely with a clean kitchen towel and allowing it to rest in a warm, sheltered spot until it doubles in volume, roughly 60 minutes.
Shaping: Gently deflate the risen dough, carefully molding it into desired roll shapes on a lightly floured surface, ensuring even distribution and consistent size.
Final Proofing and Baking: Place shaped rolls on a prepared baking sheet, allowing a brief second rise of 20-30 minutes, then bake in a preheated oven at 375°F until golden brown and sounds hollow when tapped, approximately 15-18 minutes.
Finishing: Remove rolls from oven, brushing with melted butter for a glossy, appetizing finish, and let cool on a wire rack before serving warm.
Notes
Activate Yeast Carefully: Ensure milk temperature is between 110-115°F to activate yeast without killing it, which guarantees proper dough rising and texture.
Master Kneading Technique: Develop gluten structure by kneading until dough becomes smooth and elastic, preventing dense or tough rolls.
Control Proofing Environment: Place dough in a consistently warm spot around 80-85°F, covering with a damp cloth to maintain moisture and prevent surface drying.
Customize Dietary Needs: Substitute all-purpose flour with gluten-free blend, use dairy-free milk alternatives, and replace egg with flax egg for versatile dietary adaptations.
Recipe development with a focus on single-dish meals.
Fusion of traditional and modern Australian cuisines.
Food styling and photography for digital platforms.
Education
Box Hill Institute, Melbourne
Degree: Advanced Diploma of Hospitality Management
Focus: Specialized in practical food and beverage service, responsible alcohol and hygiene compliance, legal risk management, and hands‑on experience in a simulated restaurant environment.
William Angliss Institute, Melbourne
Program: Certificate IV in Patisserie
Focus: Specialized in pastry and bakery techniques, cookery and specialty food preparation, recipe planning and costing, commercial kitchen operations, sustainable and inclusive work practices, food safety and hygiene compliance, and workplace health and safety.
Jenna is the heart of Picture Perfect Meals, turning simple ingredients into beautiful, easy‑to‑make dishes.
Growing up around family meals in Melbourne, she trained at Box Hill Institute and then perfected her pastry skills at William Angliss Institute. She loves mixing classic Australian flavors with fresh ideas to keep cooking fun and stress‑free.


Jenna Hartley
Founder & Recipe Creator
Expertise
Education
Box Hill Institute, Melbourne
William Angliss Institute, Melbourne
Jenna is the heart of Picture Perfect Meals, turning simple ingredients into beautiful, easy‑to‑make dishes.
Growing up around family meals in Melbourne, she trained at Box Hill Institute and then perfected her pastry skills at William Angliss Institute. She loves mixing classic Australian flavors with fresh ideas to keep cooking fun and stress‑free.