
Golden Garlic Parmesan Cheeseburger Bombs Recipe: Tasty Bites!
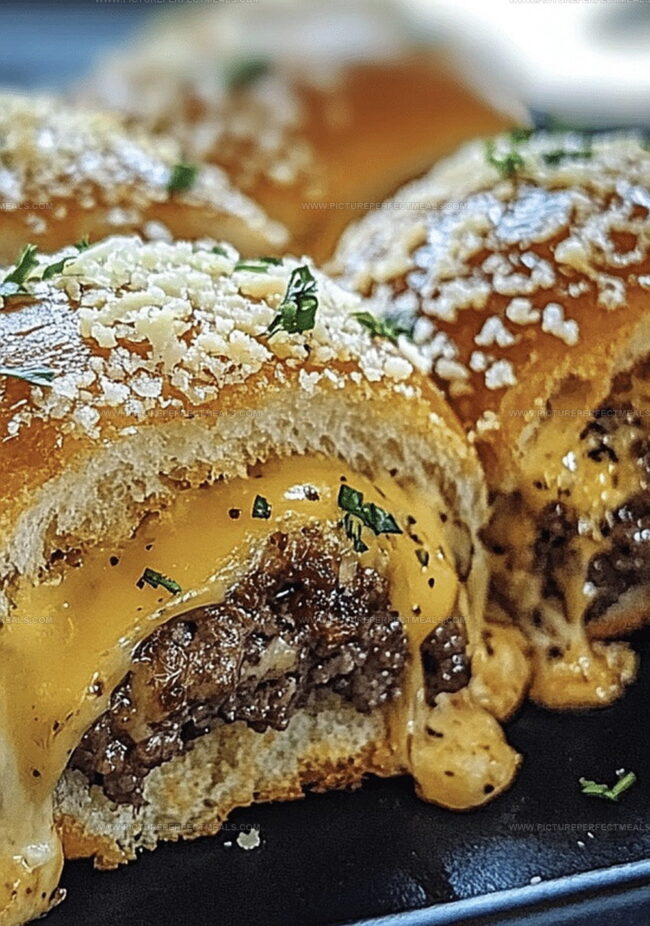
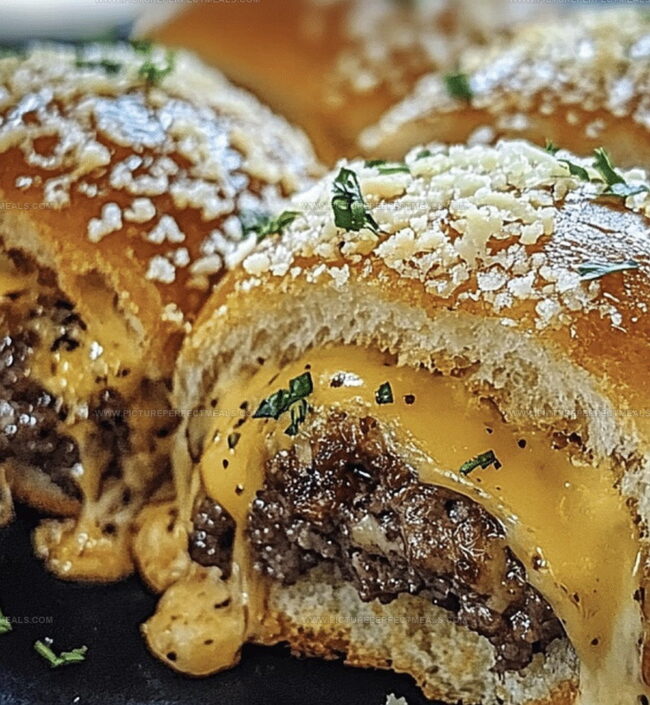
Crispy, golden garlic parmesan cheeseburger bombs burst with flavor that’ll make taste buds dance.
Nothing beats a handheld snack packed with melted cheese and savory meat.
These little delights combine the comfort of a classic burger with an unexpected twist.
Each bite promises a delectable explosion of rich, creamy goodness.
Imagine sinking your teeth into a perfectly crisp exterior that gives way to a molten center.
Simple ingredients come together to create something truly spectacular.
You’ll want to gather everyone around and watch their faces light up with the first mouthwatering bite.
Why Garlic Parmesan Cheeseburger Bombs Are the Ultimate Snack
Ingredients That Make Each Bite Burst with Flavor
Meat and Protein Base:Dough and Baking Base:Cheese and Dairy Components:Seasoning Blend:Steps to Wrap and Bake Cheeseburger Bombs Just Right
Step 1: Warm Up The Oven
Crank oven to 375°F. Cover baking sheet with parchment paper or lightly spray with cooking spray.
Step 2: Brown The Meat
Heat skillet over medium flame. Crumble beef while cooking, breaking into small chunks. Drain extra fat. Season meat with:Remove from heat and set aside.
Step 3: Prepare Dough Circles
Unwrap refrigerated biscuit dough. Gently stretch each round with fingers until thin and wider.
Step 4: Create Delicious Pockets
Place beef mixture in center of each dough circle. Top with:Carefully fold edges, pinching to seal completely. Ensure no filling leaks out.
Step 5: Bake Golden Pouches
Arrange sealed pockets on prepared baking sheet. Cook for 12-15 minutes until exterior turns golden brown.
Step 6: Add Flavorful Coating
Combine in small bowl:Brush mixture generously over hot baked pockets.
Step 7: Serve Immediately
Plate these cheesy beef pockets while warm. Pair with favorite dipping sauce or enjoy solo.
Tips That Help Keep Filling Inside While Cooking
Storage Methods That Retain That Fresh-Out-the-Oven Feel
What Pairs Well with These Savory Cheese Bombs
Mix-Ins That Take This Recipe in New Directions
Vegetarian Cheeseburger Bombs: Replace ground beef with black beans, lentils, or plant-based meat crumbles for a protein-packed vegetarian alternative.
Gluten-Free Option: Use gluten-free biscuit dough or create the bombs with cauliflower pizza crust as a base to accommodate gluten-sensitive individuals.
Low-Carb Keto Version: Swap biscuit dough with thin, pressed cauliflower rounds or large cheese wraps to create a carb-conscious version of the recipe.
Spicy Southwest Variation: Add diced jalapeños, chili powder, and pepper jack cheese to the beef mixture for a zesty, southwestern-inspired flavor profile.
Print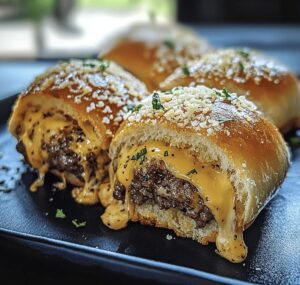
Garlic Parmesan Cheeseburger Bombs Recipe
- Total Time: 35 minutes
- Yield: 12 1x
Description
Juicy garlic parmesan cheeseburger bombs explode with savory goodness, delivering a mouthwatering twist on classic burger flavors. Melted cheese and seasoned ground beef create an irresistible handheld delight you’ll crave again and again.
Ingredients
Protein:
- 1 lb (450 g) ground beef
Cheese:
- 12 small cubes of cheddar cheese or mozzarella
Filling and Seasoning:
- 1 small onion, finely diced
- 2 cloves garlic, minced
- 1 tablespoon ketchup
- 1 teaspoon mustard
- Salt and black pepper, to taste
Dough:
- 1 (16 ounces / 450 g) can refrigerated biscuit dough
Garlic Butter Topping:
- ¼ cup (60 g) unsalted butter, melted
- 2 cloves garlic, minced
- 2 tablespoons grated Parmesan cheese
- 1 teaspoon dried parsley
Instructions
- Warm the cooking space to 375F (190C), preparing a baking sheet with parchment paper or a light grease coating to prevent adhesion.
- In a skillet, render the ground beef over medium heat, fragmenting the meat with a spatula. Once thoroughly browned, eliminate excess fat. Incorporate Worcestershire sauce, garlic powder, onion powder, salt, and pepper into the meat mixture, then remove from thermal source.
- Extract refrigerated biscuit dough and delicately expand each round into a broader, thinner circular shape using fingertips.
- Deposit a modest portion of seasoned meat at the center of each dough circle, layering with abundant cheddar cheese. Meticulously envelope the filling by folding dough edges, ensuring complete sealing without gaps.
- Arrange sealed parcels onto prepared baking surface, positioning them with sufficient spacing. Roast for 12-15 minutes until surfaces transform into a rich golden hue and dough achieves complete internal cooking.
- Meanwhile, craft a luxurious coating by whisking melted butter with finely chopped garlic and grated Parmesan cheese. Upon removing the bombs from the oven, generously brush the aromatic mixture across the warm surfaces.
- Present these savory parcels immediately, accompanied by complementary dipping sauces or enjoyed independently for maximum gustatory pleasure.
Notes
- Seal biscuit edges tightly to prevent filling from leaking during baking, creating perfect contained cheeseburger bombs.
- Experiment with different cheese varieties like mozzarella or pepper jack for unique flavor profiles and exciting taste combinations.
- Pat ground beef dry before cooking to achieve better browning and prevent excess moisture in the filling.
- Customize the bombs for dietary needs by using lean ground turkey, gluten-free biscuit dough, or plant-based meat alternatives for a healthier spin.
- Prep Time: 15 minutes
- Cook Time: 20 minutes
- Category: Lunch, Dinner, Appetizer, Snacks
- Method: Baking
- Cuisine: American
Nutrition
- Serving Size: 12
- Calories: 215
- Sugar: 1 g
- Sodium: 350 mg
- Fat: 12 g
- Saturated Fat: 6 g
- Unsaturated Fat: 5 g
- Trans Fat: 0 g
- Carbohydrates: 18 g
- Fiber: 1 g
- Protein: 9 g
- Cholesterol: 35 mg
Daves Miller
Contributing Chef & Culinary Educator
Expertise
Education
Sullivan University, Louisville, Kentucky
White Mountains Community College, Berlin, New Hampshire
Daves is the friendly face guiding you through flavorful, fuss-free recipes at Picture Perfect Meals.
He studied culinary arts at Sullivan University and embraced Baking and Pastry Arts at White Mountains Community College. Daves specializes in comforting meals with vibrant flavors, highlighting fresh, seasonal ingredients.