
Irresistible Gooey Chocolate Peanut Butter Poke Cake Recipe
Decadent desserts have a special place in every sweet tooth’s heart, especially when gooey chocolate peanut butter poke cake promises pure indulgence.
Rich chocolate cake becomes an irresistible canvas for creamy peanut butter magic.
Layers of flavor burst through each carefully pierced hole, creating a symphony of textures and tastes.
Every forkful delivers a luxurious blend of chocolate and nutty goodness that melts effortlessly on your tongue.
The combination transforms a simple cake into a show-stopping dessert that demands attention.
Drizzles of silky chocolate and peanut butter sauce make this treat impossible to resist.
One slice will transport you to dessert heaven, leaving you craving another delectable bite.
Quick Recipe Overview
Ingredients You’ll Need for the Poke Cake
For Cake Base:For Filling and Moisture Layer:For Topping and Garnish:For Baking Tools:Baking Gear for Chocolate PB Poke Cake
Make That Poke Cake Shine
Mix the chocolate cake batter following package guidelines and bake in a rectangular pan. Let it rest for 10 minutes after coming out of the oven.
Grab a wooden spoon handle or straw and poke holes across the warm cake surface, spacing them evenly.
Blend sweetened condensed milk with melted peanut butter until silky smooth. Pour this mixture carefully over the cake, ensuring it seeps into every hole.
Once the cake has cooled completely, spread a generous layer of whipped cream across the entire surface.
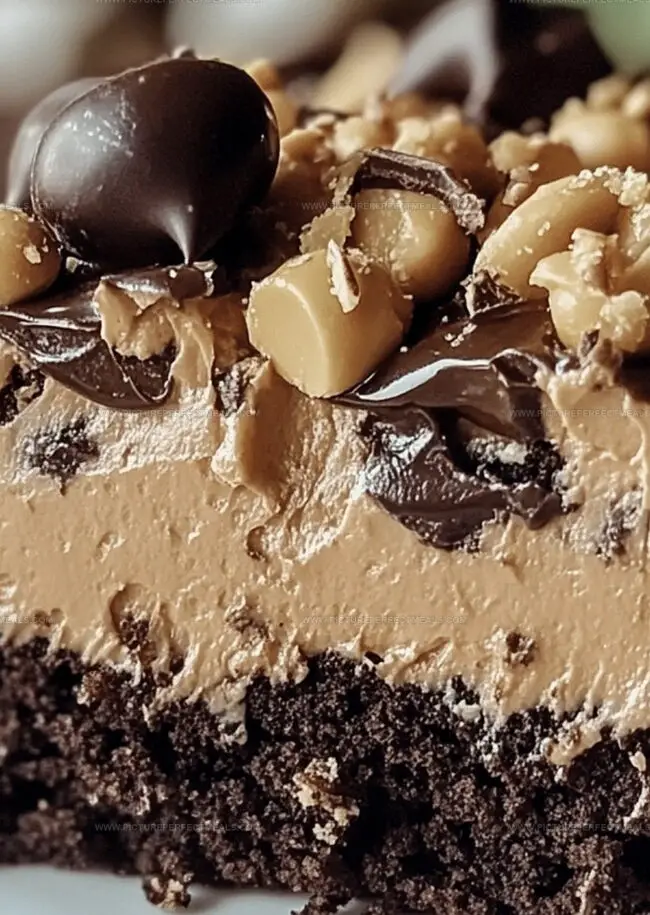
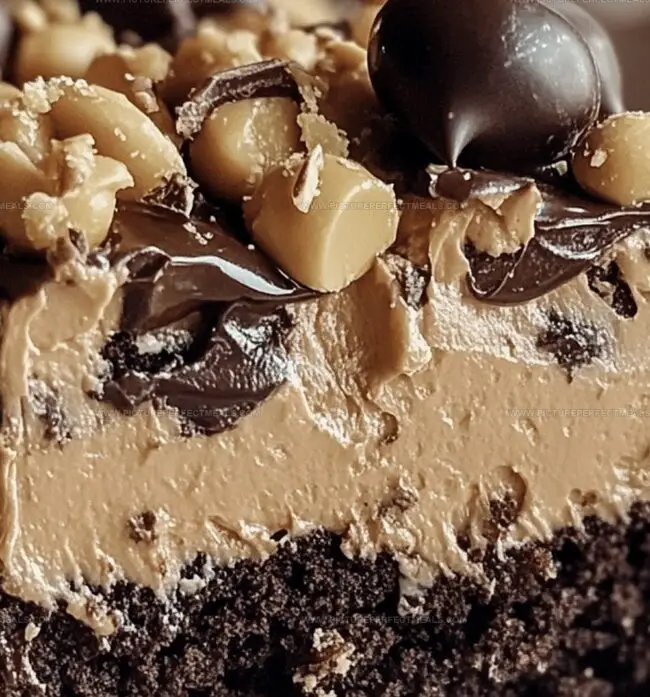
Scatter chocolate chips and chopped peanut butter candies over the top for extra crunch and visual appeal.
Refrigerate the cake for at least an hour to let the flavors dance together. Slice and savor each decadent bite.
Boost the Flavor in Poke Cake
Serving Tips for Chocolate Peanut Butter Cake
Keep That Poke Cake Tasting Fresh
Print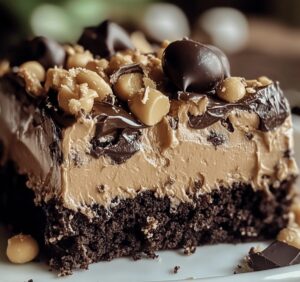
Gooey Chocolate Peanut Butter Poke Cake Recipe
- Total Time: 45 minutes
- Yield: 13 1x
Description
Indulgent chocolate peanut butter poke cake promises a delightful dessert adventure for sweet enthusiasts. Rich layers of chocolate cake infused with creamy peanut butter create a mouthwatering experience you won’t soon forget.
Ingredients
- 1 box (425 g) chocolate cake mix
- 1 cup (250 ml) creamy peanut butter
- 1 can (14 oz / 397 g) sweetened condensed milk
- eggs (as specified on cake mix box)
- oil (as specified on cake mix box)
- water (as specified on cake mix box)
- 1 container (8 oz / 225 g) whipped topping, thawed
- ½ cup (50 g) mini chocolate chips
- ½ cup (75 g) chopped Reeses peanut butter cups
Instructions
- Cake Preparation: Preheat oven and craft chocolate cake in a 9×13-inch baking pan according to package guidelines, ensuring a rich, moist foundation.
- Perforation Process: While cake remains warm, systematically puncture the surface using a wooden spoon handle or straw, creating uniform channels for flavor infusion.
- Filling Creation: Whisk sweetened condensed milk with molten peanut butter until achieving a smooth, homogeneous liquid that will penetrate the cake’s interior.
- Moisture Infiltration: Methodically pour the peanut butter-condensed milk mixture across the cake, guaranteeing each carefully crafted hole receives comprehensive coverage.
- Cooling and Setting: Allow the cake to cool completely, enabling the filling to set and permeate every chocolate crevice, intensifying the dessert’s depth of flavor.
- Topping Application: Generously spread whipped topping across the cake’s surface, creating a light, ethereal layer that complements the rich underlying flavors.
- Decorative Finale: Sprinkle miniature chocolate chips, delicate chocolate shavings, and chopped Reeses peanut butter cups strategically, adding visual and textural complexity.
- Chilling Phase: Refrigerate the assembled dessert for at least one hour, allowing flavors to meld and intensify before serving these decadent, chilled slices.
Notes
- Ensure Cake Moisture: Pierce cake while warm to create deep channels, allowing maximum peanut butter mixture absorption for rich, moist texture.
- Temperature Control: Cool cake completely before adding whipped topping to prevent melting and maintain structural integrity of the dessert.
- Customize Sweetness: Adjust condensed milk and peanut butter ratio to control overall sweetness level, catering to different taste preferences.
- Gluten-Free Adaptation: Substitute chocolate cake mix with gluten-free alternative and verify all ingredients are certified gluten-free for dietary restrictions.
- Prep Time: 15 minutes
- Cook Time: 25-30 minutes
- Category: Desserts
- Method: Baking
- Cuisine: American
Nutrition
- Serving Size: 13
- Calories: 450
- Sugar: 36 g
- Sodium: 300 mg
- Fat: 22 g
- Saturated Fat: 9 g
- Unsaturated Fat: 10 g
- Trans Fat: 0 g
- Carbohydrates: 53 g
- Fiber: 2 g
- Protein: 7 g
- Cholesterol: 35 mg
Jenna Hartley
Founder & Recipe Creator
Expertise
Education
Box Hill Institute, Melbourne
William Angliss Institute, Melbourne
Jenna is the heart of Picture Perfect Meals, turning simple ingredients into beautiful, easy‑to‑make dishes.
Growing up around family meals in Melbourne, she trained at Box Hill Institute and then perfected her pastry skills at William Angliss Institute. She loves mixing classic Australian flavors with fresh ideas to keep cooking fun and stress‑free.