Cozy Homemade Eggnog Recipe for Holiday Cheer
Creamy, rich homemade eggnog captures the essence of holiday cheer like nothing else.
Winter celebrations buzz with anticipation when this classic drink appears.
Smooth and velvety, the recipe brings warmth to cold evenings.
Classic ingredients dance together, creating a nostalgic blend that whispers memories of festive gatherings.
Nutmeg and cinnamon weave magic through each delightful sip.
Mixing this traditional beverage feels like unwrapping a cherished gift from generations past.
You’ll want to savor every delicious moment of this comforting seasonal treat.
Homemade Eggnog Everyone Wants Seconds Of
Everything You Need for Creamy Eggnog
Base Ingredients:Dairy Components:Spice and Flavor Enhancers:Optional Alcoholic Component:Egg White Component:Whip Up Homemade Eggnog in No Time
Step 1: Whisk Egg Yolks
Grab a large mixing bowl and combine egg yolks with sugar. Whisk vigorously until the mixture transforms into a silky, pale yellow creation that looks smooth and inviting.
Step 2: Warm Dairy Magic
Pour whole milk and heavy cream into a saucepan. Add:Heat the mixture gently over medium temperature, stirring occasionally. Watch carefully to prevent scorching.
Step 3: Gentle Egg Tempering
Carefully stream about half a cup of warm milk mixture into egg yolks while whisking continuously. This prevents egg scrambling and ensures a velvety texture. Slowly return the tempered egg mixture back into the saucepan.
Step 4: Slow Cooking Technique
Return saucepan to stove and cook on low-medium heat. Stir constantly until the liquid thickens like heavy cream. This process takes around 5-7 minutes. Patience is key to avoiding curdling.
Step 5: Alcohol Optional Boost
After removing from heat, let the mixture cool to room temperature. For an adult version, stir in rum or bourbon at this point.
Step 6: Fluffy Egg White Clouds
In a separate bowl, beat egg whites with a pinch of salt until soft peaks form. Gently fold these airy whites into the cooled eggnog, creating a light and luxurious texture.
Step 7: Chill and Celebrate
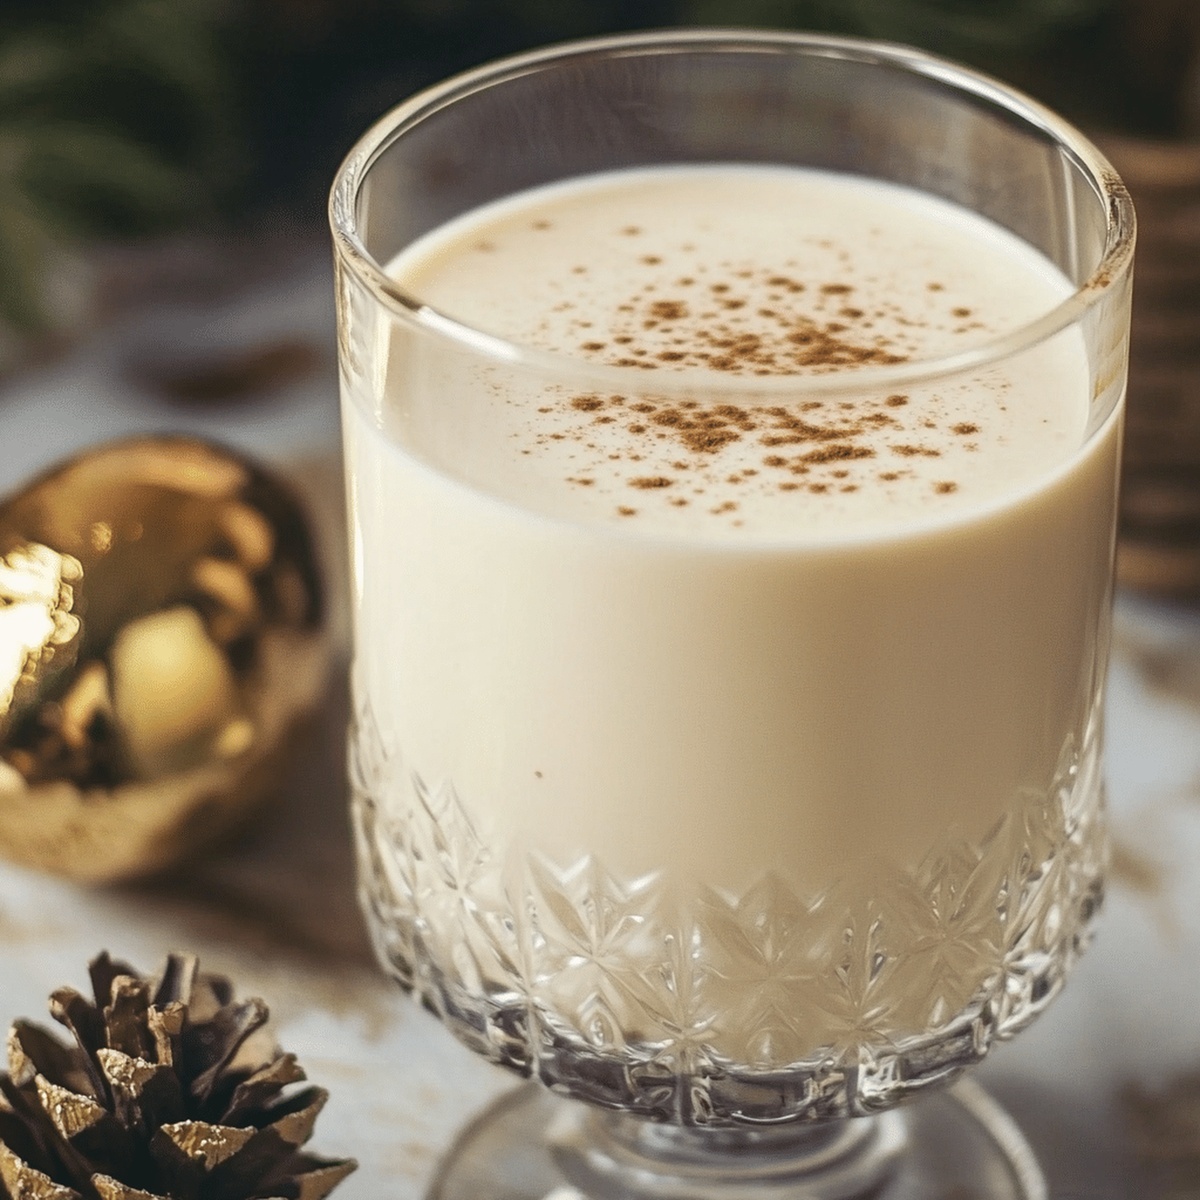
Refrigerate the eggnog for 2-3 hours to let flavors mingle. Serve in festive glasses and sprinkle extra nutmeg or add a cinnamon stick for a gorgeous presentation.
Smart Moves for Eggnog Prep
Store and Chill Homemade Eggnog Correctly
Pair Homemade Eggnog with These Treats
Homemade Eggnog Flavor Upgrades
Print
Homemade Eggnog Recipe
- Total Time: 2 hours 20 minutes
- Yield: 6 to 8 1x
Description
Creamy holiday “Grandma’s Classic Eggnog” whisks together nostalgic family flavors with rich, smooth dairy goodness. Seasonal spices and smooth bourbon create a comforting blend perfect for winter celebrations you’ll cherish.
Ingredients
Dairy and Egg Base:
- 6 large egg yolks
- 2 cups (480 milliliters) whole milk
- 1 cup (240 milliliters) heavy cream
- ¾ cup (150 grams) granulated sugar
Spices and Flavoring:
- 1 teaspoon vanilla extract
- ½ teaspoon ground nutmeg (plus more for garnish)
- ½ teaspoon ground cinnamon
Optional Alcohol:
- ½ cup (120 milliliters) bourbon, rum, or brandy
Garnish:
- Whipped cream
- Ground nutmeg or cinnamon sticks
Instructions
- Whisk egg yolks and sugar in a large mixing bowl until the mixture transforms into a smooth, pale yellow consistency, creating a silky base for the eggnog.
- Gently heat whole milk, heavy cream, vanilla extract, ground nutmeg, and ground cinnamon in a saucepan over medium heat, stirring occasionally to prevent scorching and allow the spices to infuse.
- Create a delicate temperature bridge by slowly introducing approximately half a cup of warm milk mixture into the egg yolk blend, whisking vigorously to prevent curdling.
- Pour the tempered egg mixture back into the saucepan, continuing to whisk while maintaining a steady medium-low heat until the liquid thickens to a luxurious, cream-like consistency.
- Remove the saucepan from heat and allow the mixture to cool to room temperature, creating a smooth foundation for potential alcohol additions.
- Incorporate rum or bourbon into the cooled eggnog for those desiring an adult version, stirring to distribute the spirit evenly.
- Separately whip egg whites with a pinch of salt until soft peaks emerge, transforming the mixture into a light, airy texture.
- Delicately fold the whipped egg whites into the cooled eggnog, creating a voluminous and smooth final product.
- Refrigerate the eggnog for a minimum of two to three hours, enabling the flavors to harmonize and develop a rich, complex profile.
- Serve the chilled eggnog in festive glasses, garnishing with an additional sprinkle of ground nutmeg or an elegant cinnamon stick for a traditional holiday presentation.
Notes
- Temper eggs carefully by slowly adding hot milk to prevent scrambling, ensuring a smooth, silky texture without unwanted egg chunks.
- Adjust alcohol content based on preference, using rum, bourbon, or brandy for traditional flavor, or omit entirely for a non-alcoholic version.
- Whip egg whites separately and fold gently to create a lighter, airier eggnog with beautiful volume and delicate consistency.
- Store in an airtight container for up to 3-4 days, allowing flavors to develop and intensify while maintaining food safety standards.
- Prep Time: 20 minutes
- Cook Time: 2 hours
- Category: Drinks, Cocktails
- Method: Simmering
- Cuisine: American
Nutrition
- Serving Size: 6 to 8
- Calories: 280
- Sugar: 21 g
- Sodium: 65 mg
- Fat: 19 g
- Saturated Fat: 11 g
- Unsaturated Fat: 8 g
- Trans Fat: 0 g
- Carbohydrates: 23 g
- Fiber: 0 g
- Protein: 6 g
- Cholesterol: 185 mg
Daves Miller
Contributing Chef & Culinary Educator
Expertise
Education
Sullivan University, Louisville, Kentucky
White Mountains Community College, Berlin, New Hampshire
Daves is the friendly face guiding you through flavorful, fuss-free recipes at Picture Perfect Meals.
He studied culinary arts at Sullivan University and embraced Baking and Pastry Arts at White Mountains Community College. Daves specializes in comforting meals with vibrant flavors, highlighting fresh, seasonal ingredients.