
Bake Joy: Irresistible Jam Cookies Recipe for Sweet Smiles
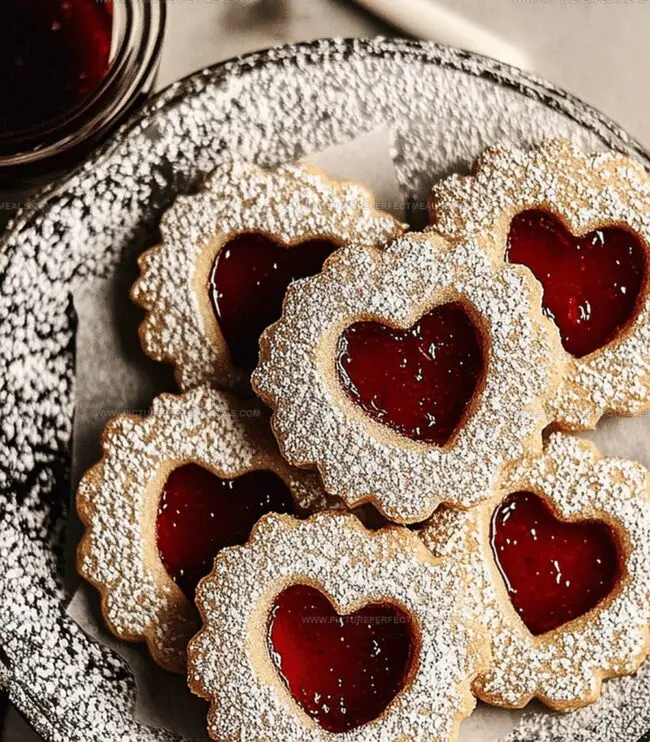
Soft, buttery cookies studded with vibrant jam create a delightful treat that sparks joy in every bite.
These jam-filled cookies bring a burst of sweetness to your favorite afternoon snack.
Baking these delectable morsels fills the kitchen with a warm, inviting aroma that draws everyone closer.
The simple yet elegant recipe combines basic pantry ingredients into something truly magical.
Each cookie offers a perfect balance of tender crumb and fruity jam center.
Crumbly, melt-in-your-mouth texture meets bright, colorful jam for a dessert that will have everyone asking for seconds.
Prepare to delight your taste buds with these irresistible cookies that promise pure baking bliss.
Jam Cookie Ingredient Lineup
For Base Ingredients:For Dry Ingredients:For Filling and Topping:Tools You’ll Use for Jam Cookies
Bake the Best Jam Cookies at Home
Grab your mixing bowl and blend butter with sugar until it becomes super fluffy and clouds of sweetness emerge.
Splash in egg yolk and vanilla, stirring until everything looks smooth and inviting.
Gently fold flour and salt into your buttery mixture, stirring until a soft, tender dough forms.
Wrap your dough in plastic and let it rest in the refrigerator for half an hour, allowing flavors to mingle.
Heat your oven to 350F and line baking sheets with parchment paper.
Roll dough into small spheres, optional: roll in chopped nuts for extra crunch.
Place cookie balls on baking sheets, press a gentle dent in each center using your thumb.
Fill each cookie’s center with a dollop of your favorite jam, being careful not to overflow.
Slide cookies into the oven, baking 12-15 minutes until edges turn golden brown.
Let cookies rest on baking sheets briefly, then transfer to a cooling rack. Dust with powdered sugar if desired.
Keep cookies in an airtight container, ready to delight for up to 5 days.
Smart Tips for Jam Cookie Flavor
How to Share and Serve Jam Cookies
Save and Store Jam Cookies the Right Way
Quick Recipe Overview

Prep Time: 15 minutes
Cook Time: 30 minutes
Total Time: 45 minutes
Calories: 120 kcal
Servings: 24
Print
Irresistible Jam Cookies
- Total Time: 45 minutes
- Yield: 25 1x
Description
Classic jam thumbprint cookies combine buttery shortbread with sweet raspberry preserves for a delightful treat. German bakers perfected these delicate cookies, offering a perfect balance of rich pastry and fruity filling that you’ll savor with afternoon tea.
Ingredients
- 1 cup unsalted butter, softened (226 g)
- ⅔ cup granulated sugar
- 2 ¼ cups all-purpose flour
- ½ cup fruit jam or preserves (e.g., raspberry, strawberry, apricot) (118 ml)
- 1 large egg yolk
- ¼ tsp salt
- 1 tsp vanilla extract
- Powdered sugar for dusting
- Finely chopped nuts for rolling
Instructions
- Creaming: Whip softened butter and sugar in a large mixing bowl until light, fluffy, and pale, creating a smooth base for the cookies.
- Enriching: Blend egg yolk and vanilla extract into the butter mixture, ensuring complete and even incorporation of flavors.
- Dry Mixture: Sift flour and salt together in a separate bowl, creating a uniform dry ingredient blend.
- Dough Formation: Delicately fold dry ingredients into the butter mixture, mixing until a tender, cohesive dough develops.
- Chilling: Wrap dough in plastic and refrigerate for 30 minutes, allowing ingredients to set and flavors to meld.
- Preparation: Preheat oven to 350F (175C) and line baking sheets with parchment paper.
- Shaping: Roll dough into 1-inch balls, optionally coating with finely chopped nuts for added texture and crunch.
- Positioning: Place dough spheres on prepared baking sheets, leaving ample space between each cookie.
- Forming Wells: Create a gentle indentation in the center of each dough ball using a thumb or small spoon.
- Filling: Carefully spoon jam into the center of each cookie, ensuring precise and neat placement.
- Baking: Bake in the preheated oven for 12-15 minutes until edges turn a delicate golden brown.
- Cooling: Rest cookies on the baking sheet for 5 minutes, then transfer to a wire rack to cool completely.
- Finishing: Optionally dust with a light sprinkle of powdered sugar for an elegant presentation.
- Storage: Keep cookies in an airtight container at room temperature, maintaining freshness for up to 5 days.
Notes
- Chill the Dough: Refrigeration helps prevent spreading and maintains the cookie’s shape, creating a more compact and refined texture.
- Control Jam Quantity: Use a small spoon or piping bag to add just enough jam, preventing overflow and ensuring a neat, professional appearance.
- Create Uniform Cookies: Use a cookie scoop or weigh dough portions to guarantee consistent size and even baking across the entire batch.
- Experiment with Jam Varieties: Explore different fruit preserves like raspberry, apricot, or mixed berry to add unique flavor profiles and personalize the recipe.
- Prep Time: 15 minutes
- Cook Time: 30 minutes
- Category: Desserts, Snacks
- Method: Baking
- Cuisine: American
Nutrition
- Serving Size: 25
- Calories: 150
- Sugar: 7 g
- Sodium: 50 mg
- Fat: 8 g
- Saturated Fat: 5 g
- Unsaturated Fat: 2 g
- Trans Fat: 0 g
- Carbohydrates: 19 g
- Fiber: 0.5 g
- Protein: 1.5 g
- Cholesterol: 20 mg
Jenna Hartley
Founder & Recipe Creator
Expertise
Education
Box Hill Institute, Melbourne
William Angliss Institute, Melbourne
Jenna is the heart of Picture Perfect Meals, turning simple ingredients into beautiful, easy‑to‑make dishes.
Growing up around family meals in Melbourne, she trained at Box Hill Institute and then perfected her pastry skills at William Angliss Institute. She loves mixing classic Australian flavors with fresh ideas to keep cooking fun and stress‑free.