Loaded Taco-Stuffed Cheesy Pockets Recipe

Quick Loaded Taco-Stuffed Cheesy Pockets Recipe for Taco Night!

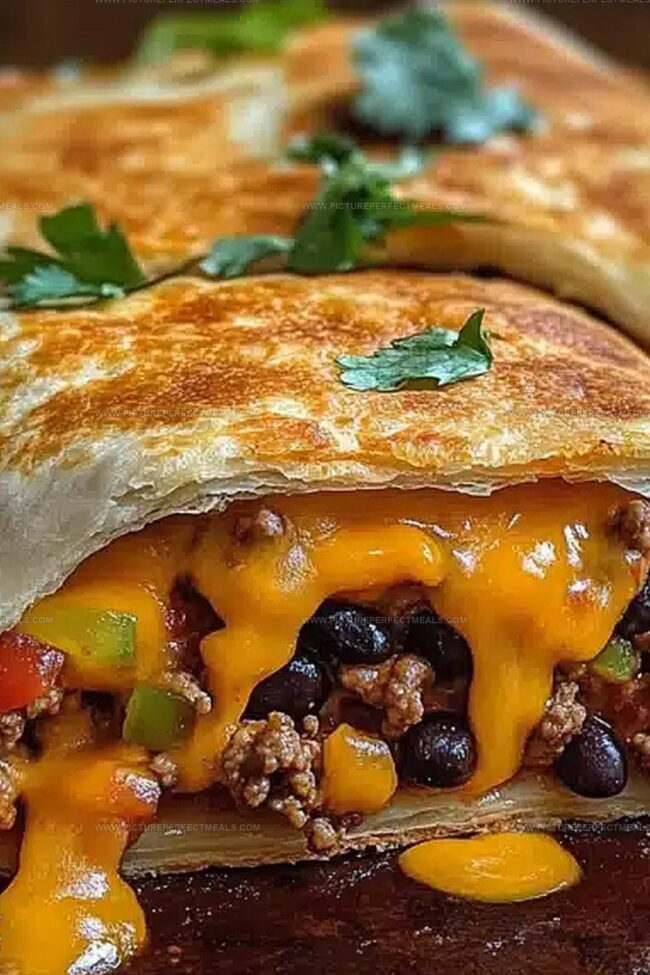
Crispy, golden taco-stuffed cheesy pockets promise a delightful twist on classic Mexican-inspired comfort food.

Each bite bursts with zesty flavors that dance across your palate.

Melted cheese mingles with seasoned ground beef, creating a mouthwatering symphony of textures.

Homemade pockets offer a personalized touch that beats any store-bought alternative.

Bold spices and gooey cheese blend seamlessly inside a perfectly crisp exterior.

Stuffed with vibrant ingredients, these pockets transform a simple meal into an exciting culinary adventure.

Grab a napkin and dive into this irresistible recipe that will make your taste buds sing with joy.

Loaded Taco-Stuffed Cheesy Pockets That Hit the Spot

  • Packed with familiar taco ingredients kids love, these cheesy pockets transform a traditional meal into an exciting handheld treat that sparks mealtime joy.
  • Perfect for game days, potlucks, or casual gatherings, these portable pockets satisfy different taste preferences and work brilliantly as appetizers or main dishes.
  • Easily swap ingredients like ground turkey, add extra veggies, or adjust spice levels to match your family's unique flavor preferences and dietary needs.

Ingredients That Make Taco-Stuffed Cheesy Pockets Satisfying

Main Protein:
  • Ground Beef: Rich and flavorful base for the taco filling, provides hearty protein.
  • Black Beans: Adds extra protein and creates a more substantial filling.
  • Corn: Brings sweet texture and additional nutrition to the taco mixture.
Dough and Cheese:
  • Pizza Dough, Crescent Roll Dough: Versatile base for creating crispy pockets, can be easily rolled and shaped.
  • Shredded Cheddar Cheese: Melts beautifully and adds sharp, tangy flavor to the filling.
Seasoning and Extras:
  • Taco Seasoning: Provides authentic Mexican-inspired flavor profile to the beef mixture.
  • Water: Helps blend taco seasoning and moisten the meat mixture.
  • Sour Cream: Optional cool and creamy topping for serving.
  • Salsa: Optional zesty condiment for additional flavor when serving.

How to Bake Loaded Taco-Stuffed Cheesy Pockets Step-by-Step

Step 1: Fire Up the Oven

Turn the oven to 375F (190C). A hot oven ensures perfectly crispy pockets that’ll make mouths water.

Step 2: Brown the Meat Magic

In a sizzling skillet over medium heat, cook ground beef until it transforms into a delicious brown treasure. Drain away excess fat, then sprinkle in:
  • Taco seasoning
  • Water splash
  • Black beans
  • Corn

Stir and cook until everything’s heated and dancing together.

Step 3: Stretch the Dough

Grab your pizza or crescent roll dough. Dust a clean surface with flour and roll it out. Slice the dough into squares or circles- your tasty canvas awaits!

Step 4: Create Flavor Pouches

Scoop a generous spoonful of taco mixture right in the center of each dough piece. Shower with:
  • Shredded cheddar cheese

Fold the dough over, hugging the filling tightly. Pinch or crimp edges to seal in all the goodness.

Step 5: Bake to Golden Perfection

Place these flavor packets on a parchment-lined baking sheet. Slide into the oven and bake for 12-15 minutes until they turn a beautiful golden brown.

Step 6: Dive Into Deliciousness

Let the pockets cool just a bit. Serve with:
  • Sour cream
  • Salsa

Prepare for a taste explosion!

Pro Tips for Loaded Taco-Stuffed Cheesy Pockets Perfection

  • Customize Taco Filling: Mix ground beef with ground turkey or plant-based crumbles for healthier protein options that keep the zesty flavor intact.
  • Seal Pockets Perfectly: Press edges firmly with a fork or crimp carefully to prevent filling from leaking during baking, ensuring a neat and tidy final result.
  • Boost Flavor Variety: Experiment with different cheese types like pepper jack, monterey jack, or queso fresco to add unique taste dimensions to your taco pockets.
  • Make Ahead Magic: Prepare these pockets in advance and freeze unbaked- simply add 5-7 extra minutes to cooking time when baking directly from frozen for a quick meal.
  • Spice It Up: Sprinkle everything bagel seasoning or taco seasoning on top of pockets before baking to create an extra crunchy, flavor-packed exterior that elevates the entire dish.

How to Reheat Taco-Stuffed Cheesy Pockets Without Losing the Crunch

  • Store leftover taco pockets in an airtight container for up to 3-4 days in the refrigerator, keeping them fresh and tasty.
  • Wrap individual pockets tightly in plastic wrap or aluminum foil, then place in a freezer bag. Freeze for up to 2 months for quick future meals.
  • Warm refrigerated or thawed pockets at 350F for 10-12 minutes, ensuring they're heated through and regain their crispy exterior.
  • Reheat chilled pockets for 30-45 seconds, but note they might lose some crispness compared to oven reheating.

Sides That Pair Perfectly with Taco-Stuffed Cheesy Pockets

  • Blend tangy lime, tequila, and a hint of salt to complement the rich, spicy taco filling. The cocktail's brightness cuts through the cheese's richness.
  • Chop ripe tomatoes, onions, cilantro, and jalapeños for a vibrant, refreshing salsa that adds crisp texture and balances the pocket's heaviness.
  • Whisk together sour cream, chopped chives, and a dash of lime juice for a creamy, tangy sauce that enhances the taco pocket's flavor profile.
  • Select a crisp, light lager like Corona or Modelo to wash down the cheesy, spicy pockets with a clean, refreshing finish.

Flavor Fillings to Upgrade Taco-Stuffed Cheesy Pockets

  • Gluten-Free Version: Replace pizza dough with gluten-free crescent roll dough or homemade gluten-free pastry. Use corn tortillas as an alternative wrapper for a naturally gluten-free option.
  • Vegetarian Swap: Substitute ground beef with plant-based crumbles, black beans, or diced mushrooms. Add extra spices like cumin and chili powder to boost flavor intensity.
  • Dairy-Free Alternative: Use dairy-free cheese shreds made from cashew or almond base. Replace regular sour cream with coconut yogurt or dairy-free sour cream alternative.
  • Protein-Packed Edition: Incorporate quinoa with ground turkey or chicken for a leaner protein option. Add extra black beans or lentils to increase nutritional value and create a more filling pocket.
Print
clock clock iconcutlery cutlery iconflag flag iconfolder folder iconinstagram instagram iconpinterest pinterest iconfacebook facebook iconprint print iconsquares squares iconheart heart iconheart solid heart solid icon
Loaded Taco-Stuffed Cheesy Pockets Recipe

Loaded Taco-Stuffed Cheesy Pockets Recipe


5 Stars 4 Stars 3 Stars 2 Stars 1 Star

4.9 from 32 reviews

  • Total Time: 35 minutes
  • Yield: 12 1x

Description

Savory loaded taco-stuffed cheesy pockets bring Mexican-inspired comfort straight to your kitchen. Melted cheese, seasoned meat, and crispy edges create an irresistible handheld meal that satisfies hearty appetites with bold flavors.


Ingredients

Scale

Main Ingredients:

  • 1 pound (450g) ground beef
  • 12 small (6-inch) flour tortillas
  • 1 cup shredded cheddar cheese
  • 8 ounces (225g) cream cheese, softened

Seasoning and Flavor Enhancers:

  • 1 packet taco seasoning mix
  • ½ cup salsa

Finishing Ingredients:

  • 2 tablespoons melted butter

Instructions

  1. Warm the oven to 375F (190C), creating an ideal environment for crispy, golden-brown taco pockets.
  2. In a sizzling skillet, brown the ground beef over medium heat, eliminating excess fat. Infuse the meat with zesty taco seasoning and a hint of water, then gently fold in black beans and corn until thoroughly heated.
  3. Transform the pizza or crescent dough into a flat canvas on a lightly dusted surface. Slice the dough into uniform squares or circular shapes, preparing the foundation for the savory filling.
  4. Carefully position a generous spoonful of the seasoned beef mixture at the center of each dough piece. Lavishly sprinkle sharp cheddar cheese over the filling, creating a molten core.
  5. Artfully fold the dough, embracing the filling and sealing the edges with precise pinches or delicate fork crimps, ensuring no delectable contents escape during baking.
  6. Arrange the pockets on a parchment-lined baking sheet, allowing each pocket ample space. Slide into the preheated oven and bake until the exterior turns a beautiful golden hue and achieves a crisp texture.
  7. Allow the pockets to rest momentarily after removing from the oven. Serve alongside cooling sour cream and vibrant salsa, inviting guests to customize their culinary experience.

Notes

  • Swap ground beef with lean turkey or plant-based crumbles for a healthier protein option that still packs incredible flavor.
  • Create a gluten-free version by using cauliflower dough or gluten-free crescent roll alternatives to accommodate dietary restrictions.
  • Customize heat levels by adjusting taco seasoning intensity or adding diced jalapeños for spice lovers who want an extra kick.
  • Prep these pockets ahead of time and freeze uncooked for quick weeknight meals – simply add 3-5 extra minutes to baking time when cooking from frozen state.
  • Prep Time: 20 minutes
  • Cook Time: 15 minutes
  • Category: Lunch, Dinner, Snacks
  • Method: Baking
  • Cuisine: Mexican

Nutrition

  • Serving Size: 12
  • Calories: 288
  • Sugar: 2g
  • Sodium: 560mg
  • Fat: 18g
  • Saturated Fat: 9g
  • Unsaturated Fat: 6g
  • Trans Fat: 0g
  • Carbohydrates: 20g
  • Fiber: 1g
  • Protein: 12g
  • Cholesterol: 50mg
Daves Miller

Daves Miller

Contributing Chef & Culinary Educator

Expertise

  • American Southern cuisine with a modern twist.
  • Instruction in culinary fundamentals and advanced techniques.
  • Development of recipes that highlight seasonal and local produce.​
  • Mastery of artisanal bread and pastry techniques, from laminated doughs to decorative sugar artistry.

Education

Sullivan University, Louisville, Kentucky

  • Degree: Associate of Science Degree in Culinary Arts
  • Focus: Specialized in cooking techniques and culinary sciences, hands‑on externships, professional kitchen lab training, and career preparation for restaurants, entrepreneurship, and global culinary opportunities.

White Mountains Community College, Berlin, New Hampshire

  • Program: Baking and Pastry Arts degree
  • Focus: Specialized in comprehensive baking and pastry arts, including bread making, artisan breads, cake decorating and design, chocolates, confections, and decorative centerpieces; product development and baking theory; and career preparation for baker and pastry chef roles in many places.

Daves is the friendly face guiding you through flavorful, fuss-free recipes at Picture Perfect Meals. 

He studied culinary arts at Sullivan University and embraced Baking and Pastry Arts at White Mountains Community College. Daves specializes in comforting meals with vibrant flavors, highlighting fresh, seasonal ingredients.

Leave a Reply

Your email address will not be published. Required fields are marked *

Recipe rating 5 Stars 4 Stars 3 Stars 2 Stars 1 Star