
Dreamy Banana Chocolate Roll Recipe: Sweet Indulgence Awaits!
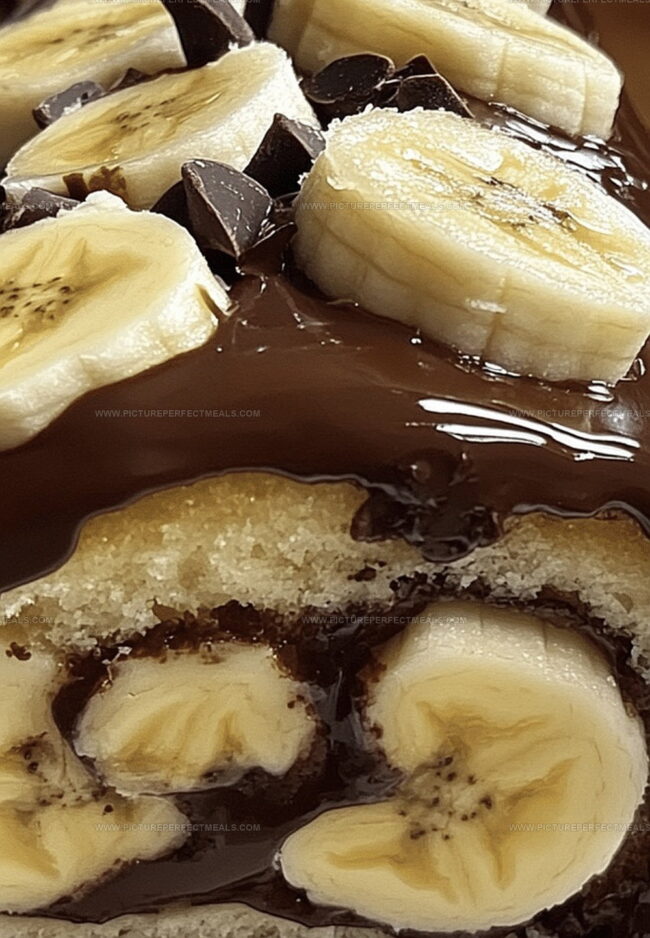
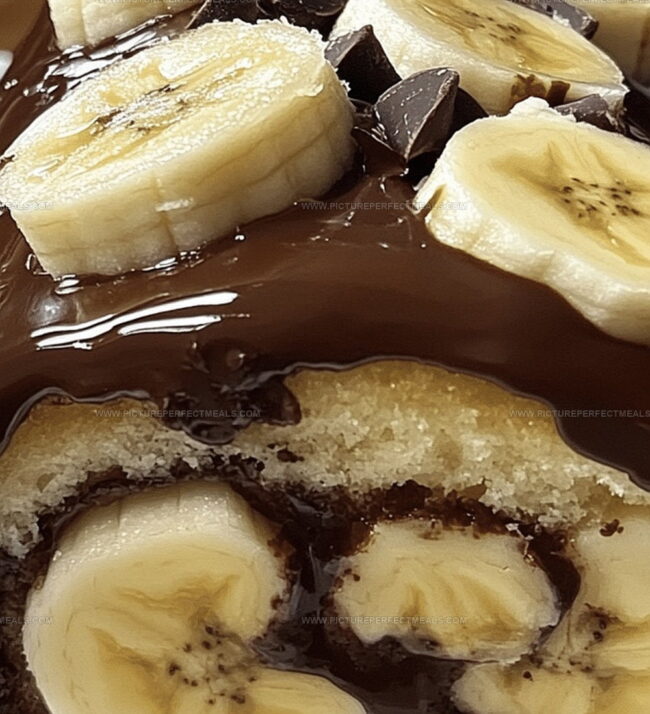
Soft banana bread meets rich chocolate in this mouthwatering banana chocolate dream roll that will transport you straight to dessert heaven.
Decadent swirls of chocolate dance through tender banana-infused layers, creating a sublime treat.
Each slice promises a perfect balance of sweet fruit and smooth cocoa.
The roll combines classic comfort with elegant sophistication.
Bakers of all skill levels can master this impressive dessert with simple techniques.
Surprising and delightful, this roll turns an ordinary afternoon into a gourmet experience.
Prepare to indulge in a slice of pure culinary bliss.
Quick Recipe Overview
What You’ll Need for a Banana Chocolate Dream Roll
For Cake Base:For Filling:For Chocolate Glaze:Tools to Roll Out a Chocolate Banana Masterpiece
How to Create a Perfect Banana Chocolate Roll
Crank your oven to 350F and grab a jelly roll pan. Line it with parchment paper for smooth cake release.
Mix dry ingredients in one bowl. In another, beat eggs and sugar until they turn pale and fluffy. Gently fold in flour mixture and milk, keeping the batter light and airy.
Pour batter into the pan and spread evenly. Slide into the oven and bake for 10-12 minutes until the cake bounces back when touched.
Whip cream with sugar until peaks form. Fold in mashed bananas for a creamy, fruity surprise.
While cake is warm, dust a towel with cocoa. Carefully roll the cake, then let it cool completely. Unroll and spread banana cream filling generously.
Melt chocolate and cream together until silky. Pour over the rolled cake, letting it cascade down the sides.
Refrigerate for an hour to let everything set. Slice and enjoy your decadent banana chocolate dream roll!
Tips to Make This Roll Unforgettable
Serving the Dream Roll with Extra Wow
Keeping the Banana Roll Fresh and Firm
Print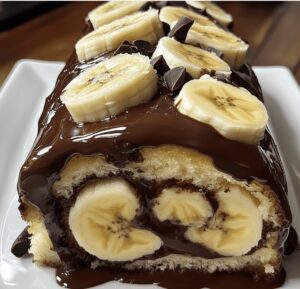
Luscious Banana Chocolate Dream Roll Recipe
- Total Time: 37 minutes
- Yield: 9 1x
Description
Banana chocolate dream roll combines classic dessert flavors into a delightful pastry experience. French-inspired techniques elevate this sweet treat, promising rich chocolate and ripe banana harmony you’ll savor with each delectable bite.
Ingredients
- 4 large eggs
- ¾ cups (180 ml) granulated sugar
- ¾ cups (90 g) all-purpose flour
- ¼ cups (25 g) cocoa powder
- 1 tsp baking powder
- ¼ tsp salt
- ¼ cups (60 ml) milk
- 1 tsp vanilla extract
- 2 ripe bananas, mashed
- 1 cups (240 ml) heavy whipping cream, cold
- ¼ cups (30 g) powdered sugar
- 1 tsp vanilla extract
- ½ cups (85 g) semi-sweet chocolate chips
- ¼ cups (60 ml) heavy cream
Instructions
- Prepare Dry Ingredients: Sift flour, cocoa powder, baking powder, and salt into a mixing bowl, ensuring a uniform blend without lumps.
- Whip Egg Mixture: Vigorously beat eggs and sugar until the mixture becomes pale and voluminous, incorporating vanilla for enhanced flavor complexity.
- Combine Batter: Gently fold dry ingredients into the egg mixture, alternating with milk to maintain a light, airy texture without deflating the batter.
- Bake Cake Base: Pour batter into a parchment-lined jelly roll pan, spreading evenly, and bake at 350F (175C) for 10-12 minutes until the surface springs back when touched.
- Initial Rolling: Immediately transfer the hot cake onto a cocoa-dusted towel, carefully remove parchment, and roll from the short end, allowing it to cool completely in this cylindrical shape.
- Prepare Banana Filling: Whip heavy cream with powdered sugar and vanilla until stiff peaks form, then gently fold in mashed bananas to create a smooth, creamy mixture.
- Assemble Roll: Unroll the cooled cake, spread banana cream evenly, leaving a small border, then re-roll without the towel, positioning seam-side down on a serving plate.
- Finish with Chocolate Glaze: Melt chocolate chips with heavy cream until smooth, then pour over the cake, allowing it to drip elegantly down the sides.
- Chill and Serve: Refrigerate for at least one hour to set the glaze and allow flavors to meld, then slice and serve chilled for a decadent dessert experience.
Notes
- Maintain Cake Elasticity: Immediately roll the warm cake with a towel to prevent cracking and ensure a flexible, smooth texture without breaks.
- Prevent Overmixing: Gently fold dry ingredients into the egg mixture using minimal strokes to preserve the batter’s airiness and prevent dense, tough cake.
- Cream Whipping Precision: Use a chilled bowl and whisk when preparing whipped cream to achieve stable, voluminous peaks that hold their shape perfectly.
- Chocolate Glaze Technique: Melt chocolate slowly and stir consistently to avoid burning, creating a smooth, glossy finish that enhances the dessert’s visual appeal and taste.
- Prep Time: 25 minutes
- Cook Time: 12 minutes
- Category: Desserts, Snacks
- Method: Baking
- Cuisine: American
Nutrition
- Serving Size: 9
- Calories: 260
- Sugar: 18 g
- Sodium: 120 mg
- Fat: 16 g
- Saturated Fat: 10 g
- Unsaturated Fat: 5 g
- Trans Fat: 0 g
- Carbohydrates: 30 g
- Fiber: 1 g
- Protein: 3 g
- Cholesterol: 90 mg
Jenna Hartley
Founder & Recipe Creator
Expertise
Education
Box Hill Institute, Melbourne
William Angliss Institute, Melbourne
Jenna is the heart of Picture Perfect Meals, turning simple ingredients into beautiful, easy‑to‑make dishes.
Growing up around family meals in Melbourne, she trained at Box Hill Institute and then perfected her pastry skills at William Angliss Institute. She loves mixing classic Australian flavors with fresh ideas to keep cooking fun and stress‑free.