
Dreamy No-Bake Butterscotch Pie Recipe: Sweet Bliss Awaits!
Butterscotch magic swirls through this no-bake pie like a creamy dream waiting to happen.
Cool kitchen tricks make dessert preparation feel like child’s play.
Sweet memories of grandmother’s classic recipes inspired this simplified approach.
Rich caramel notes dance across a silky smooth filling that melts in you mouth.
Minimal ingredients mean maximum flavor without complicated steps.
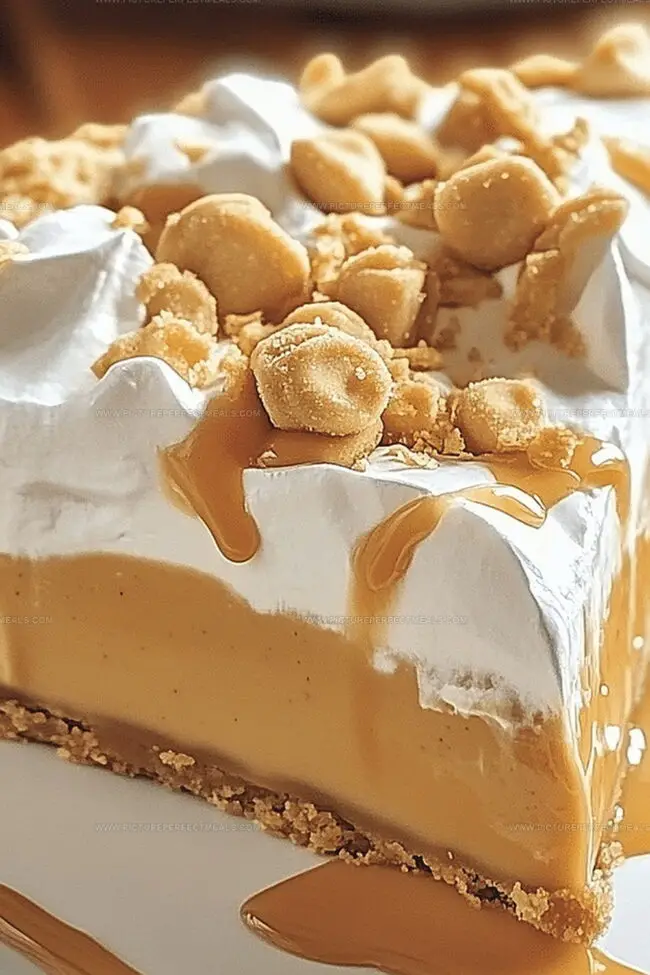
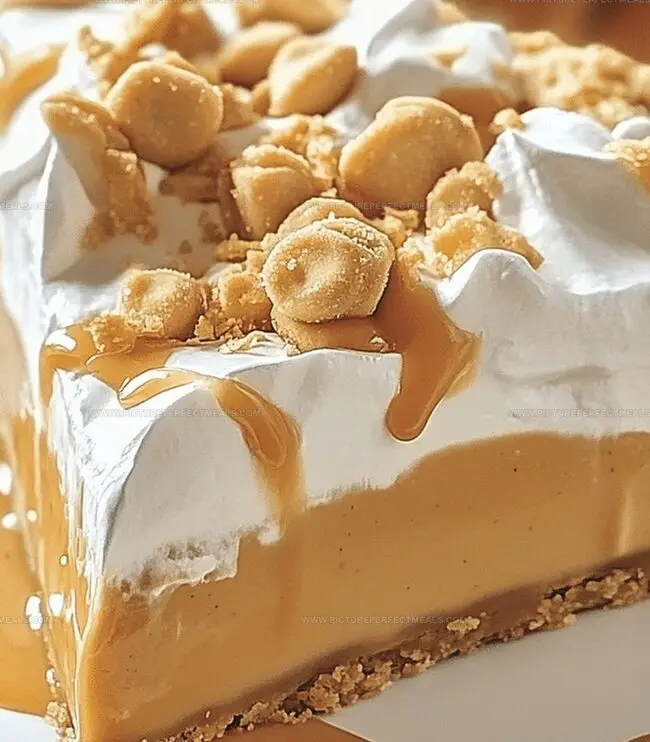
Crisp graham cracker crust provides the perfect foundation for luscious butterscotch goodness.
This delightful treat comes together faster than you can imagine.
Whip up this irresistible pie and watch smiles bloom around the table.
Butterscotch Pie That Requires Zero Baking
Simple Ingredients for Butterscotch Pie Magic
Crust Ingredients:Filling Ingredients:Topping Ingredients:How to Whip Up No-Bake Butterscotch Pie
Step 1: Create Crunchy Cracker Base
Grab graham crackers and crush them into fine crumbs. Mix crumbs with sugar and melted butter until thoroughly blended. Press the mixture firmly into a 9-inch pie pan, ensuring an even layer across bottom and sides. Use fingertips or spoon back to compact the crumbs tightly. Slide the crust into refrigerator for half an hour to firm up.
Step 2: Craft Silky Butterscotch Filling
Combine brown sugar, cornstarch, and salt in a saucepan. Slowly introduce milk while whisking until completely smooth. Heat mixture over medium flame, stirring continuously until thickened and bubbling gently.
Separate egg yolks into a separate bowl. Carefully stream about half cup of hot butterscotch into yolks, whisking rapidly to prevent scrambling. Pour tempered yolk mixture back into saucepan, continuing to whisk. Bring to boil once more and cook for two additional minutes.
Remove from heat and fold in:Stir until butter melts completely and mixture looks glossy. Allow filling to cool for 10-15 minutes.
Step 3: Assemble Dreamy Pie
Pour slightly cooled filling into prepared crust. Smooth surface with spatula until perfectly level. Let pie rest at room temperature briefly before transferring to refrigerator. Chill for minimum four hours or overnight for optimal setting.
Step 4: Crown with Fluffy Topping
Just before serving, blanket pie with generous layer of whipped cream. Sprinkle butterscotch chips on top for extra crunch and sweetness.
Butterscotch Tips to Get It Silky and Smooth
Storage Tips to Keep Pie Fresh Longer
Treats That Go with Butterscotch Pie
Flavor Enhancements for Butterscotch
Print
No-Bake Butterscotch Pie Recipe
- Total Time: 2 hours 50 minutes
- Yield: 8 1x
Description
Silky butterscotch pie delivers creamy indulgence without turning on the oven. Rich caramel notes and smooth custard create a delightful dessert that entices with each luxurious spoonful.
Ingredients
Filling Ingredients:
- 1 package (3.4 ounces / 96 grams) butterscotch instant pudding mix
- 2 cups (480 milliliters) cold whole milk
- ½ cup (120 milliliters) heavy cream, whipped to soft peaks
Topping Ingredients:
- 1 cup (240 milliliters) heavy cream
- 2 tablespoons powdered sugar
- ½ teaspoon vanilla extract
Garnish Ingredients (Optional):
- Butterscotch chips
- Shaved chocolate
Instructions
- Craft a textured foundation by blending graham cracker crumbs with sugar and melted butter until uniformly crumbly.
- Press the mixture firmly into a 9-inch pie pan, creating an even layer that covers the bottom and sides completely. Use fingertips or a spoon to compact the crumbs tightly.
- Refrigerate the crust for approximately 30 minutes to solidify its structure.
- In a saucepan, whisk brown sugar, cornstarch, and salt until thoroughly integrated.
- Slowly incorporate milk, stirring continuously to create a smooth, lump-free mixture.
- Heat the mixture over medium temperature, maintaining constant stirring until it thickens and initiates gentle bubbling, which typically takes 5-7 minutes.
- Separately, whisk egg yolks in a small bowl. Carefully stream about half a cup of hot butterscotch mixture into the yolks, whisking vigorously to prevent curdling.
- Reintroduce the tempered egg mixture back into the saucepan, stirring consistently.
- Return to a boil and continue cooking for an additional two minutes to ensure proper thickening.
- Remove from heat and fold in butter and vanilla extract until the mixture achieves a silky, uniform consistency.
- Allow the filling to cool for 10-15 minutes, maintaining a lukewarm temperature.
- Gently pour the cooled filling into the prepared graham cracker crust, using a spatula to create a smooth, even surface.
- Let the pie rest at room temperature briefly before transferring to the refrigerator.
- Chill for a minimum of 4 hours, preferably overnight, to achieve optimal filling set.
- Prior to serving, embellish with a lavish layer of whipped cream and optional butterscotch chips for enhanced visual appeal and flavor complexity.
Notes
- Ensure graham cracker crumbs are finely ground for a smooth, compact crust that holds together perfectly.
- When tempering eggs, pour hot mixture slowly and whisk continuously to prevent scrambling and create a silky butterscotch filling.
- Chill pie thoroughly to achieve a firm, sliceable texture that won’t fall apart when serving.
- For a gluten-free version, substitute graham cracker crumbs with crushed gluten-free cookies or almond meal.
- Prep Time: 20 minutes
- Cook Time: 2 hours 30 minutes
- Category: Desserts
- Method: Boiling
- Cuisine: American
Nutrition
- Serving Size: 8
- Calories: 340
- Sugar: 22 g
- Sodium: 250 mg
- Fat: 23 g
- Saturated Fat: 14 g
- Unsaturated Fat: 7 g
- Trans Fat: 0 g
- Carbohydrates: 30 g
- Fiber: 0 g
- Protein: 4 g
- Cholesterol: 80 mg
Daves Miller
Contributing Chef & Culinary Educator
Expertise
Education
Sullivan University, Louisville, Kentucky
White Mountains Community College, Berlin, New Hampshire
Daves is the friendly face guiding you through flavorful, fuss-free recipes at Picture Perfect Meals.
He studied culinary arts at Sullivan University and embraced Baking and Pastry Arts at White Mountains Community College. Daves specializes in comforting meals with vibrant flavors, highlighting fresh, seasonal ingredients.