Old Fashioned Chocolate Pie Recipe

Old Fashioned Chocolate Pie Recipe Dreamiest Classic Dessert

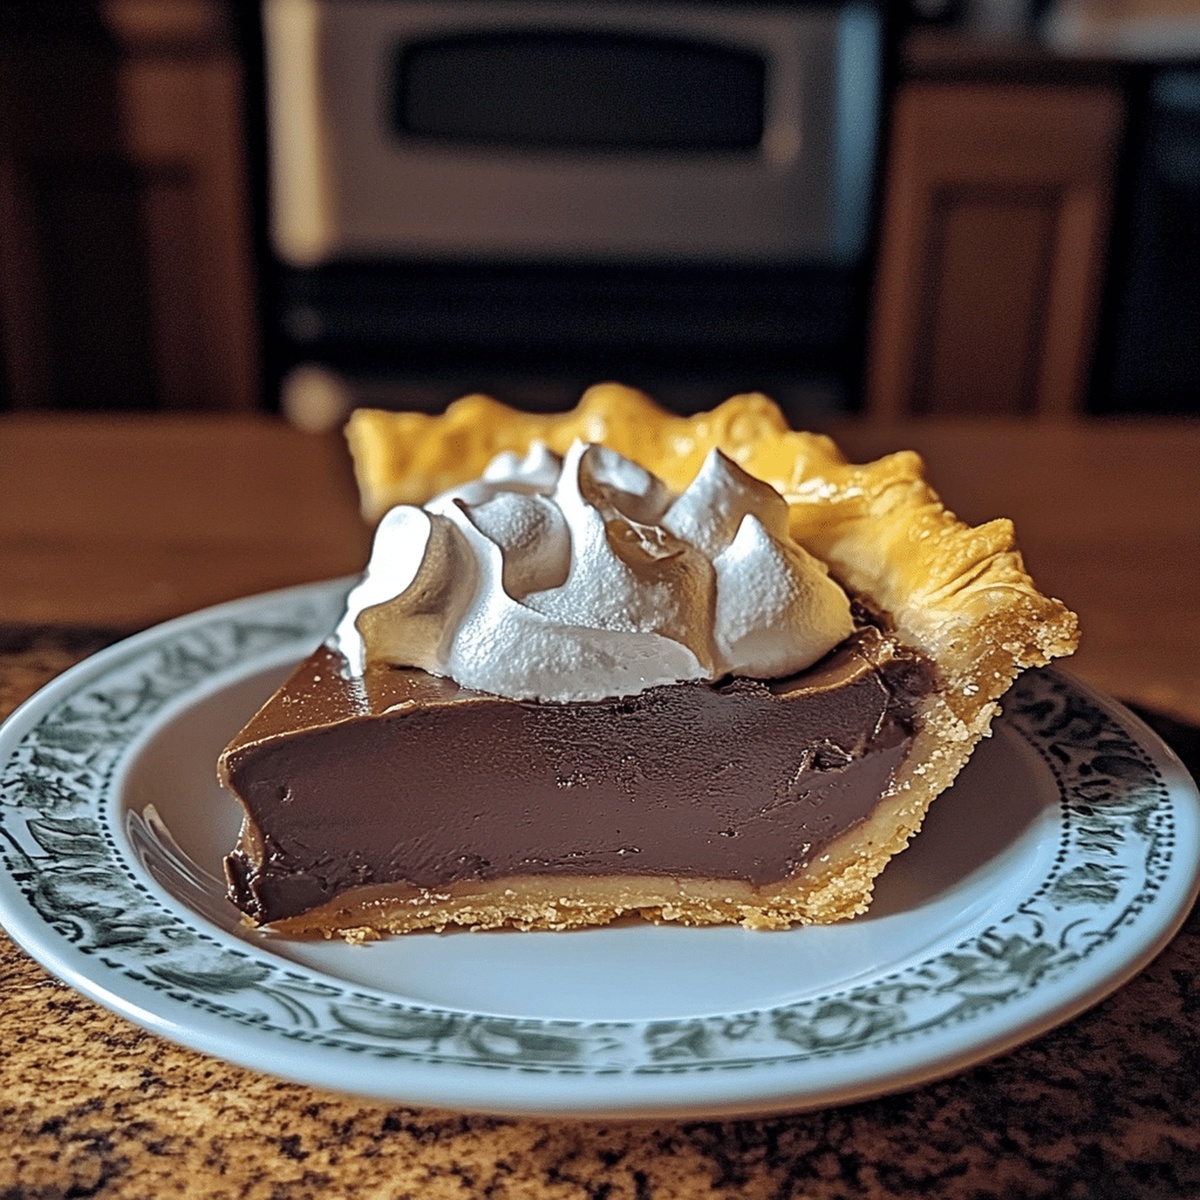
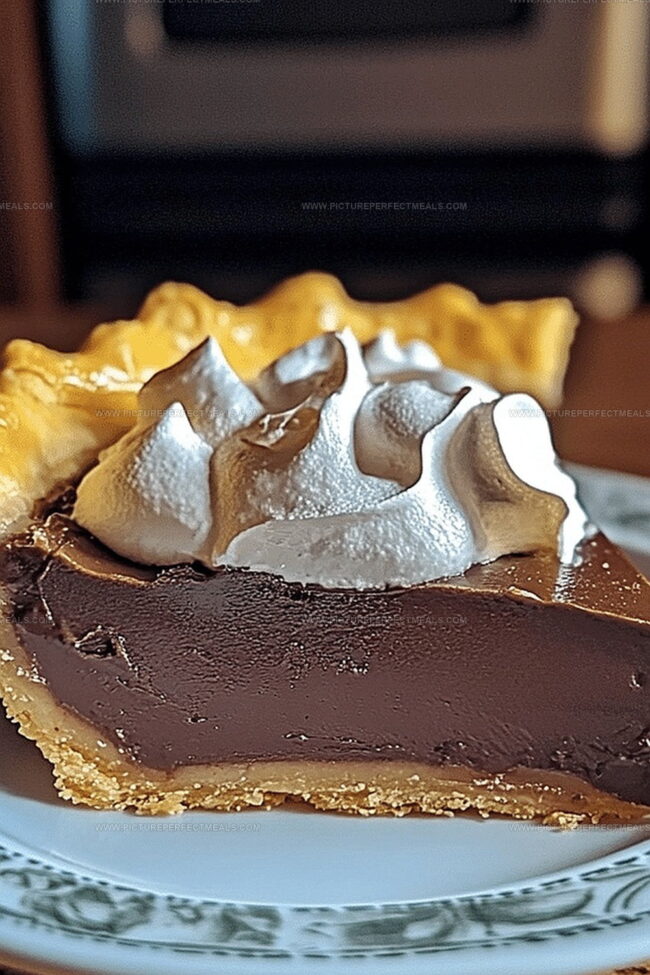
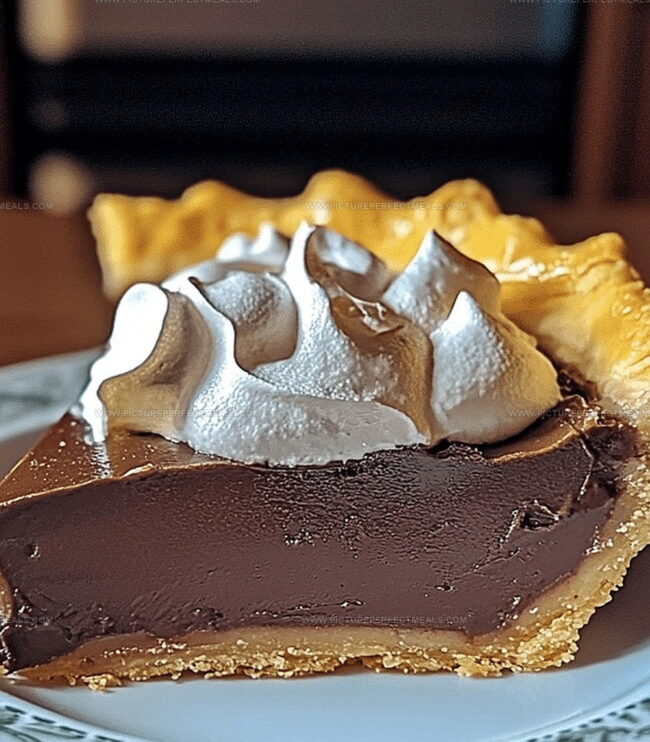
Chocolate lovers have a special place in their hearts for this classic old fashioned chocolate pie that whispers nostalgic comfort.

Memories of grandma’s kitchen drift through each silky slice of this timeless dessert.

Rich cocoa depths blend seamlessly with a buttery, flaky crust that crumbles perfectly on your fork.

Smooth custard layers promise indulgence with every delectable bite you’ll savor.

Some recipes connect us directly to cherished family traditions, and this pie does exactly that.

Delightful and uncomplicated, this dessert brings warmth to any gathering around the table.

Prepare to fall in love with a pie that feels like a sweet culinary hug.

Old-Fashioned Chocolate Pie That Brings Back Memories

  • This recipe offers a straightforward process even novice bakers can master with simple steps and minimal specialized equipment.
  • From start to finish, the pie crust preparation takes less than 30 minutes, making it perfect for busy home cooks seeking delicious desserts.
  • Ideal for family gatherings, potlucks, holiday celebrations, or weekend treat, this chocolate pie suits multiple occasions and pleases all age groups.
  • Delivers nostalgic flavors reminiscent of traditional homemade desserts, bringing warmth and memories to the dining table with its rich chocolate filling and flaky crust.

What You Need to Make This Classic Pie

Pie Crust:
  • Pie Crust, Flour, Butter, Salt: Flaky base that provides a crisp and delicious foundation for the chocolate filling, with a buttery and tender texture.
Chocolate Filling Ingredients:
  • Unsweetened Chocolate: Rich and intense chocolate that gives deep flavor and creates smooth consistency.
  • Granulated Sugar: Sweetens the chocolate filling and balances the bitterness of the unsweetened chocolate.
  • Cornstarch: Thickens the filling, ensuring a perfect pudding-like texture without being runny.
  • Eggs: Provides structure and helps set the custard-like filling.
  • Whole Milk: Creates a creamy base for the chocolate pudding, adding richness and smoothness.
  • Vanilla Extract: Enhances the chocolate flavor and adds a subtle aromatic depth.
Topping Ingredients:
  • Heavy Whipping Cream: Light and fluffy topping that complements the rich chocolate filling.
  • Powdered Sugar: Sweetens the whipped cream and helps stabilize its texture.
  • Chocolate Shavings: Decorative element that adds visual appeal and extra chocolate flavor.

How to Bake a Silky Chocolate Pie from Scratch

Step 1: Prepare Pie Crust

Arrange pie dough into a 9-inch pie pan. Gently press dough against sides and bottom, creating smooth edges. Use fork tines to create decorative crimped border around rim. Poke small holes across bottom of crust to prevent air bubbles.

Step 2: Blind Bake Crust

Cover crust with parchment paper. Fill with:
  • Ceramic pie weights
  • Dried beans

Bake in preheated oven at 375°F for 12-15 minutes until light golden color appears. Remove weights and parchment paper. Return crust to oven for additional 5 minutes to achieve crispy texture. Allow crust to cool completely before filling.

Step 3: Create Chocolate Filling

Combine in saucepan over medium heat:
  • Granulated sugar
  • Cornstarch
  • Cocoa powder
  • Salt
  • Whole milk
  • Heavy cream

Whisk continuously until mixture thickens and begins bubbling. Remove from heat.

Step 4: Incorporate Egg Yolks

Temper egg yolks by slowly adding hot chocolate mixture while stirring constantly. Pour tempered eggs back into saucepan. Cook for additional 2 minutes, stirring consistently.

Step 5: Finish Filling

Remove from heat. Stir in:
  • Unsalted butter
  • Vanilla extract
  • Dark chocolate chips

Pour smooth chocolate filling into cooled pie crust. Refrigerate for minimum 4 hours.

Step 6: Garnish Pie

Top with fresh whipped cream. Sprinkle chocolate shavings for elegant presentation.

Tips for a Smooth Filling and Flaky Crust

  • Prevent Pie Crust Shrinkage: Chill the pie crust for 30 minutes before baking to minimize shrinking and maintain its shape during the blind baking process.
  • Master Smooth Chocolate Filling: Whisk the filling ingredients constantly to prevent lumps and achieve a silky, creamy texture that's free from grainy bits.
  • Temperature Control Matters: Allow ingredients like eggs and milk to reach room temperature before mixing to ensure a more uniform and smooth chocolate filling.
  • Avoid Soggy Bottom: Use a glass or ceramic pie dish to help conduct heat evenly and create a crisp, golden crust that doesn't become wet or soft.
  • Perfect Whipped Cream Topping: Chill your mixing bowl and whisk beforehand to help the cream whip faster and achieve stiff, stable peaks for a luxurious garnish.

Best Way to Store and Reheat Chocolate Pie

  • Store the chocolate pie in an airtight container or cover with plastic wrap, keeping it fresh in the refrigerator for up to 4 days.
  • Wrap the entire pie or individual slices tightly in plastic wrap and aluminum foil, storing in the freezer for 1-2 months.
  • Remove the pie from the freezer and let it slowly defrost in the refrigerator overnight for best texture and flavor.
  • Warm individual slices in the microwave for 10-15 seconds or in a preheated oven at 300°F (150°C) for 5-7 minutes to restore the pie's delicious warm feel.

Pairing Ideas for a Rich Chocolate Slice

  • Pair this rich chocolate pie with a bold, dark roast coffee that complements its deep, velvety chocolate notes and cuts through the sweetness.
  • Serve a smooth bourbon or aged whiskey alongside the pie, where the caramel and oak undertones beautifully match the chocolate's warm, decadent flavor profile.
  • Top the pie with a scoop of vanilla bean ice cream, allowing the creamy, cold texture to contrast with the warm, dense chocolate filling and provide a delightful temperature contrast.
  • Select a full-bodied red wine like Cabernet Sauvignon or a Port wine, which brings out the chocolate's complexity and adds a luxurious depth to each bite.

Chocolate Pie Variations to Keep Things Fresh

  • Gluten-Free Chocolate Pie: Replace traditional pie crust with a gluten-free graham cracker or almond flour crust for those with wheat sensitivities.
  • Vegan Chocolate Filling: Swap dairy ingredients with coconut milk, dairy-free chocolate, and use silken tofu as a creamy base for the chocolate filling.
  • Low-Sugar Chocolate Pie: Substitute sugar with monk fruit sweetener or stevia, and use dark chocolate with higher cocoa content to reduce overall sugar levels.
  • Keto-Friendly Chocolate Pie: Create a nut-based crust using ground almonds or pecans, and use sugar-free chocolate with heavy cream for a low-carb version.
Print
clock clock iconcutlery cutlery iconflag flag iconfolder folder iconinstagram instagram iconpinterest pinterest iconfacebook facebook iconprint print iconsquares squares iconheart heart iconheart solid heart solid icon
Old Fashioned Chocolate Pie Recipe

Old Fashioned Chocolate Pie Recipe


5 Stars 4 Stars 3 Stars 2 Stars 1 Star

4.9 from 13 reviews

  • Total Time: 45 minutes
  • Yield: 8 1x

Description

Sweet Southern hospitality shines through this old fashioned chocolate pie, blending rich cocoa depths with silky smooth custard. Comfort desserts like this whisper memories of grandma’s kitchen, inviting you to savor each creamy, indulgent slice.


Ingredients

Scale

Main Ingredients:

  • 3 cups (720 ml) whole milk
  • 1 cup (200 g) granulated sugar
  • 4 large egg yolks
  • 1 pre-made pie crust

Thickening Ingredients:

  • ¼ cup (30 g) all-purpose flour
  • 3 tablespoons unsweetened cocoa powder
  • ¼ teaspoon salt

Flavor and Finishing Ingredients:

  • 2 tablespoons unsalted butter
  • 1 teaspoon vanilla extract

Optional Topping:

  • Whipped cream or meringue

Instructions

  1. Warm the oven to 375F (190C), positioning the rack in the center for even heat distribution.
  2. Gently unroll the prepared pie dough, carefully transferring it into a 9-inch pie pan with minimal stretching.
  3. Delicately shape the dough’s edges, creating an elegant crimped border using fingertips or a fork.
  4. Use a fork to puncture small holes across the bottom of the crust, preventing potential air bubbles during baking.
  5. Cover the crust with parchment paper, ensuring complete bottom surface coverage.
  6. Fill the lined crust with ceramic pie weights or dried beans, distributing them evenly to maintain the crust’s shape.
  7. Place the weighted crust into the preheated oven and bake for 12-15 minutes until the edges turn a pale golden hue.
  8. Carefully remove the weights and parchment paper, then return the crust to the oven for an additional 5 minutes to achieve a uniform, crisp texture.
  9. Extract the pie crust from the oven and allow it to cool completely on a wire rack, preparing it for the filling.

Notes

  • Blind baking ensures a crisp, golden crust that won’t become soggy from the chocolate filling.
  • Chill the pie weights or dried beans beforehand to help them conduct heat more evenly and prevent the crust from shrinking.
  • Use a ceramic or metal pie pan for better heat distribution and a more consistent baking result.
  • For a gluten-free version, substitute the traditional pie crust with a nut-based or gluten-free graham cracker crust to accommodate dietary restrictions.
  • Prep Time: 15 minutes
  • Cook Time: 30 minutes
  • Category: Desserts
  • Method: Baking
  • Cuisine: American

Nutrition

  • Serving Size: 8
  • Calories: 350
  • Sugar: 25 g
  • Sodium: 150 mg
  • Fat: 15 g
  • Saturated Fat: 9 g
  • Unsaturated Fat: 4 g
  • Trans Fat: 0 g
  • Carbohydrates: 50 g
  • Fiber: 1 g
  • Protein: 6 g
  • Cholesterol: 120 mg
Daves Miller

Daves Miller

Contributing Chef & Culinary Educator

Expertise

  • American Southern cuisine with a modern twist.
  • Instruction in culinary fundamentals and advanced techniques.
  • Development of recipes that highlight seasonal and local produce.​
  • Mastery of artisanal bread and pastry techniques, from laminated doughs to decorative sugar artistry.

Education

Sullivan University, Louisville, Kentucky

  • Degree: Associate of Science Degree in Culinary Arts
  • Focus: Specialized in cooking techniques and culinary sciences, hands‑on externships, professional kitchen lab training, and career preparation for restaurants, entrepreneurship, and global culinary opportunities.

White Mountains Community College, Berlin, New Hampshire

  • Program: Baking and Pastry Arts degree
  • Focus: Specialized in comprehensive baking and pastry arts, including bread making, artisan breads, cake decorating and design, chocolates, confections, and decorative centerpieces; product development and baking theory; and career preparation for baker and pastry chef roles in many places.

Daves is the friendly face guiding you through flavorful, fuss-free recipes at Picture Perfect Meals. 

He studied culinary arts at Sullivan University and embraced Baking and Pastry Arts at White Mountains Community College. Daves specializes in comforting meals with vibrant flavors, highlighting fresh, seasonal ingredients.

Leave a Reply

Your email address will not be published. Required fields are marked *

Recipe rating 5 Stars 4 Stars 3 Stars 2 Stars 1 Star