
Peanut Butter Cup Gooey Cookie Bars Recipe for Sweet Lovers
Chocolate and peanut butter create magic in these irresistible gooey cookie bars that’ll make you weak at the knees.
Sweet memories of childhood treats dance through every decadent bite.
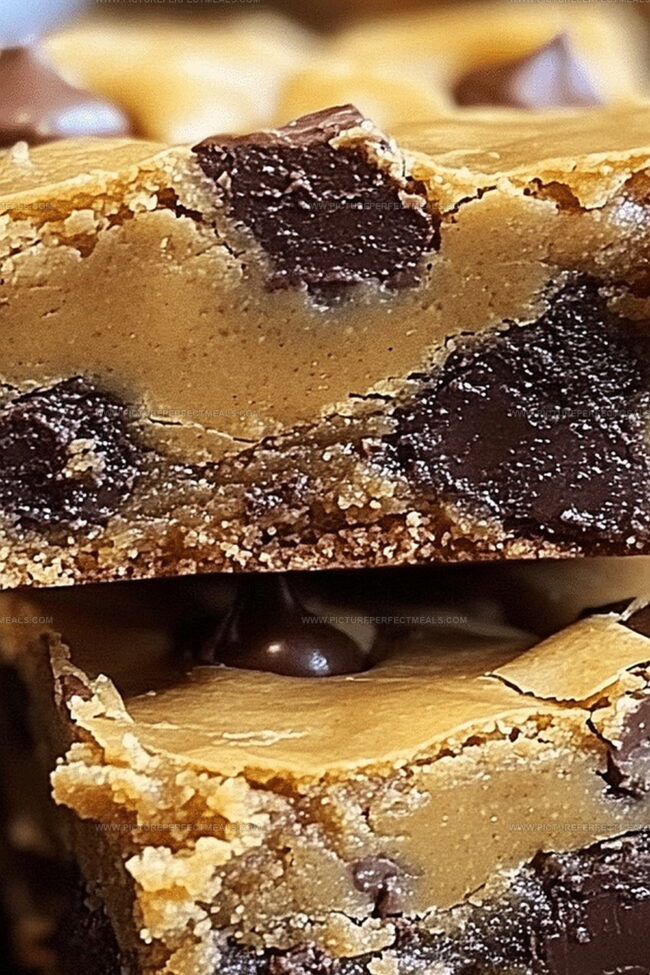
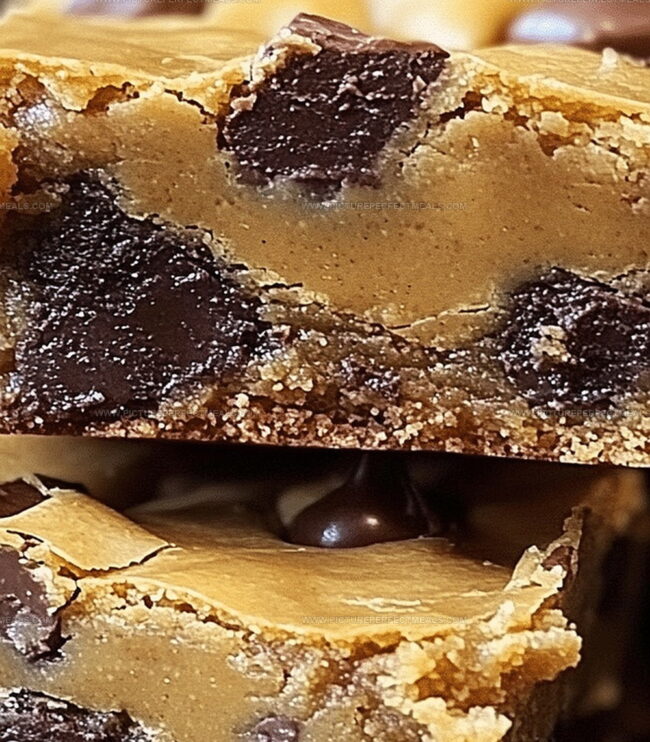
Layers of rich chocolate and creamy peanut butter melt together in a symphony of pure indulgence.
Soft, chewy cookie dough becomes the perfect canvas for these spectacular bars.
Dense, fudgy textures promise an experience that goes beyond ordinary desserts.
Unexpected bursts of flavor will have everyone begging you for the secret recipe.
Each square delivers a comforting blend of nostalgia and pure deliciousness.
You won’t be able to resist cutting just one more piece.
Why Peanut Butter Cup Cookie Bars Are So Gooey Good
What You’ll Need for These Loaded Cookie Bars
Base Ingredients:Chocolate and Peanut Butter Components:Binding and Leavening Ingredients:How to Bake Soft Bars with Peanut Butter Cup Layers
Step 1: Prepare the Baking Station
Preheat the oven to 350°F (175°C). Grab a 9×13-inch baking dish and give it a generous coating of cooking spray. Line the pan with parchment paper, letting the edges hang over the sides for effortless bar removal later.
Step 2: Create the Cookie Base
Combine in a large mixing bowl:Mix everything until you get a smooth, creamy cookie dough that looks absolutely irresistible.
Step 3: Layer the Deliciousness
Press about two-thirds of the cookie dough into the prepared baking dish, creating an even base layer. This will be the foundation of your amazing bars.
Step 4: Scatter Peanut Butter Cups
Chop up peanut butter cups into chunky pieces. Sprinkle these delectable chocolate-peanut butter morsels generously across the cookie dough base.
Step 5: Add the Topping
Crumble the remaining cookie dough over the peanut butter cup pieces, creating a rustic, uneven top that will look gorgeous when baked.
Step 6: Bake to Perfection
Slide the baking dish into the preheated oven. Bake for about 25-30 minutes, or until the edges turn golden brown and the center looks slightly gooey.
Step 7: Cool and Slice
Remove from the oven and let the bars cool completely in the pan. Use the parchment paper overhang to lift the entire batch out. Slice into squares and watch everyone’s eyes light up with pure joy.
Tips for Thick, Chewy, and Chocolaty Results
Best Way to Store Cookie Bars with Toppings
What Drinks Work with These Gooey Treats
Ways to Switch Up the Filling in Cookie Bars
Print
Peanut Butter Cup Gooey Cookie Bars Recipe
- Total Time: 55 minutes
- Yield: 16 1x
Description
Indulgent Peanut Butter Cup Gooey Cookie Bars blend creamy chocolate and nutty peanut butter into a irresistible dessert. Layers of rich flavors and gooey texture promise sweet satisfaction for chocolate and cookie enthusiasts.
Ingredients
Base Ingredients:
- 3 cups (375 grams / 13.2 ounces) all-purpose flour
- 2 cups (350 grams / 12.3 ounces) semi-sweet chocolate chips
- 1 cup (225 grams / 8 ounces) unsalted butter, softened
- 1 cup (200 grams / 7 ounces) granulated sugar
- 1 cup (200 grams / 7 ounces) brown sugar, packed
Wet Ingredients:
- 2 large eggs
- 2 teaspoons vanilla extract
- 2 tablespoons heavy cream or milk
Filling and Topping Ingredients:
- 1 cup (240 grams / 8.5 ounces) creamy peanut butter
- ½ cup (115 grams / 4 ounces) unsalted butter, melted
- 1 ½ cups (180 grams / 6.3 ounces) powdered sugar
- 1 ½ cups (225 grams / 7.9 ounces) mini peanut butter cups, chopped
- 1 teaspoon baking soda
- ½ teaspoon salt
Instructions
- Prepare the baking vessel by thoroughly coating a 9×13-inch dish with non-stick spray and carefully lining it with parchment paper, ensuring smooth edges for effortless bar extraction.
- Craft the chocolate cookie foundation by blending dry ingredients until uniformly combined, creating a rich, dark base that will support the decadent layers.
- Incorporate softened butter and sugars, mixing until the mixture transforms into a creamy, light texture that promises exceptional moisture and depth of flavor.
- Integrate eggs and vanilla, whisking vigorously to create a silky emulsion that binds the cookie dough components and enhances overall structural integrity.
- Gradually fold dry ingredients into the wet mixture, stirring gently to prevent overworking the dough, which could result in tough bars.
- Press approximately two-thirds of the prepared cookie dough into the prepared baking dish, creating an even, compact layer that will serve as the sturdy foundation.
- Strategically arrange peanut butter cups across the initial dough layer, distributing them evenly to guarantee a delightful chocolate-peanut butter surprise in every bite.
- Dollop the remaining cookie dough atop the peanut butter cups, using gentle pressing and spreading techniques to create a rustic, imperfect top layer.
- Slide the assembled bars into the preheated oven, baking until the edges turn golden brown and the center maintains a subtle jiggle, indicating perfect gooey consistency.
- Remove from the oven and allow the bars to cool completely within the pan, permitting the layers to set and intensify their rich, indulgent flavors.
- Once cooled, lift the bars from the dish using the parchment paper edges, slice into precise squares, and serve at room temperature for maximum enjoyment.
Notes
- Swap standard peanut butter for almond or sunflower seed butter to accommodate nut allergies and create a similar rich, creamy texture.
- Use gluten-free graham cracker crumbs or oat-based alternatives to make the recipe suitable for those with gluten sensitivities.
- Chill the bars completely before cutting to ensure clean, neat slices and prevent the gooey filling from spreading too much during serving.
- For a lower-sugar version, select dark chocolate peanut butter cups and reduce the amount of added sugar in the recipe by 25%.
- Prep Time: 20 minutes
- Cook Time: 35 minutes
- Category: Desserts, Snacks
- Method: Baking
- Cuisine: American
Nutrition
- Serving Size: 16
- Calories: 350
- Sugar: 22 g
- Sodium: 200 mg
- Fat: 18 g
- Saturated Fat: 8 g
- Unsaturated Fat: 10 g
- Trans Fat: 0 g
- Carbohydrates: 44 g
- Fiber: 2 g
- Protein: 6 g
- Cholesterol: 30 mg
Daves Miller
Contributing Chef & Culinary Educator
Expertise
Education
Sullivan University, Louisville, Kentucky
White Mountains Community College, Berlin, New Hampshire
Daves is the friendly face guiding you through flavorful, fuss-free recipes at Picture Perfect Meals.
He studied culinary arts at Sullivan University and embraced Baking and Pastry Arts at White Mountains Community College. Daves specializes in comforting meals with vibrant flavors, highlighting fresh, seasonal ingredients.