
Cozy Peppermint Sugar Cookie Bars Recipe for Holiday Magic
Sweet memories of holiday baking come flooding back with these delightful peppermint sugar cookie bars that melt in your mouth.
Crisp edges and soft centers promise a delectable treat for anyone who loves seasonal desserts.
Festive peppermint adds a cool twist to classic sugar cookies, creating a perfect winter indulgence.
Minimal ingredients and simple steps make this recipe a breeze for home bakers of all skill levels.
Each square delivers a burst of minty freshness that dances across your taste buds.
Fragrant and inviting, these bars will become an instant favorite at gatherings and cozy nights in.
You won’t be able to resist cutting just one more slice of this irresistible seasonal delight.
Peppermint Sugar Cookie Bars That Steal the Spotlight
Must-Have Ingredients for Peppermint Sugar Cookie Bars
Cookie Base Ingredients:Dry Ingredients:Frosting and Topping Ingredients:Baking Peppermint Sugar Cookie Bars in Simple Steps
Step 1: Preheat and Prepare Baking Pan
Warm the oven to 350F. Grab a 9×13-inch pan and line it with parchment paper or give it a generous butter coating.
Step 2: Create Cookie Dough Base
In a large mixing bowl, blend:Whip until the mixture looks light and fluffy. Add eggs, vanilla extract, and peppermint extract. Mix thoroughly.
Step 3: Combine Dry Ingredients
In a separate bowl, combine:Gently fold dry ingredients into wet mixture until just combined.
Step 4: Bake Cookie Base
Press dough evenly into prepared pan. Slide into preheated oven and bake for 18-20 minutes. Look for golden edges and a set center. Remove and let cool completely.
Step 5: Craft Peppermint Frosting
In another bowl, beat butter until creamy. Gradually add:Blend until smooth and fluffy. Stir in peppermint extract and red food coloring if desired.
Step 6: Decorate and Finish
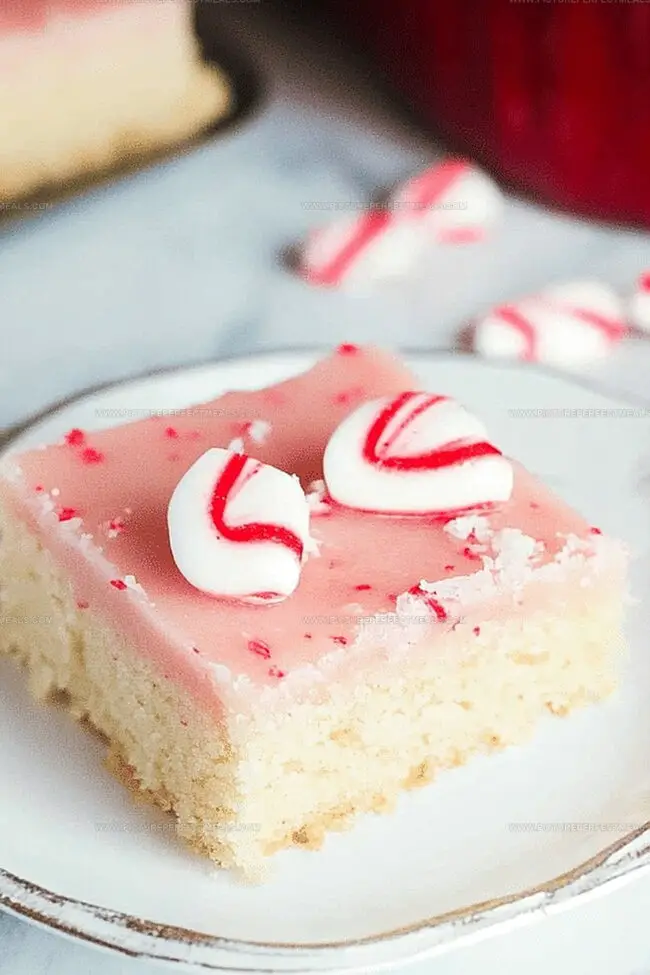
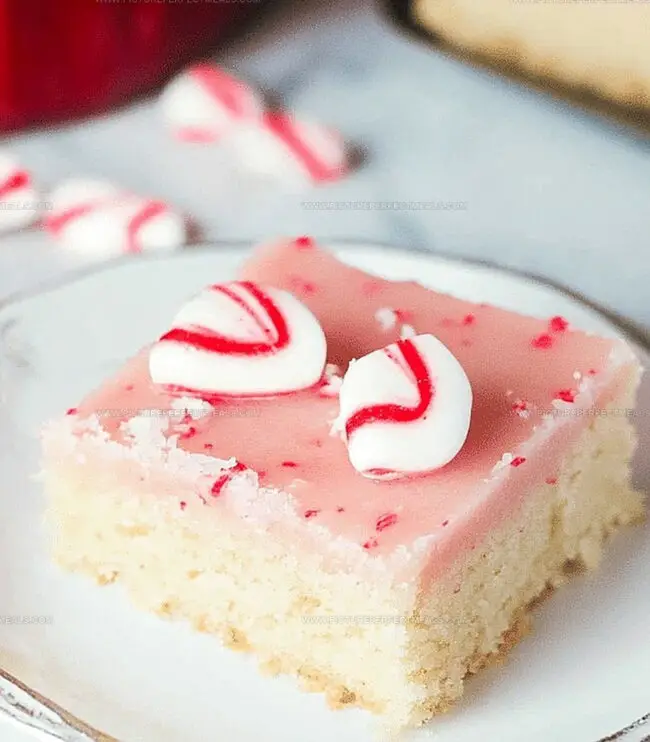
Spread frosting evenly across cooled cookie base. Sprinkle crushed candy canes on top for extra holiday cheer.
Step 7: Slice and Serve
Cut into squares or rectangles with a sharp knife. Enjoy immediately or store in an airtight container.
Tips to Perfect Your Peppermint Sugar Cookie Bars
Save and Reheat Peppermint Sugar Cookie Bars Easily
Top Pairings for Peppermint Sugar Cookie Bars
Fun Ways to Switch Up Peppermint Sugar Cookie Bars
Common Questions About Peppermint Sugar Cookie Bars
Adjust the salt in the recipe by reducing or omitting the added salt. Salted butter can slightly change the overall flavor profile of the cookie bars.
Do not overmix the dough and avoid overbaking. Take the bars out of the oven when the edges are lightly golden and the center is just set. This ensures a soft, moist texture.
You can use mint extract as an alternative, though the flavor will be slightly different. For a non-mint option, try almond or vanilla extract for a different taste profile.
Crush them into small, uneven pieces for the best texture. Use a rolling pin or food processor to create a mix of fine and slightly larger candy cane fragments for visual and textural interest.
Print
Peppermint Sugar Cookie Bars Recipe
- Total Time: 35 minutes
- Yield: 16 1x
Description
Sweet holiday magic unfolds with these peppermint sugar cookie bars, blending classic comfort and festive cheer. Candy cane crumbles and creamy frosting create irresistible seasonal delight you cannot resist.
Ingredients
Main Ingredients:
- 2 ¾ cups (350 g / 12.35 ounces) all-purpose flour
- 1 cup (225 g / 8 ounces) unsalted butter, softened
- 1 cup (200 g / 7.05 ounces) granulated sugar
- ½ cup (100 g / 3.5 ounces) powdered sugar
- 2 large eggs
Flavor Enhancers:
- 1 teaspoon vanilla extract
- ½ teaspoon peppermint extract
- 1 teaspoon baking powder
- ½ teaspoon baking soda
- ¼ teaspoon salt
Frosting and Garnish:
- ½ cup (115 g / 4 ounces) unsalted butter, softened
- 3 cups (375 g / 13.23 ounces) powdered sugar
- 2 tablespoons heavy cream (or milk)
- ½ teaspoon peppermint extract
- 12 drops red food coloring (optional, for a festive pink hue)
- ¼ cup crushed candy canes or peppermint candies
Instructions
- Create the cookie foundation by whisking flour, baking powder, baking soda, and salt in a separate mixing vessel, ensuring a uniform dry mixture.
- Cream butter with granulated and powdered sugars until achieving a velvety, pale texture, incorporating eggs and extracts methodically to develop a smooth batter.
- Transfer the cookie dough into a prepared rectangular baking vessel, gently pressing to create an even, uniform layer that reaches all corners and edges.
- Roast the cookie base in a preheated oven until the perimeter transforms to a delicate golden hue and the center stabilizes, approximately 18-20 minutes.
- Allow the baked confection to cool completely within the pan, enabling it to set and firm up for optimal frosting application.
- Whip butter until achieving a silky, light consistency, gradually integrating powdered sugar and cream to construct a luscious, spreadable frosting.
- Enhance the frosting with peppermint extract and optional crimson food coloring, blending until the mixture presents a uniform, vibrant appearance.
- Generously distribute the peppermint frosting across the cooled cookie base, creating a smooth, even layer that covers the entire surface.
- Embellish the frosted creation by scattering crushed candy canes, adding a festive crunch and visual appeal.
- Slice the decorated confection into precise squares or rectangles, presenting a delightful holiday-inspired treat ready for enjoyment.
Notes
- Swap out regular flour with gluten-free flour blend for those with wheat sensitivities, ensuring the texture remains soft and chewy.
- Use plant-based butter and egg substitutes to create a vegan-friendly version of these delightful peppermint bars.
- Reduce peppermint extract slightly if you prefer a milder mint flavor, allowing the sweet cookie base to shine through.
- Chill the frosted bars for 15-20 minutes before cutting to achieve clean, precise edges and prevent crumbling.
- Prep Time: 15 minutes
- Cook Time: 20 minutes
- Category: Desserts, Snacks
- Method: Baking
- Cuisine: American
Nutrition
- Serving Size: 16
- Calories: 320
- Sugar: 32 g
- Sodium: 150 mg
- Fat: 15 g
- Saturated Fat: 9 g
- Unsaturated Fat: 4 g
- Trans Fat: 0 g
- Carbohydrates: 44 g
- Fiber: 0 g
- Protein: 2 g
- Cholesterol: 40 mg
Daves Miller
Contributing Chef & Culinary Educator
Expertise
Education
Sullivan University, Louisville, Kentucky
White Mountains Community College, Berlin, New Hampshire
Daves is the friendly face guiding you through flavorful, fuss-free recipes at Picture Perfect Meals.
He studied culinary arts at Sullivan University and embraced Baking and Pastry Arts at White Mountains Community College. Daves specializes in comforting meals with vibrant flavors, highlighting fresh, seasonal ingredients.