
Sweet Pineapple Christmas Balls Recipe for Holiday Magic
Sweet memories of holiday gatherings dance through my kitchen when I craft these delightful pineapple christmas balls.
Tropical flavors merge perfectly with festive cheer in this delectable treat.
Guests always marvel at the unexpected burst of fruity goodness.
Our family recipe carries whispers of Caribbean sunshine and winter celebrations.
Rich cream cheese blends seamlessly with crushed pineapple, creating irresistible bite-sized delights.
Minimal ingredients and simple steps make this dessert a stress-free joy.
These little spheres of happiness promise to become your new seasonal favorite.
Pineapple Christmas Balls Everyone Wants to Try

Ingredients for Making Pineapple Christmas Balls
Fruit Base:Binding Ingredients:Coating Ingredient:Put Together Pineapple Christmas Balls with Ease
Step 1: Squeeze Out Pineapple Liquid
Step 2: Blend Tropical Ingredients
Gather these delightful components:Mix all ingredients in a spacious mixing bowl until a uniform dough emerges
Step 3: Chill Mixture
Cover the bowl with plastic wrap
Place inside refrigerator
Let the mixture rest and firm up for half an hour
Step 4: Create Festive Coconut Balls
Remove chilled mixture from refrigerator
Scoop small portions and roll into round shapes
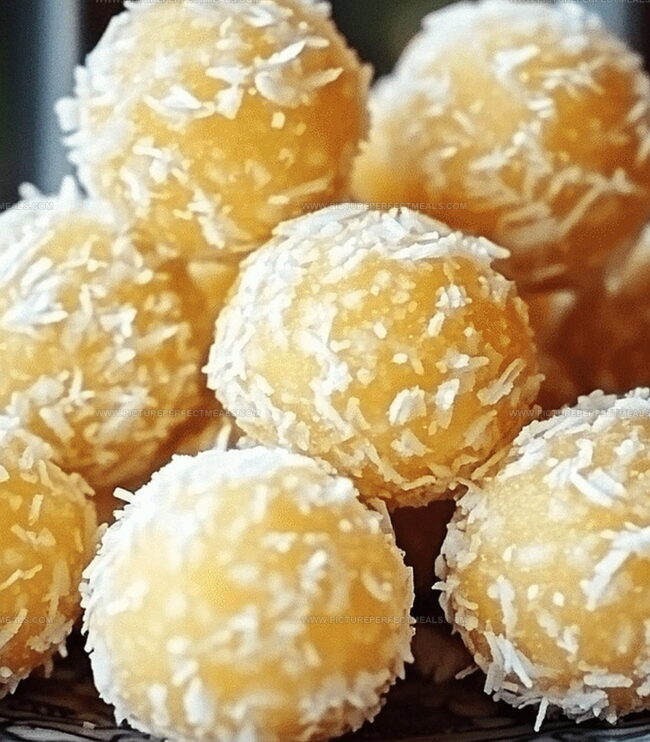
Gently roll each ball in additional shredded coconut
Ensure complete coconut coverage
Step 5: Final Cooling
Arrange coconut-covered balls on a parchment-lined baking sheet
Return to refrigerator
Let balls set for one hour
Step 6: Serve and Celebrate
Transfer chilled pineapple balls to a decorative serving platter
Invite friends and family to enjoy these tropical treats
Pineapple Christmas Balls Cooking Tips to Follow
Keep Pineapple Christmas Balls Fresh and Firm
Pair Pineapple Christmas Balls with These Picks
Fun Versions of Pineapple Christmas Balls
Print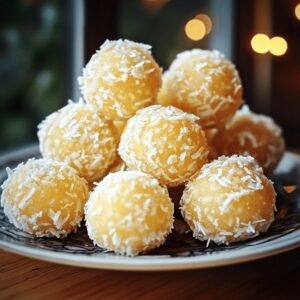
Pineapple Christmas Balls Recipe
- Total Time: 1 hour 15 minutes
- Yield: 12 1x
Description
Festive Pineapple Christmas Balls bring holiday cheer with their delightful tropical twist. Sweet coconut and pineapple combine in a simple no-bake treat that will charm guests at any seasonal celebration.
Ingredients
Main Ingredients:
- 1 can (20 oz/567 g) crushed pineapple
- 2 cups (200 g) graham cracker crumbs
- 1 cup (100 g) shredded sweetened coconut
Additional Ingredients:
- ½ cup (100 g) granulated sugar
- ¼ cup (60 g) unsalted butter, melted
Coating:
- Extra shredded sweetened coconut (for rolling)
Instructions
- Thoroughly strain the crushed pineapple using a fine mesh strainer or cheesecloth, ensuring maximum liquid removal to prevent a watery consistency.
- Combine the well-drained pineapple with graham cracker crumbs, shredded coconut, granulated sugar, and melted butter in a spacious mixing bowl, blending until the ingredients create a uniform, cohesive mixture.
- Refrigerate the prepared mixture for approximately 30 minutes, allowing the ingredients to solidify and simplify the shaping process.
- Using chilled hands, carefully form small, compact spheres approximately one inch in diameter from the consolidated mixture.
- Gently roll each formed ball in additional shredded coconut, creating a delicate, textured exterior that completely envelops the pineapple base.
- Arrange the coconut-coated spheres on a parchment-lined baking sheet, ensuring they do not touch each other.
- Place the prepared confections in the refrigerator for a minimum of one hour, enabling them to set and develop a firm, cohesive structure.
- Once thoroughly chilled, transfer the pineapple Christmas balls to an elegant serving platter, presenting a festive and delectable treat perfect for holiday gatherings.
Notes
- Drain pineapple completely using a cheesecloth or fine mesh strainer to prevent excess moisture from making the mixture soggy and difficult to shape.
- Experiment with alternative coatings like crushed nuts, powdered sugar, or chocolate sprinkles for a unique twist on the classic coconut version.
- Adjust sweetness by reducing granulated sugar or using alternative sweeteners like honey or maple syrup for a more natural flavor profile.
- Store these no-bake treats in an airtight container in the refrigerator for up to 5 days, making them a convenient make-ahead dessert for holiday gatherings.
- Prep Time: 15 minutes
- Cook Time: 1 hour
- Category: Desserts, Snacks
- Method: None
- Cuisine: American
Nutrition
- Serving Size: 12
- Calories: 150
- Sugar: 8 g
- Sodium: 50 mg
- Fat: 7 g
- Saturated Fat: 4 g
- Unsaturated Fat: 3 g
- Trans Fat: 0 g
- Carbohydrates: 22 g
- Fiber: 1 g
- Protein: 1 g
- Cholesterol: 15 mg
Daves Miller
Contributing Chef & Culinary Educator
Expertise
Education
Sullivan University, Louisville, Kentucky
White Mountains Community College, Berlin, New Hampshire
Daves is the friendly face guiding you through flavorful, fuss-free recipes at Picture Perfect Meals.
He studied culinary arts at Sullivan University and embraced Baking and Pastry Arts at White Mountains Community College. Daves specializes in comforting meals with vibrant flavors, highlighting fresh, seasonal ingredients.