Silky Cherry Chocolate Cheesecake Recipe

Dreamy Silky Cherry Chocolate Cheesecake Recipe for Sweet Bliss

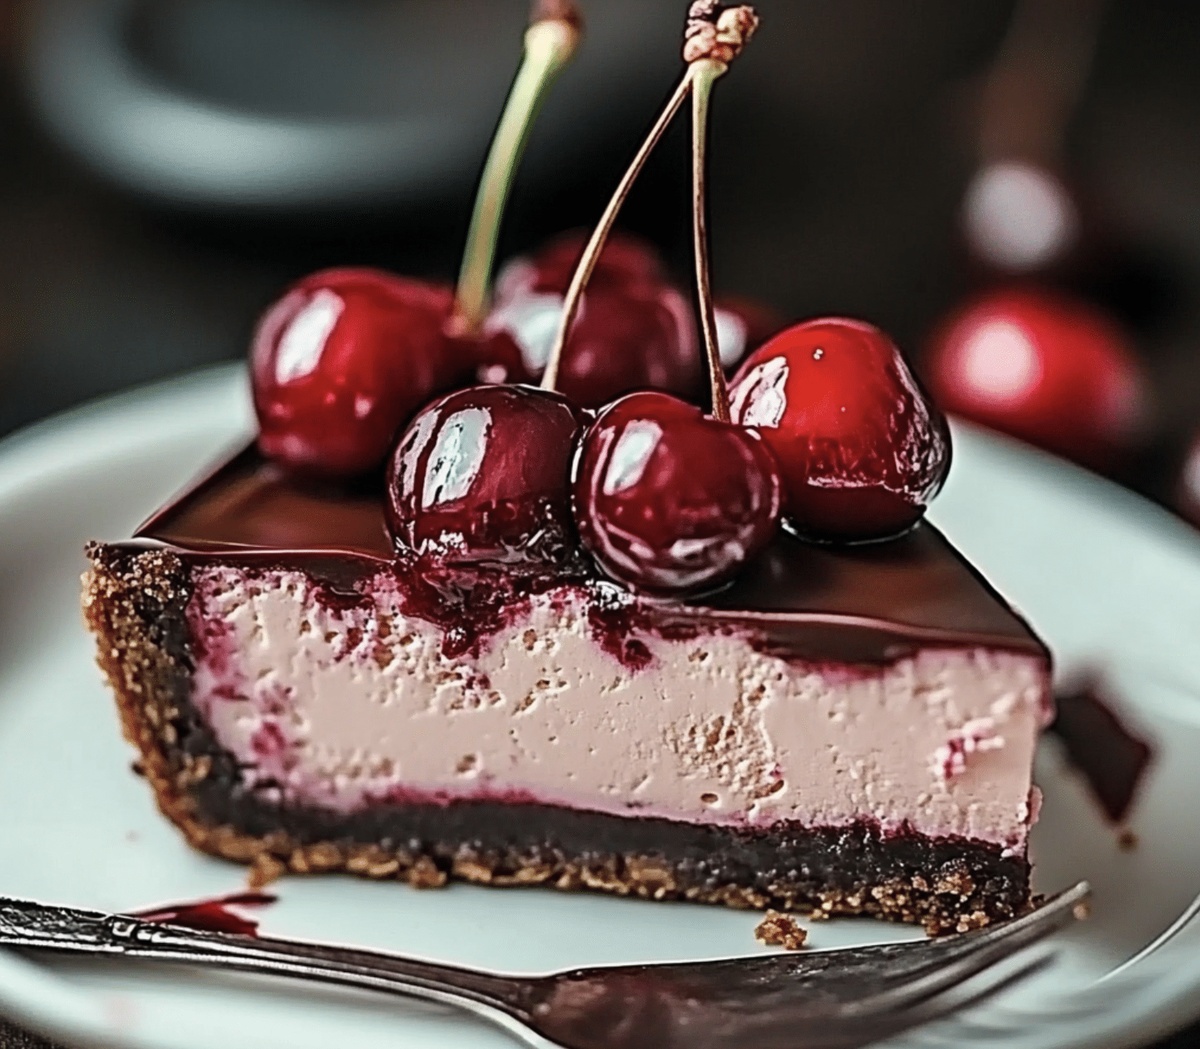
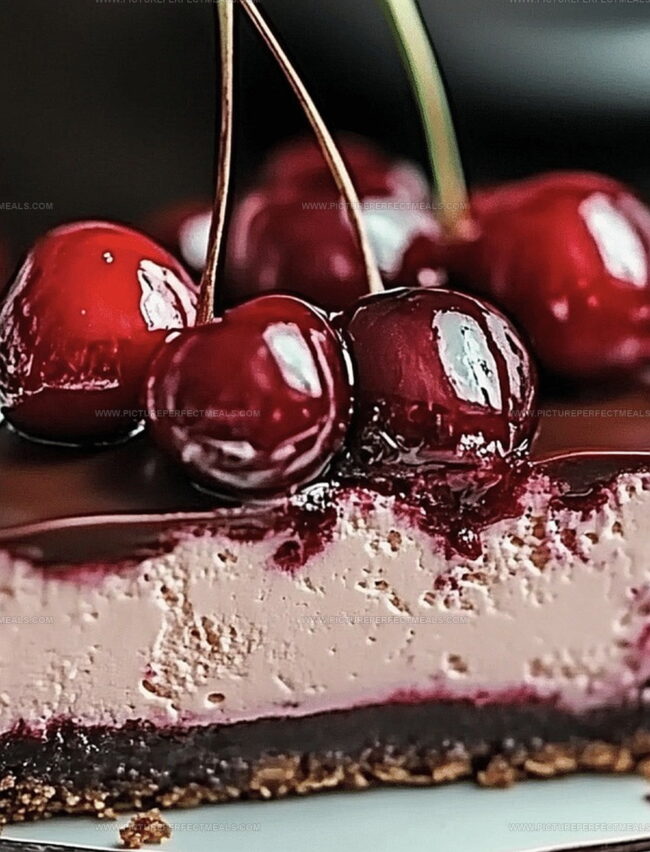
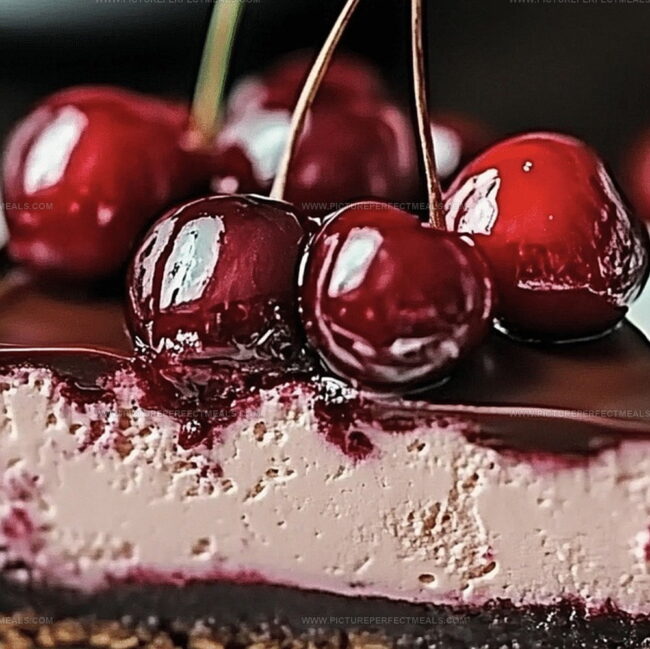
Decadent chocolate swirls dance through this creamy cherry chocolate cheesecake, creating an irresistible dessert that promises pure indulgence.

Rich cocoa notes blend seamlessly with tart cherry undertones, delivering a harmonious flavor profile.

Each velvety slice whispers of elegant simplicity and carefully balanced ingredients.

The chocolate provides depth while cherries add a bright, tangy contrast to the smooth cream cheese base.

Layers of intense flavor promise a dessert experience that will delight even the most discerning palate.

Weekend bakers and passionate dessert enthusiasts will find this recipe both approachable and exciting.

Prepare to savor every luxurious bite of this show-stopping cheesecake.

Flavor Tips to Make This Cheesecake Shine

  • Crust Perfection: Press the cookie crumb mixture gently but firmly to create an even, compact base that holds together without being too dense.
  • Smooth Filling Trick: Beat cream cheese at room temperature to avoid lumps and achieve a silky-smooth cheesecake texture that melts in your mouth.
  • Cherry Swap Magic: Replace fresh cherries with frozen or canned cherries during off-season months, ensuring you can enjoy this dessert year-round.
  • Gluten-Free Option: Substitute regular chocolate cookie crumbs with gluten-free chocolate cookie crumbs to make this dessert suitable for those with gluten sensitivities.
  • Dairy-Free Adaptation: Use dairy-free cream cheese and vegan butter alternatives to create a delicious plant-based version of this decadent cheesecake.

Serve It Sliced with Extra Cherries or Whipped Cream

  • Decadent Dessert Pairing: Serve this luscious cheesecake with a scoop of vanilla bean ice cream to complement the rich chocolate and cherry flavors, creating a heavenly contrast of temperatures and textures.
  • Elegant Garnish Option: Top each slice with fresh cherries, a light dusting of cocoa powder, and a delicate chocolate curl to elevate the presentation and add a professional bakery-style touch.
  • Wine Companion Experience: Pair this indulgent cheesecake with a glass of sweet dessert wine like port or a rich red moscato, which will enhance the chocolate and cherry notes and create a sophisticated dessert moment.
  • Breakfast Remix Twist: Transform leftover cheesecake slices into a decadent morning treat by serving alongside a strong espresso or cappuccino, turning an evening dessert into a luxurious breakfast indulgence.

How to Store Cheesecake

  • Smart Refrigeration Strategy: Store this delectable cheesecake in an airtight container within the refrigerator, keeping it fresh for up to 5 days. Cool the dessert completely before sealing to prevent condensation and maintain its delightful texture.
  • Freezing Magic: Wrap individual slices or the entire cheesecake tightly in plastic wrap, then place inside a freezer-safe container. Frozen cheesecake remains delicious for 1-2 months, offering a convenient make-ahead dessert option.
  • Room Temperature Tips: Allow chilled cheesecake to sit at room temperature for 15-20 minutes before serving. This gentle warming enhances the creamy texture and allows the rich chocolate and cherry flavors to fully develop.
  • Ingredient Freshness Check: Inspect cherry and chocolate toppings before storing. Remove any wilted cherries or discolored chocolate pieces to maintain the cheesecake's optimal taste and visual appeal. Use fresh garnishes when possible to elevate the dessert's presentation.

Quick Recipe Overview

Prep Time: 30 minutes

Cook Time: 1 hour

Total Time: 1 hour 30 minutes

Calories: 378 kcal

Servings: 8

Ingredients to Build Cherry Chocolate Cheesecake Layers

For Crust:
  • Chocolate Cookie Crumbs: Provides a rich, dark foundation with deep cocoa flavor and delightful crumbly texture that complements the creamy cheesecake.
  • Unsalted Butter: Binds the crumbs together, creating a sturdy and deliciously crisp base that holds the cheesecake perfectly.
For Filling:
  • Cream Cheese: The star ingredient that creates the smooth, luxurious, and tangy base of the cheesecake with its velvety consistency.
  • Granulated Sugar: Sweetens the filling and balances the tanginess of the cream cheese for a harmonious flavor profile.
  • Large Eggs: Adds structure, richness, and helps bind the cheesecake filling together, creating a silky smooth texture.
  • Vanilla Extract: Enhances the overall flavor with its warm, aromatic notes that complement the chocolate and cherry elements.
  • Sour Cream: Contributes to the creamy texture and adds a subtle tang that brightens the entire dessert.
For Topping:
  • Fresh Cherries: Brings a burst of vibrant, juicy sweetness and a beautiful pop of color to the cheesecake.
  • Dark Chocolate: Provides rich, intense chocolate flavor and creates an elegant decorative element with its glossy sheen.

Tools to Bake Cherry Chocolate Cheesecake Like a Pro

  • Springform pan: 9-inch round pan with removable sides, perfect for cheesecakes.
  • Food processor or blender: Helps crush chocolate cookie crumbs smoothly.
  • Mixing bowls: Medium-sized for combining ingredients and preparing the filling.
  • Electric mixer: Essential for creating smooth, creamy cheesecake batter.
  • Measuring cups and spoons: Ensures precise ingredient measurements.
  • Spatula: Helps scrape batter and spread evenly in the pan.
  • Baking sheet: Optional, can place under springform pan to catch any potential drips.

How to Swirl and Bake Cherry Chocolate Cheesecake

  • Create Chocolate Cookie Base

Crush cookies into fine crumbs and blend with melted butter until perfectly combined. Press the mixture firmly into the bottom of a springform pan, creating a smooth, compact foundation for your cheesecake.

  • Whip Creamy Cheesecake Filling

Beat cream cheese until silky and soft. Gradually add sugar, eggs, and vanilla, mixing until the batter becomes luxuriously smooth and free of lumps. Pour this dreamy mixture over the chocolate cookie crust.

  • Bake and Chill

Place the cheesecake in a preheated oven and bake until the center is almost set but still slightly jiggly. After baking, let it cool completely at room temperature, then refrigerate for several hours to allow the cheesecake to set perfectly.

  • Decorate with Cherry Topping

Spread a vibrant layer of cherry preserves or fresh cherry compote across the top of the chilled cheesecake. For an extra touch of elegance, garnish with chocolate shavings or whole cherries around the edges.

  • Serve and Enjoy

Carefully release the springform pan and slice the cheesecake into elegant wedges. Serve chilled and watch as your guests marvel at this decadent dessert that combines rich chocolate, creamy cheesecake, and bright cherry flavors.

Print
clock clock iconcutlery cutlery iconflag flag iconfolder folder iconinstagram instagram iconpinterest pinterest iconfacebook facebook iconprint print iconsquares squares iconheart heart iconheart solid heart solid icon
Silky Cherry Chocolate Cheesecake Recipe

Silky Cherry Chocolate Cheesecake Recipe


5 Stars 4 Stars 3 Stars 2 Stars 1 Star

4.7 from 17 reviews

  • Total Time: 1 hour 30 minutes
  • Yield: 9 1x

Description

Rich chocolate cheesecake blends creamy Philadelphia cream cheese with dark chocolate for an indulgent dessert. Luxurious layers of chocolate ganache and fresh cherries complete this irresistible sweet experience you will savor with delight.


Ingredients

Scale
  • 500 g (1.1 lb) cream cheese
  • 300 g (10.6 oz) cherries
  • 3 large eggs
  • 200 g (7 oz) chocolate cookie crumbs
  • 150 g (5.3 oz) granulated sugar
  • 120 ml (4 fl oz) sour cream
  • 120 g (4.2 oz) dark chocolate
  • 75 g (2.6 oz) unsalted butter
  • 2 tbsps water
  • 1 tbsp cornstarch
  • 1 tsp vanilla extract
  • 1 tsp lemon juice

Instructions

  1. Crust Preparation: Pulverize chocolate cookies into fine crumbs, thoroughly mixing with melted butter to create a cohesive base, then press evenly into a springform pan.
  2. Initial Baking: Position the crust in a preheated oven at 175°C (350°F) and bake for 10 minutes until golden and set, then allow to cool completely.
  3. Filling Creation: In a large bowl, whip cream cheese until velvety smooth, gradually blending in sugar until light and airy, then incorporate eggs one at a time to maintain a silky texture.
  4. Chocolate Integration: Gently fold in vanilla extract and melted chocolate, ensuring a uniform, rich filling that will create a decadent cheesecake experience.
  5. Baking Process: Pour the filling over the cooled crust, smoothing the surface and eliminating potential air pockets by gently tapping the pan, then bake until the center is barely set but still slightly trembling.
  6. Cooling Technique: After baking, turn off the oven and leave the cheesecake inside with the door slightly open to prevent surface cracking, allowing for a gradual temperature reduction.
  7. Chilling and Garnishing: Refrigerate the cheesecake for several hours or overnight, then adorn with fresh cherries and delicate chocolate shavings just before serving for an elegant final presentation.

Notes

  • Prevent Crust Crumbling: Use melted butter generously and press cookie crumbs firmly to create a compact, stable base that holds together perfectly when slicing.
  • Control Cheesecake Texture: Beat cream cheese at room temperature to eliminate lumps and achieve a smooth, silky consistency without overmixing, which can introduce air bubbles.
  • Avoid Cracking Techniques: Use a water bath or gradual cooling method by leaving the cheesecake in the oven with the door slightly open to prevent sudden temperature changes that cause surface cracks.
  • Enhance Flavor Depth: Incorporate a small pinch of salt or espresso powder into the chocolate to intensify the rich chocolate notes and create a more complex flavor profile in the cheesecake.
  • Prep Time: 30 minutes
  • Cook Time: 1 hour
  • Category: Desserts
  • Method: Baking
  • Cuisine: American

Nutrition

  • Serving Size: 9
  • Calories: 410
  • Sugar: 24 g
  • Sodium: 210 mg
  • Fat: 28 g
  • Saturated Fat: 17 g
  • Unsaturated Fat: 8 g
  • Trans Fat: 0 g
  • Carbohydrates: 38 g
  • Fiber: 1 g
  • Protein: 6 g
  • Cholesterol: 95 mg
Jenna Hartley

Jenna Hartley

Founder & Recipe Creator

Expertise

  • Recipe development with a focus on single-dish meals.
  • Fusion of traditional and modern Australian cuisines.
  • Food styling and photography for digital platforms.​

Education

Box Hill Institute, Melbourne

  • Degree: Advanced Diploma of Hospitality Management
  • Focus: Specialized in practical food and beverage service, responsible alcohol and hygiene compliance, legal risk management, and hands‑on experience in a simulated restaurant environment.

William Angliss Institute, Melbourne

  • Program: Certificate IV in Patisserie
  • Focus: Specialized in pastry and bakery techniques, cookery and specialty food preparation, recipe planning and costing, commercial kitchen operations, sustainable and inclusive work practices, food safety and hygiene compliance, and workplace health and safety.

Jenna is the heart of Picture Perfect Meals, turning simple ingredients into beautiful, easy‑to‑make dishes. 

Growing up around family meals in Melbourne, she trained at Box Hill Institute and then perfected her pastry skills at William Angliss Institute. She loves mixing classic Australian flavors with fresh ideas to keep cooking fun and stress‑free.

Leave a Reply

Your email address will not be published. Required fields are marked *

Recipe rating 5 Stars 4 Stars 3 Stars 2 Stars 1 Star