
Velvet Meets Crunch: Silky Salty Peanut Banana Pudding Recipe
Creamy desserts that blend smooth banana peanut butter pudding strike the perfect balance between comfort and indulgence.
Sweet bananas mingle with rich, salty peanut butter in this decadent treat.
Each spoonful promises a delightful journey of flavors that dance across your palate.
The recipe combines simple ingredients with minimal effort to create something extraordinary.
Luscious and velvety, this pudding transforms ordinary ingredients into a spectacular dessert.
Layers of creamy goodness await you in every single bite.
Prepare to delight your taste buds with this irresistible culinary creation that will surely become a household favorite.
Quick Recipe Overview

Salty Peanut Banana Pudding Ingredient List
For Creamy Base:For Layers and Crunch:For Garnish:Tools You’ll Need for Banana Peanut Pudding
Putting Together Banana Pudding with Crunch

Grab your mixer and transform heavy cream, powdered sugar, and vanilla into fluffy peaks that look like delicate clouds.
Blend instant pudding mix with cold milk, whisking energetically until the mixture transforms into a silky smooth texture.
Gently fold the whipped cream into the pudding, creating a luxurious blend that’s light and dreamy. Chill for a quick 20-30 minutes.
In your favorite serving dish, start creating mouthwatering layers: spread pudding, then add banana slices, sprinkle vanilla wafers, and dust with salted peanuts.
Continue layering ingredients, making sure each spoonful will be a flavor explosion. Top with a final pudding layer.
Crown your dessert with crushed peanuts, banana slices, and a cloud of whipped cream if you’re feeling extra indulgent.
Refrigerate for at least 2 hours, letting all those incredible flavors dance and mingle together. The longer it sits, the more delicious it becomes.
Flavor Twists for Salty Peanut Banana Pudding
Presenting Salty Peanut Banana Pudding
Banana Pudding Storage and Prep Notes
Print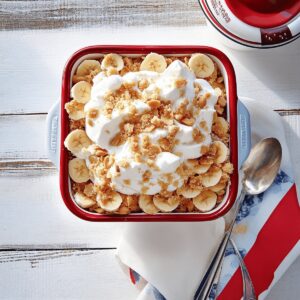
Silky Salty Peanut Banana Pudding Recipe
- Total Time: 2 hours 20 minutes
- Yield: 9 1x
Description
Rich and creamy salty peanut banana pudding brings Southern comfort to dessert tables with nostalgic charm. Layers of silky pudding, ripe bananas, and crunchy peanuts create a delightful finale you’ll savor with pure satisfaction.
Ingredients
- 4 large bananas, sliced
- 1 box (11 oz/311 g) vanilla wafers or butter cookies
- 2 cups salted peanuts, roughly chopped
- 1 package (3.4 oz/96 g) instant vanilla pudding mix
- 2 cups cold milk
- 1 cup heavy cream
- ¼ cup powdered sugar
- 1 tsp vanilla extract
- Crushed peanuts (for garnish)
- Banana slices (for garnish)
- Whipped cream (for garnish)
Instructions
- Pudding Preparation: Whisk instant pudding mix and cold milk in a medium bowl until smooth and thickened, creating a creamy base.
- Cream Fusion: Whip heavy cream with powdered sugar and vanilla extract until forming stiff, luxurious peaks, then gently fold into the pudding mixture to maintain its airy consistency.
- Layering Foundation: Chill the pudding mixture, then select a serving vessel and create the first stratum by spreading a generous portion of the chilled pudding across the bottom.
- Textural Composition: Systematically layer thinly sliced ripe bananas, followed by vanilla wafers and a sprinkle of salted peanuts, repeating the process to build multiple delectable strata.
- Final Touches: Complete the dessert with a smooth pudding surface, optionally garnishing with crushed peanuts, banana slices, and a delicate whipped cream accent.
- Flavor Development: Refrigerate for a minimum of 2 hours or overnight, allowing the flavors to harmonize and intensify, transforming the dessert into a sublime culinary experience.
Notes
- Banana Ripeness Matters: Select perfectly ripe bananas with golden-brown speckles for optimal sweetness and smooth texture, preventing bland or overly firm fruit layers.
- Prevent Browning Technique: Lightly toss banana slices with lemon juice to maintain their fresh appearance and prevent rapid oxidation during preparation.
- Texture Balance Strategy: Layer ingredients carefully to ensure each spoonful contains a harmonious blend of creamy pudding, soft bananas, crunchy wafers, and salty peanuts.
- Make-Ahead Wisdom: Prepare the dessert a day in advance to allow flavors to develop fully, with wafers softening slightly and ingredients melding together for enhanced taste experience.
- Prep Time: 20 minutes
- Cook Time: 2 hours
- Category: Desserts, Snacks
- Method: None
- Cuisine: American
Nutrition
- Serving Size: 9
- Calories: 360
- Sugar: 18 g
- Sodium: 200 mg
- Fat: 22 g
- Saturated Fat: 10 g
- Unsaturated Fat: 12 g
- Trans Fat: 0 g
- Carbohydrates: 37 g
- Fiber: 2 g
- Protein: 6 g
- Cholesterol: 30 mg
Jenna Hartley
Founder & Recipe Creator
Expertise
Education
Box Hill Institute, Melbourne
William Angliss Institute, Melbourne
Jenna is the heart of Picture Perfect Meals, turning simple ingredients into beautiful, easy‑to‑make dishes.
Growing up around family meals in Melbourne, she trained at Box Hill Institute and then perfected her pastry skills at William Angliss Institute. She loves mixing classic Australian flavors with fresh ideas to keep cooking fun and stress‑free.