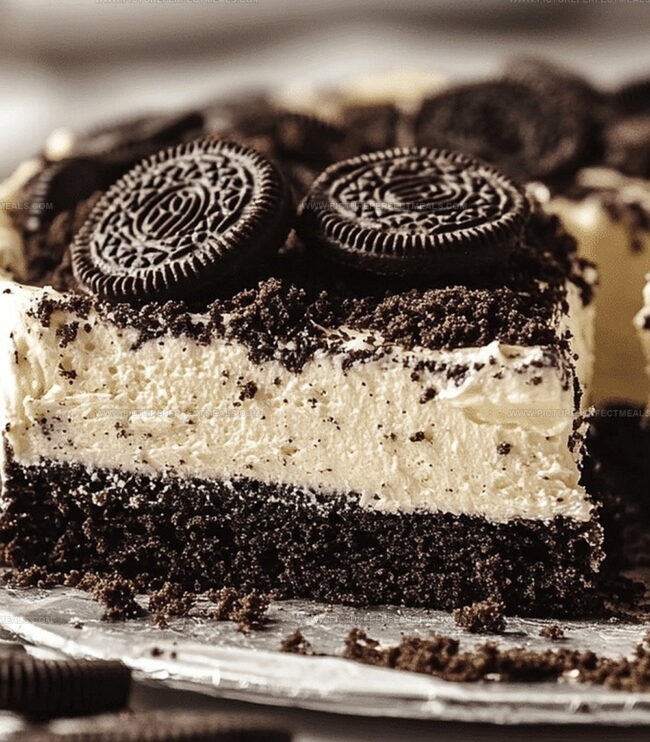
Creamy layers of decadence dance through this heavenly Oreo dirt cake that promises pure indulgence.
Chocolate cookie crumbs create a tantalizing base for a dessert that melts in your mouth.
Each spoonful delivers a rich symphony of textures and flavors.
The no-bake wonder combines classic ingredients into a delightful treat that feels like pure comfort.
Crushed Oreos mingle with silky pudding and cream cheese, creating a dessert that transforms ordinary moments into something spectacular.
Chocolate lovers will swoon over this simple yet irresistible confection.
Prepare to experience a dessert that makes every bite a celebration of sweet, creamy bliss.
Quick Recipe Overview
Prep Time: 15 minutes
Cook Time: 2 hours
Total Time: 2 hours 15 minutes
Calories: 330 kcal
Servings: 12
Ingredients That Make Oreo Dirt Cake Epic
For Crust and Topping:
Oreo Cookies: Chocolatey base that provides rich, crumbly texture and classic sandwich cookie flavor, choose original style for best results.
Whole Oreos work best when crushed finely to create a smooth, even consistency.
For Base Ingredients:
Cream Cheese: Creamy foundation that adds luxurious richness and helps bind the filling together, select full-fat version for optimal smoothness.
Powdered Sugar: Sweetens and stabilizes the filling, ensuring a silky, perfectly balanced dessert texture.
Vanilla Extract: Enhances overall flavor profile with warm, aromatic notes, use pure vanilla for best taste.
For Creamy Layers:
Whipped Topping: Provides light, airy texture and additional sweetness, opt for fresh whipped cream or high-quality frozen whipped topping.
Instant Vanilla Pudding Mix: Creates smooth, consistent filling and adds subtle vanilla undertones, choose name-brand for reliable results.
Cold Milk: Activates pudding mix and contributes to creamy consistency, use whole milk for richer flavor.
Tools for the Ultimate Oreo Dirt Cake
Food Processor or Zip-Top Bag: Perfect for crushing Oreos into fine crumbs with minimal mess.
Rolling Pin: Helps smash Oreos evenly if not using a food processor.
Large Mixing Bowl: Essential for combining cake ingredients smoothly.
Measuring Cups and Spoons: Ensures accurate ingredient proportions.
Whisk: Blends pudding mix and other ingredients without lumps.
9×13 Inch Baking Dish: Provides the right space for layering the dirt cake.
Spatula: Helps spread layers evenly and scrape mixing bowls clean.
Steps to Assemble Your Oreo Dirt Creation
Pulverize Oreo Cookies Break down the Oreo cookies into fine crumbs using a food processor or by placing them in a sealed bag and crushing with a rolling pin. Set aside a portion of the crushed cookies for garnishing later.
Mix Cream Cheese Blend softened cream cheese in a large mixing bowl until smooth and creamy, ensuring no lumps remain.
Whip Creamy Base Gently fold in whipped cream or whipped topping into the cream cheese mixture, creating a light and fluffy texture.
Layer Cookie Crumbs Begin assembling the dessert by spreading a layer of crushed Oreo cookies at the bottom of a clear serving dish, creating a delicious foundation.
Add Creamy Mixture Carefully spread the cream cheese and whipped topping blend over the cookie crumb base, creating an even and smooth layer.
Repeat Layering Continue alternating layers of cookie crumbs and creamy mixture, building a visually appealing dessert with distinct texture contrasts.
Top and Chill Sprinkle the reserved crushed Oreo cookies on top as a final garnish. Refrigerate the dirt cake for several hours or overnight to allow flavors to meld and achieve a perfect, chilled consistency.
Variations with Pudding, Cream, and More
Chilling Perfection: Refrigerate the dirt cake for at least 2 hours before serving to allow flavors to meld and achieve a firmer, more delightful texture.
Texture Tricks: Use a food processor for ultra-fine Oreo crumbs, ensuring a smooth, consistent base that mimics rich soil in your dessert.
Gluten-Free Swap: Replace regular Oreos with gluten-free chocolate sandwich cookies to make this treat accessible for those with gluten sensitivities.
Kid-Friendly Fun: Let children help layer the dessert or sprinkle the reserved Oreo crumbs on top, turning preparation into a playful family activity.
Make-Ahead Magic: Prepare the dirt cake up to 24 hours in advance, storing covered in the refrigerator for a stress-free dessert option that tastes even better after the flavors settle.
Dirt Cake Serving Styles for Every Crowd
Dirt Cake Display Magic: Serve in a clean terra cotta flower pot or clear glass trifle dish for a playful, garden-themed presentation that delights guests.
Creamy Topping Adventure: Sprinkle the reserved crushed Oreos on top to create a realistic “dirt” layer, then add gummy worms peeking out for a whimsical, nostalgic touch.
Kid-Friendly Dessert Station: Provide small individual cups or mason jars so children can customize their own dessert with extra cookie crumbs and fun chocolate decorations.
Chilled Delight Serving: Refrigerate the dessert for at least 2 hours before serving to ensure a perfectly set, cool and refreshing treat that’s ideal for summer gatherings.
Dirt Cake Storage So It Stays Dreamy
Refrigeration Retreat: Store your Oreo dirt cake in an airtight container in the refrigerator for up to 4 days, keeping the layers fresh and cookie crumbs crisp.
Make-Ahead Magic: Prepare the dessert a day before serving to let flavors meld and textures settle, creating an even more delicious treat.
Freezing Freedom: Wrap the cake tightly in plastic wrap and aluminum foil, then freeze for up to 2 weeks. Thaw in the refrigerator overnight before enjoying.
Topping Tip: Keep reserved crushed Oreos in a sealed container at room temperature and sprinkle just before serving to maintain maximum crunch and prevent soggy cookies.
Oreo dirt cake weaves nostalgia and playful dessert design into a creamy chocolate masterpiece. Layers of crushed cookies and silky pudding create a whimsical treat you’ll adore.
Ingredients
Scale
1 package (14.3 oz, 406 g) Oreo cookies (crushed into crumbs)
2 tbsps butter (melted, optional for extra crunch)
½ tsp vanilla extract (optional, for extra flavor)
Instructions
Cookie Preparation: Pulse Oreo cookies in a food processor or crush within a sealed bag until transformed into fine, consistent crumbs, ensuring no large fragments remain.
Cream Composition: Whip cream cheese and powdered sugar until smooth, gradually incorporating pudding mix and milk to create a velvety, luxurious filling with a light, airy consistency.
Layering Foundation: Alternate delicate layers of crushed Oreo crumbs and creamy pudding mixture in a clear glass serving dish, building a visually appealing stratified dessert with contrasting textures.
Chilling Protocol: Refrigerate the assembled dessert for a minimum of 2-3 hours, allowing flavors to meld and the structure to set, developing a rich, cohesive taste profile.
Finishing Touch: Garnish the top with reserved Oreo crumbs, creating a rustic, chocolate-dusted surface that provides a delightful textural contrast to the smooth underlying layers.
Notes
Crush Cookies Carefully: Break Oreos into ultra-fine, consistent crumbs without large chunks for a smooth, professional texture.
Separate Topping Portion: Set aside precise measurement of cookie crumbs before mixing to ensure perfect decorative garnish later.
Control Crumb Consistency: Use food processor for uniform crumb size, which impacts overall dessert texture and visual appeal.
Crumb Layer Strategy: Understand crumbs serve dual purpose – creating base layer and providing chocolate-rich decorative element for dramatic presentation.
Recipe development with a focus on single-dish meals.
Fusion of traditional and modern Australian cuisines.
Food styling and photography for digital platforms.
Education
Box Hill Institute, Melbourne
Degree: Advanced Diploma of Hospitality Management
Focus: Specialized in practical food and beverage service, responsible alcohol and hygiene compliance, legal risk management, and hands‑on experience in a simulated restaurant environment.
William Angliss Institute, Melbourne
Program: Certificate IV in Patisserie
Focus: Specialized in pastry and bakery techniques, cookery and specialty food preparation, recipe planning and costing, commercial kitchen operations, sustainable and inclusive work practices, food safety and hygiene compliance, and workplace health and safety.
Jenna is the heart of Picture Perfect Meals, turning simple ingredients into beautiful, easy‑to‑make dishes.
Growing up around family meals in Melbourne, she trained at Box Hill Institute and then perfected her pastry skills at William Angliss Institute. She loves mixing classic Australian flavors with fresh ideas to keep cooking fun and stress‑free.


Jenna Hartley
Founder & Recipe Creator
Expertise
Education
Box Hill Institute, Melbourne
William Angliss Institute, Melbourne
Jenna is the heart of Picture Perfect Meals, turning simple ingredients into beautiful, easy‑to‑make dishes.
Growing up around family meals in Melbourne, she trained at Box Hill Institute and then perfected her pastry skills at William Angliss Institute. She loves mixing classic Australian flavors with fresh ideas to keep cooking fun and stress‑free.