Sweet Strawberry Pie Hearts Recipe

Adorable Sweet Strawberry Pie Hearts Recipe for Love-Filled Treats

Baking a delightful strawberry pie hearts recipe brings pure joy to any dessert table.

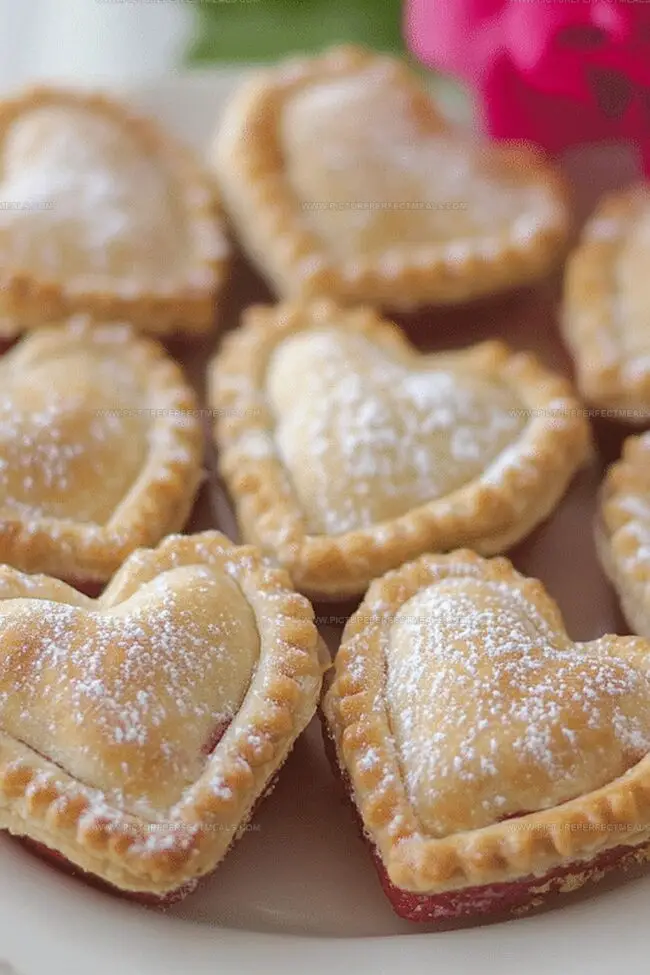
These delicate hearts bursting with fresh strawberry pie filling capture the essence of love and sweetness.

Crafted with simple ingredients and a touch of passion, this delectable treat will melt hearts faster than butter on a warm skillet.

The vibrant red hue and flaky crust promise a sensational dessert experience that goes beyond ordinary sweets.

Each carefully shaped heart holds a promise of deliciousness that beckons dessert enthusiasts.

Serve these charming pie hearts at gatherings, romantic dinners, or simply as a delightful weekend indulgence.

Prepare to fall in love with every single bite.

Quick Recipe Overview

Prep Time: 15 minutes

Cook Time: 15 minutes

Total Time: 30 minutes

Calories: 200 kcal

Servings: 8

Strawberry Pie Heart Ingredients

For Crust and Pastry Base:
  • All-Purpose Flour: Creates tender, flaky base that holds the pie hearts together with a delicate texture.
  • Pie Crust: Provides classic buttery foundation for the delightful heart-shaped pastries.
  • Granulated Sugar: Adds subtle sweetness and helps with golden browning of the crust.
For Filling and Moisture:
  • Strawberry Jam: Delivers concentrated berry flavor and juicy center for each heart-shaped pie.
  • Fresh Strawberries: Enhances jam with natural sweetness and fresh fruity chunks.
For Binding and Finishing:
  • Egg: Serves as adhesive to seal pie hearts and creates beautiful golden shine when brushed on surface.
  • Melted Chocolate: Optional elegant drizzle that adds rich decadent finishing touch.

Equipment for Strawberry Pie Hearts

  • Heart-shaped cookie cutter: Essential for creating perfect heart-shaped pie hearts.
  • Baking sheet: Provides a flat surface for baking and ensures even cooking.
  • Parchment paper: Prevents sticking and makes cleanup a breeze.
  • Rolling pin: Helps roll out pie crusts evenly and smoothly.
  • Pastry brush: Perfect for applying egg wash and creating a golden, shiny finish.
  • Fork: Great for crimping edges and creating a decorative seal.
  • Knife or small slit cutter: Needed to create steam vents in the pie hearts.
  • Small bowl: Useful for beating the egg and preparing egg wash.
  • Wire rack: Helps cool pie hearts and prevents bottom from getting soggy.
  • Measuring spoon: Ensures precise amount of strawberry jam for each heart.

Create Your Strawberry Pie Hearts

  • Create Hearty Pastry Cutouts

Roll out pie dough on a floured surface and use a heart-shaped cookie cutter to craft adorable heart shapes. Aim for matching pairs that will cradle delicious filling.

  • Fill With Sweet Strawberry Goodness

Lay half of the heart shapes on a parchment-lined baking sheet. Dollop a luscious strawberry jam center into each heart, leaving a small border around the edges for sealing.

  • Seal and Decorate Edges

Top each jam-filled heart with a matching pastry cutout. Press edges firmly together, using fork tines to create a charming crimped border. Brush the surface with an egg wash and sprinkle with a light dusting of sugar.

  • Bake Until Golden Perfection

Slide the baking sheet into a preheated 375F oven. Bake for 15-18 minutes until the hearts turn a beautiful golden brown. Allow them to cool slightly on the baking sheet.

  • Add Final Magical Touch

Optional chocolate drizzle brings these cute pastries to the next level. Serve warm and watch faces light up with delight.

Helpful Tips for Pie Heart Success

  • Perfect Pie Preparation Tricks: Quick tips to elevate your strawberry pie hearts.
  • Crust Temperature Control: Keep pie dough chilled before rolling to ensure flaky, tender pastry that doesn't stick or tear easily during cutting and shaping.
  • Jam Selection Strategy: Use high-quality, thick strawberry preserves to prevent leaking and ensure a concentrated fruity flavor in each delicate heart-shaped pocket.
  • Sealing Success: Press pie heart edges firmly with a fork and seal completely to prevent filling from escaping during baking, creating picture-perfect treats.
  • Gluten-Free Adaptation: Replace traditional pie crust with gluten-free pastry dough or almond flour crust for those with wheat sensitivities, maintaining the same delightful texture and taste.
  • Chocolate Lover's Twist: Experiment with different chocolate drizzles like dark, milk, or white chocolate to create varied flavor profiles and stunning visual presentations.

How to Serve Strawberry Pie Hearts

  • Sweet Romantic Plating: Arrange these adorable pie hearts on a rustic wooden board with fresh strawberries scattered around, creating a gorgeous Valentine's Day or anniversary dessert display.
  • Delightful Dessert Companion: Serve these warm pie hearts alongside a scoop of vanilla bean ice cream or a dollop of fresh whipped cream to complement their sweet strawberry filling and enhance the overall flavor experience.
  • Elegant Gift Packaging: Wrap cooled pie hearts individually in parchment paper tied with a delicate ribbon, making them a charming homemade gift for loved ones or a special treat to share at brunch gatherings or afternoon tea parties.
  • Instagram-Worthy Presentation: Dust the cooled pie hearts with powdered sugar and garnish with a few mint leaves or edible flowers to create a picture-perfect dessert that looks as stunning as it tastes, perfect for social media sharing.

Save and Store Your Pie Hearts

  • Quick Refrigeration Technique: Store pie hearts in an airtight container inside the refrigerator for up to 3 days. Keep layers separated with parchment paper to prevent sticking and maintain their delicate shape.
  • Smart Freezing Strategy: Wrap individual pie hearts in plastic wrap, then place in a freezer-safe container. Frozen treats will stay fresh for 2-3 weeks. Thaw at room temperature for 30 minutes before enjoying.
  • Room Temperature Freshness Tip: Leave pie hearts uncovered at room temperature for 6-8 hours. Enjoy their crisp texture and flaky crust within this window for optimal taste and quality.
  • Make-Ahead Magic: Prepare pie hearts a day before serving. Assemble and refrigerate unbaked hearts, then bake just before guests arrive. This method ensures maximum freshness and minimal last-minute stress.
Print
clock clock iconcutlery cutlery iconflag flag iconfolder folder iconinstagram instagram iconpinterest pinterest iconfacebook facebook iconprint print iconsquares squares iconheart heart iconheart solid heart solid icon
Sweet Strawberry Pie Hearts Recipe

Sweet Strawberry Pie Hearts Recipe


5 Stars 4 Stars 3 Stars 2 Stars 1 Star

4.6 from 14 reviews

  • Total Time: 30 minutes
  • Yield: 9 1x

Description

Strawberry pie hearts combine classic dessert charm with romantic appeal. Delicate pastry crusts cradle sweet, fresh berries in a delightful treat perfect for special celebrations with someone you love.


Ingredients

Scale
  • 2 pie crusts, refrigerated (1 package, 14 oz/397 g)
  • ½ cup (120 ml/4 fl oz) strawberry jam or preserves
  • ½ cup (75 g/2.6 oz) fresh strawberries, finely diced
  • 1 egg, beaten (for egg wash)
  • granulated sugar or coarse sanding sugar
  • optional: white or dark chocolate, melted (for drizzling)

Instructions

  1. Pastry Preparation: Roll out pie dough on a floured surface and use a heart-shaped cookie cutter to create symmetrical cutouts, ensuring an equal number for sandwiching.
  2. Base Arrangement: Line a baking sheet with parchment paper and place half of the heart-shaped dough cutouts as the foundation for filling.
  3. Filling and Sealing: Spread strawberry jam in the center of each heart, leaving a border to prevent overflow. Optionally, add finely chopped fresh strawberries. Brush edges with whisked egg to create a moisture seal.
  4. Assembly and Decoration: Cover with remaining heart cutouts, pressing edges together. Crimp perimeter with a fork for a decorative seal. Brush with egg wash and sprinkle granulated sugar for a caramelized finish.
  5. Baking Process: Create small steam vents on top of each heart. Bake in a preheated 375°F (190°C) oven for 15-18 minutes until golden and crisp.
  6. Finishing Touches: Allow hearts to cool slightly on the baking sheet for structural stability. Optionally drizzle with chocolate for an elegant presentation. Serve warm or at room temperature for an intimate dessert experience.

Notes

  • Manage Moisture Carefully: Control jam and fresh strawberry quantities to prevent soggy pastry and ensure crisp edges during baking.
  • Master Egg Wash Technique: Apply egg wash evenly with a soft brush, creating a glossy golden-brown finish without oversaturating the delicate pastry.
  • Prevent Filling Leakage: Leave a precise border around jam to minimize potential spillage and maintain clean, attractive heart shapes during baking.
  • Customize Flavor Variations: Experiment with alternative fruit preserves like raspberry or mixed berry to diversify the recipe while maintaining the core technique.
  • Prep Time: 15 minutes
  • Cook Time: 15 minutes
  • Category: Desserts
  • Method: Baking
  • Cuisine: American

Nutrition

  • Serving Size: 9
  • Calories: 210
  • Sugar: 10 g
  • Sodium: 150 mg
  • Fat: 9 g
  • Saturated Fat: 3 g
  • Unsaturated Fat: 5 g
  • Trans Fat: 0 g
  • Carbohydrates: 30 g
  • Fiber: 1 g
  • Protein: 2 g
  • Cholesterol: 25 mg
Jenna Hartley

Jenna Hartley

Founder & Recipe Creator

Expertise

  • Recipe development with a focus on single-dish meals.
  • Fusion of traditional and modern Australian cuisines.
  • Food styling and photography for digital platforms.​

Education

Box Hill Institute, Melbourne

  • Degree: Advanced Diploma of Hospitality Management
  • Focus: Specialized in practical food and beverage service, responsible alcohol and hygiene compliance, legal risk management, and hands‑on experience in a simulated restaurant environment.

William Angliss Institute, Melbourne

  • Program: Certificate IV in Patisserie
  • Focus: Specialized in pastry and bakery techniques, cookery and specialty food preparation, recipe planning and costing, commercial kitchen operations, sustainable and inclusive work practices, food safety and hygiene compliance, and workplace health and safety.

Jenna is the heart of Picture Perfect Meals, turning simple ingredients into beautiful, easy‑to‑make dishes. 

Growing up around family meals in Melbourne, she trained at Box Hill Institute and then perfected her pastry skills at William Angliss Institute. She loves mixing classic Australian flavors with fresh ideas to keep cooking fun and stress‑free.

Leave a Reply

Your email address will not be published. Required fields are marked *

Recipe rating 5 Stars 4 Stars 3 Stars 2 Stars 1 Star