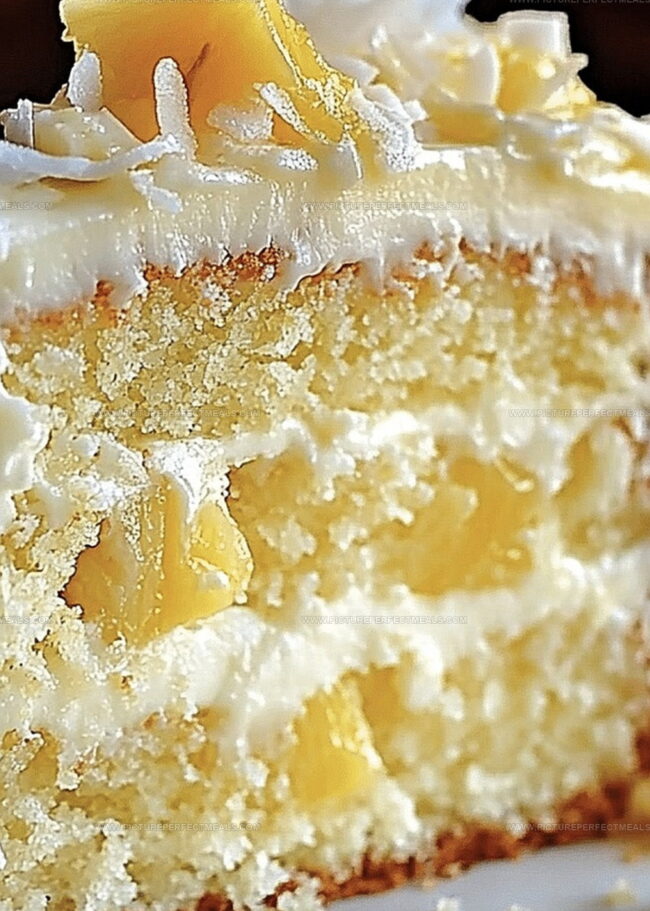
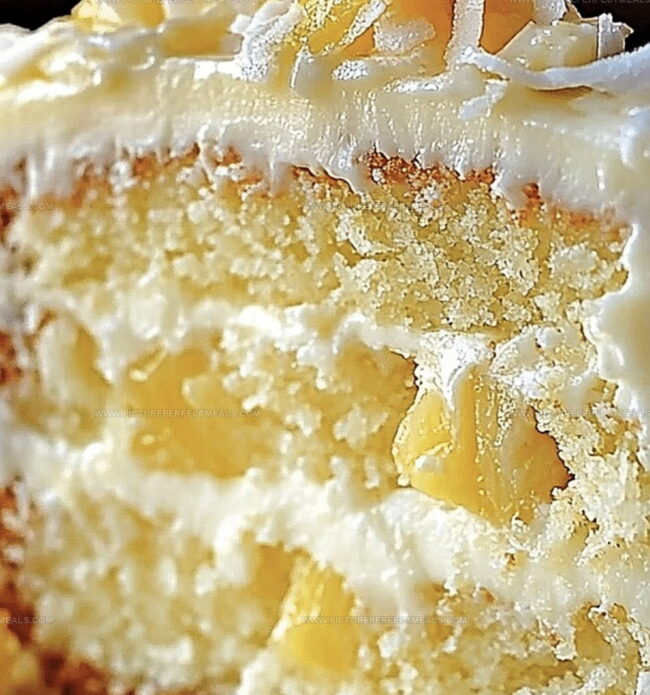
Sweet aromas of summer dance through the kitchen when you whip up this tropical pineapple coconut dream cake.
Creamy coconut and bright pineapple create a delightful harmony of flavors that transport you to a beachside paradise.
Each slice promises a burst of tropical sunshine on your plate.
The moist, tender crumb melts in your mouth with every heavenly bite.
Layers of rich frosting and fruit-infused batter make this dessert a showstopper at any gathering.
Soft, delicate textures blend perfectly with vibrant tropical notes that sing of relaxation and joy.
You’ll fall in love with this simple yet extraordinary cake that turns an ordinary day into a celebration of island-inspired deliciousness.
Quick Recipe Overview
Prep Time: 15 minutes
Cook Time: 30 minutes
Total Time: 45 minutes
Calories: 420 kcal
Servings: 12
What Goes Into Hawaiian Pineapple Coconut Dream Cake
For Cake Base:
Yellow Cake Mix: Provides the foundational structure with rich, vanilla-like flavor, choose a high-quality mix for best results.
Crushed Pineapple: Adds natural sweetness and moisture, ensuring a tender and juicy cake texture, select ripe, well-drained pineapple.
For Soaking Liquid:
Sweetened Condensed Milk: Creates a luscious, creamy base that infuses the cake with decadent sweetness.
Coconut Milk: Introduces a tropical, silky element that enhances the cake’s rich moisture and exotic flavor profile.
For Topping and Garnish:
Shredded Coconut: Provides a classic tropical texture and visual appeal, opt for unsweetened for balanced sweetness.
Heavy Cream: Whips into a cloud-like, luxurious frosting that adds lightness and elegance.
Powdered Sugar: Sweetens and stabilizes the whipped cream, choose fine-ground for smooth incorporation.
Vanilla Extract: Rounds out the cream’s flavor with warm, aromatic notes.
Toasted Coconut Flakes: Delivers a nutty, caramelized crunch and intensified coconut flavor.
Pineapple Slices: Optional fresh garnish that adds a bright, tangy visual and flavor accent.
Kitchen Must-Haves for This Tropical Dream Cake
Mixing Bowls: Large bowl for cake batter and another for whipped cream mixture.
9×13-inch Baking Pan: Essential for baking the cake perfectly.
Electric Mixer or Whisk: Needed for whipping cream and mixing cake batter.
Fork: Used for poking holes in the warm cake.
Measuring Cups and Spoons: Precise measurements for ingredients.
Toothpick: Helps check cake doneness.
Whisk: For combining sweetened condensed milk and coconut milk.
Spatula: Helps spread whipped cream evenly.
How to Bake a Pineapple Coconut Cake That Shines
Warm Up the Oven Prep your baking zone by heating the oven to 350F and getting your 9×13 pan ready with a quick grease and flour coating.
Mix the Magical Batter Combine your yellow cake mix with a twist – swap water for crushed pineapple and blend until smooth and dreamy.
Bake to Perfection Pour the batter into the pan and bake for 25-30 minutes until a toothpick comes out clean.
Create Flavor Channels While the cake is still warm, grab a fork and create little holes all over the surface to help the upcoming moisture soak in deeply.
Drench in Tropical Goodness Whisk together sweetened condensed milk and coconut milk, then pour this luscious liquid evenly over the warm cake, letting it seep into every delicious crevice.
Add Coconut Blanket Sprinkle shredded coconut across the top and let the cake cool completely.
Whip Up the Crowning Glory Beat heavy cream with powdered sugar and vanilla until it forms beautiful stiff peaks.
Frost and Finish Spread the whipped cream evenly over the cooled cake, then shower it with toasted coconut flakes and optional fresh pineapple pieces.
Chill and Savor Refrigerate for at least an hour to let all the tropical flavors mingle, then serve this cool, creamy paradise.
Tips to Elevate Your Hawaiian Cake Game
Tropical Cake Success Secrets: Poking Plenty of Holes – Create deeper flavor absorption by generously piercing cake with fork, ensuring every bite is moist and delicious.
Milk Soaking Strategy: Allow condensed and coconut milk mixture to completely saturate warm cake, creating rich, decadent texture that melts in your mouth.
Gluten-Free Friendly Twist: Swap traditional cake mix with gluten-free yellow cake mix to make recipe suitable for those with wheat sensitivities without compromising taste.
Make-Ahead Magic: Prepare cake one day in advance and store covered in refrigerator, allowing flavors to develop and intensify overnight for even more delightful dessert experience.
Coconut Crunch Enhancement: Toast coconut flakes in dry skillet before sprinkling on top to elevate flavor profile and add extra nutty, caramelized dimension to cake’s overall texture.
Presenting Your Pineapple Coconut Dream the Sweet Way
Tropical Brunch Companion: Pair this dreamy cake with fresh Hawaiian coffee or a cold passion fruit mimosa for a delightful morning treat.
Elegant Dessert Showcase: Serve individual slices on decorative plates with a sprinkle of extra toasted coconut and a small mint leaf for a sophisticated presentation.
Summer Party Centerpiece: Create a beautiful dessert table display by cutting cake into smaller squares, garnishing with fresh pineapple wedges and colorful cocktail umbrellas for a festive island-inspired feel.
Poolside Refreshment: Plate slices alongside chilled fruit skewers or a scoop of coconut sorbet to enhance the tropical flavor profile and cool down on hot summer days.
How to Store That Tropical Goodness Without Losing Flavor
Cake Refrigeration Strategy: Store the Hawaiian Pineapple Coconut Dream Cake in an airtight container in the refrigerator for up to 5 days, keeping it fresh and preventing moisture loss.
Make-Ahead Magic: Prepare the entire cake one day before serving to enhance flavor development and allow the milky mixture to fully absorb into the cake layers.
Freezing Friendly Option: Wrap the cake tightly in plastic wrap and aluminum foil, then freeze for up to 3 weeks. Thaw overnight in the refrigerator before serving to maintain texture and taste.
Serving Temperature Tip: Remove the cake from the refrigerator 15-20 minutes before serving to soften the whipped cream and allow the flavors to become more pronounced at a slightly warmer temperature.
Creamy Hawaiian pineapple coconut dream cake blends tropical paradise flavors with luxurious texture. Sweet island ingredients create a delightful dessert that transports senses to warm, sunny beaches.
Ingredients
Scale
1 can (20 oz / 567 g) crushed pineapple, undrained
1 can (14 oz / 397 g) sweetened condensed milk
1 cup (240 ml / 8 fl oz) coconut milk (or heavy cream)
1 box yellow cake mix
Eggs
Vegetable oil
Water
1 cup (100 g / 3.5 oz) shredded sweetened coconut
2 cups (480 ml / 16 fl oz) heavy whipping cream
¼ cup (30 g / 1 oz) powdered sugar
1 tsp vanilla extract
½ cup (50 g / 1.8 oz) toasted coconut flakes
Pineapple slices or chunks (optional)
Instructions
Preparation: Preheat oven to 350F (175C) and coat a 9×13-inch baking pan with grease and flour.
Batter Creation: Mix yellow cake mix with crushed pineapple, blending until smooth and homogeneous, then pour into prepared pan.
Baking Process: Bake for 25-30 minutes, verifying doneness by inserting a toothpick into the center, which should emerge clean.
Moisture Infusion: Immediately after removing from oven, perforate cake surface with fork, creating channels for liquid absorption.
Milk Soak: Whisk sweetened condensed milk and coconut milk, then evenly drench the warm cake, allowing complete liquid penetration.
Coconut Layer: Sprinkle shredded coconut generously across the saturated cake surface.
Cooling Stage: Let cake reach room temperature, allowing flavors to meld and settle.
Cream Topping: Whip heavy cream with powdered sugar and vanilla extract until stiff peaks form, then delicately spread over cooled cake.
Finishing Touches: Garnish with toasted coconut flakes and optional fresh pineapple pieces.
Chilling: Refrigerate for at least one hour to enhance flavor integration and achieve ideal serving consistency.
Notes
Enhance Pineapple Moisture: Use room temperature crushed pineapple to ensure better cake batter integration and prevent dense texture.
Prevent Soggy Bottom: Pierce cake thoroughly and evenly with fork to create consistent channels for milk mixture absorption, avoiding uneven moisture distribution.
Coconut Toasting Technique: Lightly toast coconut flakes in a dry skillet over medium heat, stirring constantly to achieve golden color and enhance nutty flavor without burning.
Make-Ahead Magic: Prepare cake one day in advance to allow flavors to develop fully, storing covered in refrigerator for maximum taste depth and smoother whipped cream consistency.
Recipe development with a focus on single-dish meals.
Fusion of traditional and modern Australian cuisines.
Food styling and photography for digital platforms.
Education
Box Hill Institute, Melbourne
Degree: Advanced Diploma of Hospitality Management
Focus: Specialized in practical food and beverage service, responsible alcohol and hygiene compliance, legal risk management, and hands‑on experience in a simulated restaurant environment.
William Angliss Institute, Melbourne
Program: Certificate IV in Patisserie
Focus: Specialized in pastry and bakery techniques, cookery and specialty food preparation, recipe planning and costing, commercial kitchen operations, sustainable and inclusive work practices, food safety and hygiene compliance, and workplace health and safety.
Jenna is the heart of Picture Perfect Meals, turning simple ingredients into beautiful, easy‑to‑make dishes.
Growing up around family meals in Melbourne, she trained at Box Hill Institute and then perfected her pastry skills at William Angliss Institute. She loves mixing classic Australian flavors with fresh ideas to keep cooking fun and stress‑free.


Jenna Hartley
Founder & Recipe Creator
Expertise
Education
Box Hill Institute, Melbourne
William Angliss Institute, Melbourne
Jenna is the heart of Picture Perfect Meals, turning simple ingredients into beautiful, easy‑to‑make dishes.
Growing up around family meals in Melbourne, she trained at Box Hill Institute and then perfected her pastry skills at William Angliss Institute. She loves mixing classic Australian flavors with fresh ideas to keep cooking fun and stress‑free.