
Sweet & Simple Valentine’s Day Oreo Pops Recipe for Love Day
Sweet memories bloom when valentines day oreo pops spark instant smiles across kitchen counters.
Romantic treats like these create magical moments without complicated techniques.
Kids adore decorating these bite-sized delights with colorful sprinkles and melted chocolate.
Crafting these playful desserts becomes a perfect afternoon activity you can share with someone special.
Simple ingredients and minimal tools make this recipe accessible for novice bakers.
Chocolate-dipped cookies on sticks become charming gifts that communicate love through delicious creativity.
You’ll want to start making these adorable treats right now!
Why Valentines Day Oreo Pops Are Sweet
Valentines Day Oreo Pops Ingredient Rundown
Cookies:Base Ingredients:Decorative Ingredients:Easy Steps to Make Valentines Day Oreo Pops
Step 1: Prepare Cookie Base
Grab your favorite Oreo cookies and carefully twist them apart. Take a clean lollipop stick and gently press it into the creamy center. Reunite the cookie halves, ensuring the stick stays securely in place. Pro tip: If the cookie starts to crumble, use a tiny dab of melted chocolate as glue to hold everything together.
Step 2: Melt Chocolate Coating
Select white chocolate or candy melts in romantic colors like pink or red. Place the chocolate in a microwave-safe bowl and heat in short 20-second bursts. Stir between each heating cycle until the chocolate transforms into a smooth, glossy liquid. Separate different colors into individual bowls for multiple design options.
Step 3: Dunk and Coat Oreos
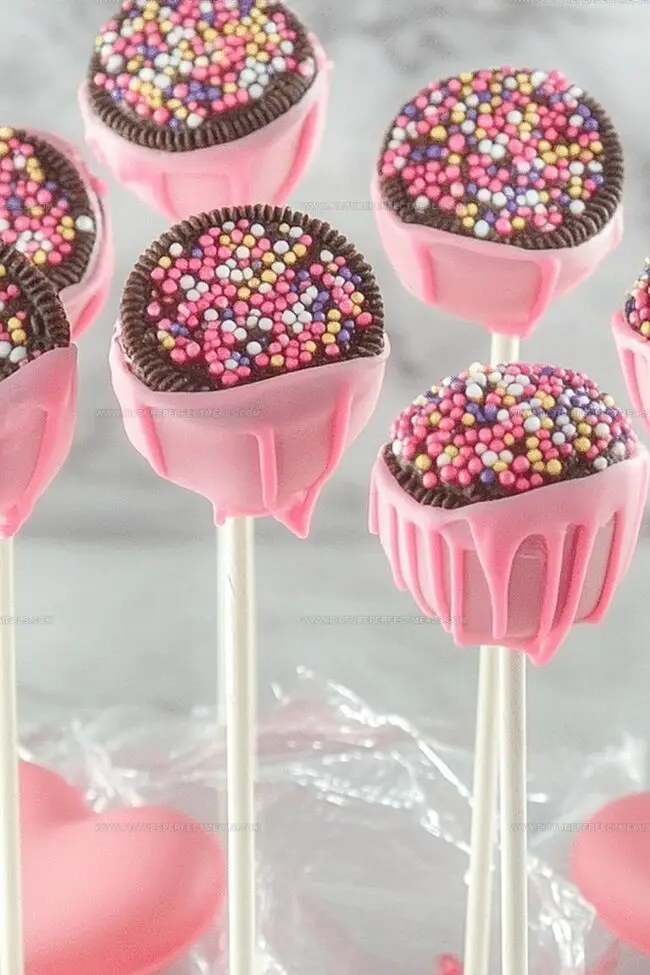
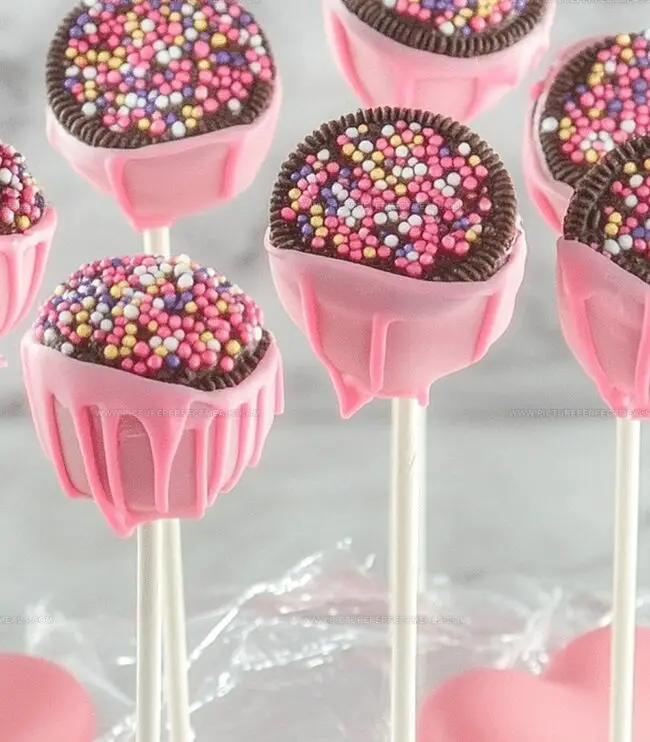
Submerge each cookie pop into the melted chocolate, making sure every inch gets a luxurious chocolate bath. Tap the stick gently to remove excess chocolate, creating a clean, even coating. Place each decorated pop onto a parchment-lined baking sheet.
Step 4: Add Festive Decorations
While the chocolate remains wet and glossy, sprinkle on:For an extra touch, drizzle contrasting chocolate in elegant zigzag patterns using a spoon or piping bag.
Step 5: Let Chocolate Set
Allow pops to rest at room temperature for about 30 minutes. For quicker results, pop them in the refrigerator for 15 minutes until the chocolate becomes firm and shiny.
Step 6: Present with Love
Create a stunning display by:Tips That Boost Valentines Day Oreo Pops
How to Keep Valentines Day Oreo Pops Perfect
What Goes with Valentines Day Oreo Pops
Valentines Day Oreo Pops with a Fun Spin
All You Want to Know About Valentines Day Oreo Pops
Carefully twist the Oreo apart, insert the stick into the cream, and press back together. If it cracks, use a little melted chocolate as glue to hold the cookie together.
White chocolate or candy melts are ideal for coating. They melt smoothly and create a clean, even finish on the Oreo pops.
Yes, you can prepare Oreo pops 1-2 days in advance. Store them in an airtight container at room temperature to maintain their crispness and chocolate coating.
Melt chocolate in short microwave intervals, stirring frequently. Dip the Oreo pop at an angle and gently tap off excess chocolate to achieve a smooth, even layer.
Print
Valentines Day Oreo Pops Recipe
- Total Time: 35 minutes
- Yield: 12 1x
Description
Sweet romance meets chocolate delight with Valentine’s Day Oreo Pops, a charming dessert perfect for sharing love. Creamy chocolate-covered Oreos on sticks become irresistible treats that spark connection and joy between sweethearts.
Ingredients
Main Ingredients:
- 12 Oreo cookies (classic or flavored)
- 12 lollipop sticks or paper straws
Chocolate and Coating:
- 8 ounces (225 grams) white chocolate or candy melts (red, pink, or white)
- ¼ cup (50 grams) semi-sweet or milk chocolate (optional for drizzling)
Decorative Ingredients:
- Valentines Day-themed sprinkles, nonpareils, or edible glitter
Instructions
- Carefully separate the Oreo cookies, creating a delicate opening to insert lollipop sticks into the creamy center. Gently reunite the cookie halves, ensuring the stick remains securely positioned. If the cookie threatens to crumble, apply a thin layer of melted chocolate as an adhesive.
- Transform white chocolate or candy melts into a silky liquid by utilizing microwave techniques. Employ short 20-second bursts, stirring thoroughly between each interval to achieve a uniform, glossy consistency. Prepare separate containers for different color variations.
- Immerse each prepared Oreo pop into the molten chocolate, rotating to guarantee complete coverage. Delicately remove excess chocolate by tapping the stick against the bowl’s edge, allowing the surplus to cascade back into the container.
- While the chocolate coating remains glistening, embellish the pops with festive Valentines Day sprinkles or shimmering edible glitter. For an elegant touch, create intricate chocolate drizzles using semi-sweet or milk chocolate, applying the design with precision via spoon or piping tool.
- Position the embellished pops on a parchment-lined surface, permitting them to solidify naturally at room temperature for approximately 30 minutes. Alternatively, accelerate the setting process by placing them in the refrigerator for a brisk 15-minute cooling period.
- Present the completed treats by artfully arranging them in a decorative glass container, wrapping individually in transparent gift bags adorned with romantic ribbons, or displaying them attractively on a serving platter for immediate enjoyment.
Notes
- Choose sturdy Oreo cookies to prevent breaking when inserting the lollipop stick, ensuring a clean and stable base for your Valentine’s treat.
- Soften chocolate by melting slowly at lower temperatures to avoid seizing or burning, which can ruin the smooth coating texture.
- Use room temperature ingredients and tools to help chocolate set evenly and prevent cracking or streaking on the Oreo pops.
- For gluten-free options, substitute regular Oreos with gluten-free sandwich cookies, maintaining the same delicious coating and decorative style.
- Prep Time: 20 minutes
- Cook Time: 15 minutes
- Category: Desserts, Snacks
- Method: Blending
- Cuisine: American
Nutrition
- Serving Size: 12
- Calories: 200
- Sugar: 20 g
- Sodium: 80 mg
- Fat: 10 g
- Saturated Fat: 5 g
- Unsaturated Fat: 4 g
- Trans Fat: 0 g
- Carbohydrates: 27 g
- Fiber: 1 g
- Protein: 2 g
- Cholesterol: 5 mg
Daves Miller
Contributing Chef & Culinary Educator
Expertise
Education
Sullivan University, Louisville, Kentucky
White Mountains Community College, Berlin, New Hampshire
Daves is the friendly face guiding you through flavorful, fuss-free recipes at Picture Perfect Meals.
He studied culinary arts at Sullivan University and embraced Baking and Pastry Arts at White Mountains Community College. Daves specializes in comforting meals with vibrant flavors, highlighting fresh, seasonal ingredients.